Installation
02
12
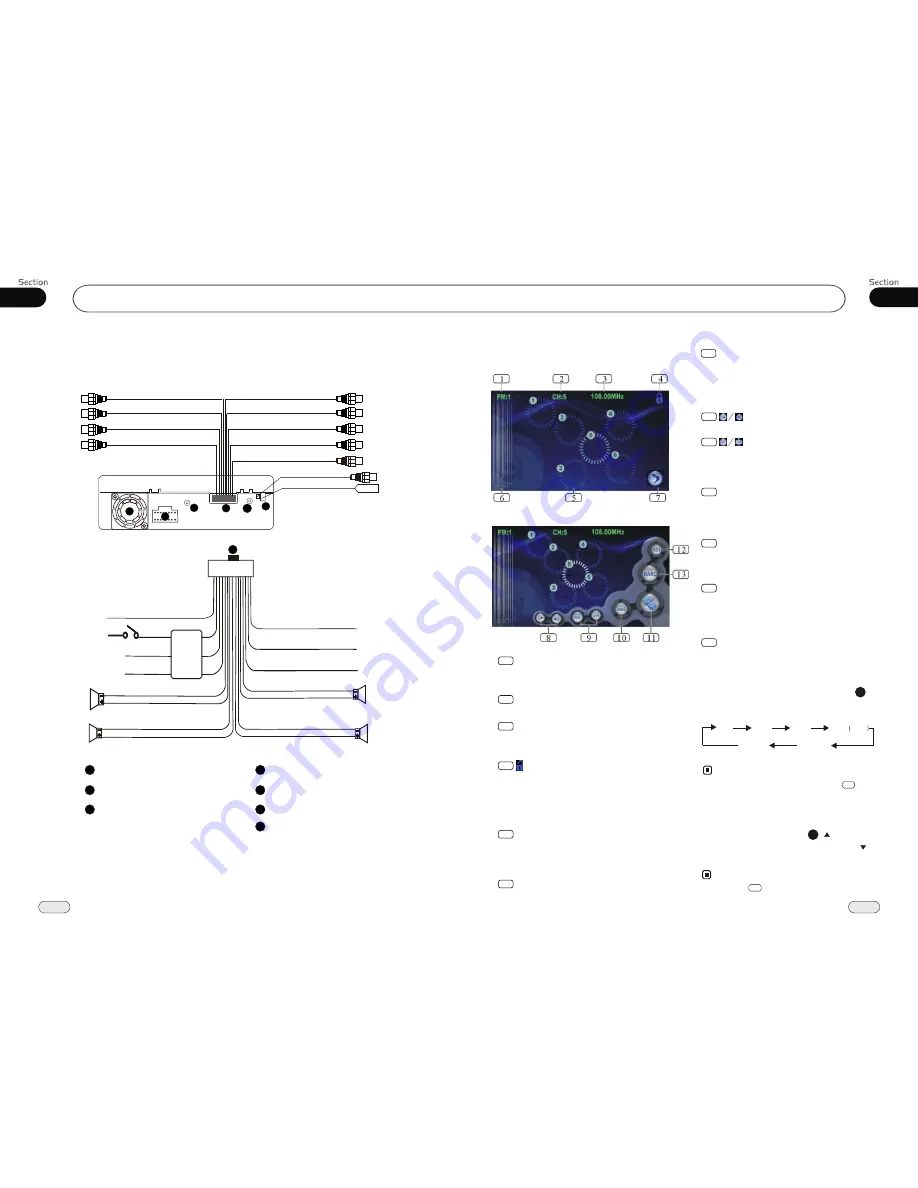
Wiring Connection
Video Out 1
Rear RCA
Front RCA
Reverse Video
Input
(Grey line with
yellow head)
(Light Grey line with
red & white head)
(Dark Grey line with
red & white head)
(Brown line with
yellow head)
Video Out 2
(Grey line with
yellow head)
Subwoofer
(Brown line with
brown head)
2
Reverse Gear
Orange
Red
Yellow
Black
Ignition Key
B
Ground
Rear L
Speaker
Front L
Speaker
Green/Black
Green
White/Black
White
Brown
Pink
Violet/Black
Blue
Violet
Grey/Black
Grey
Parking Brake
Lamp In
Antenna
Power +
Rear R
Speaker
Front R
Speaker
FILTER
&FUSE
BOX
Bluetooth Phone
(Black line with
black head)
3
4
5
6
1
AUX Audio input
(black line with
red & white head)
AUX Video input
(black line with
yellow head)
Antenna
4
1
Screw Hole
2
5
Output Plug(Male)
Wire Clip
3
Antenna Receptacle
Output Socket(Female)
6
Fan Window
7
7
Navigation Receptacle
37
07
Tuner
Ipod Wire Connection(White)(+5v)
Listening to the radio
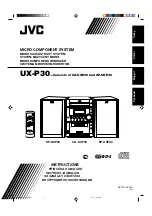
Band Indicator
Shows which band the radio is tuned
to.
1
Preset Number Indicator
Shows what preset has been selected.
2
Shows which frequency the tuner is
tuned to.
Frequency Indicator
3
6
TIME SHOW
To show the current time.
5
The 6 stations of the current band.
Briefly press to select station, hold and
press to save the current station to one
of the 6 stations.
Press this button to lock or unlock
the touch screen
During unlock status, glide up and down
or left and right on the blank space of
screen to switch to the previous or next
mode.
4
7
BACK
Press it to go back to the select menu.
Touching the blank space in the bottom right
corner of
picture 1
changes to
picture 2
.
8
Press it to adjust the volume.
9
Press this button to search the frequency
manually. Press and hold it to search
the station automatically.
10
AMS
Press it to scan the current station each
5 seconds, press and hold it to search
and store the stations automatically.
11
12
13
SETUP MENU
Press it to enter the AUDIO setup menu
of the main unit.
RDS MENU
Press this button to enter the RDS setup
menu.(Without RDS function, the icon is
in gray.)
BAND
Press this button to select bands.
Note:
* Pressing BND on the main unit or in the
monitor performs the same function.
During radio status, repeatedly press
BAND button to select bands in
lowing order:
the
fol
Band Selector
3
(For Two Bands)
13
1
FM2
AM2
AM
FM3
FM1
FM4
OIRT
Selecting the Stored Station
During radio status, press button to
select the stored station upward, press to
select downward.
the stored station
27
Note:
*
Pressing in the monitor also performs the
same function.
5
(Picture 1)
(Picture 2)
87.50
90.10
98.10
106.10
107.90
87.50
87.50
90.10
98.10
106.10
107.90
87.50


