background image

OM-NHFP          11

OM-NHFP

11

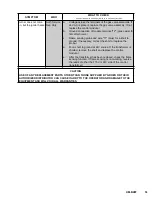
Use a sponge, cloth or plastic brush to clean the

braising pan.

Cleaning

WARNING

KEEP WATER AND SOLUTIONS OUT OF

CONTROLS AND BURNERS. NEVER SPRAY

OR HOSE THE  CONTROL  CONSOLE  OR

ELECTRICAL CONNECTIONS.

1. Before any cleaning operation, shut off

the burner by turning the thermostat dial to

"OFF". If water or cleaning solution will be

sprayed, unplug the unit from the electric

power source, or shut off the power at the

circuit breaker or fuse panel.

2. Clean all food-contact surfaces soon

after use, before the pan has cooled

completely. If the unit is in continuous use,

thoroughly clean and sanitize both interior

and exterior at least once every 12 hours.

CAUTION

MOST CLEANERS ARE HARMFUL TO THE

SKIN,  EYES,  MUCOUS  MEMBRANES  AND

CLOTHING. PRECAUTIONS  SHOULD  BE

TAKEN TO WEAR RUBBER GLOVES,

GOGGLES  OR  FACE  SHIELD  AND

PROTECTIVE  CLOTHING.  CAREFULLY

READ THE WARNINGS AND FOLLOW THE

DIRECTIONS ON THE  LABEL  OF  THE

CLEANER TO BE USED.

3. Scrape or rinse out large amounts of

food residues, then wash the inside of the

pan body with a mixture of hot water and

soap or an appropriate detergent, such as

Mikro-Quat from ECOLAB. Follow the

detergent supplier's recommendations on

strength of the solution to use. Rinse the pan

thoroughly with hot water and drain

completely.

4. To remove materials stuck to the

equipment, use a brush, sponge, cloth,

plastic or rubber scraper, or plastic wool

along with the detergent or soap solution. To

minimize the effort required in washing, let

the detergent solution sit in the pan and soak

into the residue, or heat the detergent

solution briefly in the pan. Do NOT use any

abrasive materials or metal implement that

might scratch the surface, because scratches

make the pan hard to clean and provide

places for bacteria to grow. Do NOT use steel

wool, which may leave particles imbedded in

the pan surface and cause eventual

corrosion and pitting. 

5. As part of the daily cleaning program,

clean all external and internal surfaces that

may have been soiled. Remember to check

such parts as the underside of the cover,

control console, etc.

6. Controls and the control console may be

cleaned with a damp cloth.

WARNING

THE CONTROL BOX  IS  NOT  WATER-

PROOF. TAKE CARE TO KEEP WATER AND

CLEANING SOLUTIONS OUT OF THE BOX.

NEVER HOSE OR SPRAY ELECTRICAL

CONTROLS, CONNECTIONS OR CONTROL

CONSOLE.

7. Exterior surface of the unit may be

polished with a recognized stainless steel

cleaner, such as  "Zepper" from Zep

Manufacturing Co.
8. If the equipment needs to be sanitized,

use a sanitizing solution equivalent to one

that supplies 200 parts per million available

chlorine. Obtain advice on the best sanitizing

Содержание GROEN NHFP

Страница 1: ...ce agent Evacuate all personnel from the area WARNING Improper installation adjustment alteration service or maintenance can cause property damage injury or death Readtheinstallation operatingandmaintenanceinstructions thoroughly before installing or servicing this equipment NOTIFY CARRIER OF DAMAGE AT ONCE It is the responsibility of the consignee to inspect the container upon receipt of same and...

Страница 2: ...O PAN AS POSSIBLE 4 STAND TO SIDE OF PAN WHILE POURING NOT DIRECTLY IN POUR PATH OF HOT CONTENTS 5 RETURN PAN BODY TO LEVEL POSITION AFTER CONTAINER IS FILLED OR TRANSFER IS COMPLETE 6 DO NOT OVER FILL CONTAINER AVOID DIRECT SKIN CONTACT WITH HOT CONTAINER AND ITS CONTENTS WARNING DO NOT HEAT AN EMPTY PAN FOR MORE THAN 5 MINUTES AT A SETTING HIGHER THAN 300o F WARNING IF THE PAN CONTAINS ITEMS IN ...

Страница 3: ...ARNINGS 2 EQUIPMENT DESCRIPTION 4 INSPECTION AND UNPACKING 5 INSTALLATION 5 INITIAL START UP 6 OPERATION 7 SEQUENCE OF OPERATION 9 CLEANING 10 MAINTENANCE 12 TROUBLESHOOTING 12 PARTS LIST 15 DIAGRAMS SCHEMATICS 18 REFERENCES 20 MAINTENANCE LOG 21 WARRANTY 22 ...

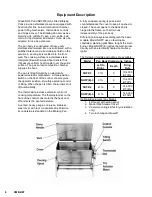
Страница 4: ...When the pan is tilted the burners shut off automatically The thermostat provides automatic control of cooking temperature The thermostat dial on the front of the control console turns the heat on or off and sets the pan temperature A vented heavy gauge one piece stainless steel cover with rear condensate drip shield on its underside is standard on the Braising Pan A fully enclosed spring type act...

Страница 5: ...the braising pan must be cleared of all combustible material WARNING INSTALLATION OF THE BRAISING PAN MUST BE DONE BY PERSONNEL QUALIFIED TO WORK WITH GAS AND ELECTRICITY IMPROPER INSTALLATION CAN RESULT IN INJURY TO PERSONNEL AND OR DAMAGE TO EQUIPMENT 1 Installation on combustible floors is allowed with a minimum clearance to combustible and noncombustible construction of six inches at the rear ...

Страница 6: ... piping system at test pressures equal to or less than psig 3 48 kPa 9 Space for servicing and operation is required DO NOT block any air intake spacing to the combustion chamber or obstruct air flow 10 After the pan has been connected to the gas supply check each gas joint for leaks Use a thick soap solution or other suitable leak detector Do not use a flame to check for leaks Initial Start Up No...

Страница 7: ...ND FOLLOW THE OPERATING INSTRUCTIONS CAUTIONS AND SAFETY INSTRUCTIONS CONTAINED IN THIS MANUAL KEEP FLOORS IN BRAISING PAN WORK AREA CLEAN AND DRY IF SPILLS OCCUR CLEAN IMMEDIATELY TO AVOID THE DANGER OF SLIPS OR FALLS 1 For Model NHFP with Thermopile System a To Start Pan 1 Set thermostat to OFF 2 Light gas pilot a Set knob on Combination Gas Control Valve to OFF by depressing the knob slightly a...

Страница 8: ...NER ON A STABLE FLAT SURFACE AS CLOSE TO THE BRAISING PAN AS POSSIBLE 4 STAND TO THE SIDE OF THE PAN WHILE POURING NOT DIRECTLY IN THE POUR PATH OF HOT CONTENTS 5 RETURN PAN BODY TO UPRIGHT POSITION AFTER CONTAINER IS FILLED OR TRANSFER IS COMPLETE 6 DO NOT OVERFILL CONTAINER AVOID DIRECT SKIN CONTACT WITH HOT CONTAINER AND CONTENTS 3 To Tilt Either Model a Press the power tilt switch down to rais...

Страница 9: ...may wish to close the vent To check cooking progress when the cover has been closed grasp the plastic handle of the vent cover lift it slightly and move it quickly to either side 2 Standing to one side of the pan to avoid the steam that will be released grasp the nearer corner of the cover handle and raise the cover The cover will stay in the open position until you push it down 4 To pour or dump ...

Страница 10: ... switch opens stopping the signal to the gas control valve and causing the valve to close When the pan cools below the set temperature the thermostat switch closes and starts another heating cycle On off cycling continues and maintains the pan at the desired temperature C Both Models The thermostat controls heating by alternately calling for flames at the full capacity of the main burner and then ...

Страница 11: ... use Rinse the pan thoroughly with hot water and drain completely 4 To remove materials stuck to the equipment use a brush sponge cloth plastic or rubber scraper or plastic wool along with the detergent or soap solution To minimize the effort required in washing let the detergent solution sit in the pan and soak into the residue or heat the detergent solution briefly in the pan Do NOT use any abra...

Страница 12: ...g Pan is designed to require minimum maintenance but certain parts may need replacement after prolonged use After installation no user adjustment should be necessary If a service need arises only authorized personnel should perform the work WARNING ELECTRIC POWER ALWAYS SHOULD BE SHUT OFF BEFORE WORK IS DONE ON INTERNAL COMPONENTS Service personnel should check the unit at least once a year This p...

Страница 13: ...ser a That electrical power supply is on b For overheated actuator motor Wait 15 minutes for motor to cool then operate the power tilt Auth Service Rep Only c For burned out capacitor or motor Burners will not light User a That the main gas supply cock is open handle is in line with the gas pipe b Gas supply to the building c That the pan body is horizontal Auth Service Rep Only d Thermostat opera...

Страница 14: ...d orifice for clogging Auth Service Rep Only c That electrical connections from Powerpile generator to Pilotstat power unit and to Powerpile operator are clean and secure d Open and closed circuit output voltages of the generator against the Acceptable Range Charts in the manual for the W720 Systems Tester e If an appropriate meter is not available replace the generator Pan will not heat but pilot...

Страница 15: ... Flame sensing probe and wire 11 blue for a short to ground If necessary correct the short or replace the probe d For a short to ground at 24V source If the transformer is shorted remove the short and replace the control module e After the transformer has been replaced check the flame sensing function If flame sensing is not working reverse the leads of either the 115V or 24V side of the control t...

Страница 16: ...16 OM NHFP OM NHFP 16 OM NHFP Parts List ...

Страница 17: ...rmer 074839 10 Thermopile 001126 30 Orifice Igniter Tube see table 11 Joint Swivel NPT 076680 31 Runner Tube Size 2 073190 12 Valve Ctrl Nat Gas Standing Pilot 002648 31 Runner Tube Size 3 055008 13 Valve Ctrl Propane Standing Pilot 002649 31 Runner Tube Size 4 046406 14 Valve Ctrl Nat Gas Carb Ignition 049555 32 Box 050378 15 Valve Ctrl Propane Carb Ignition 049557 Spacers 012733 16 Valve Manual ...

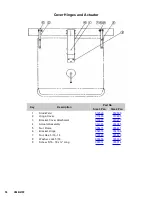
Страница 18: ... Pan 1 Stud Weld 012590 012590 2 Hinge Cover 013485 013485 3 Bracket Cover Attachment 013277 013277 4 Actuator Assembly 014085 014085 5 Nut Dome 005471 005471 6 Bracket Hinge 054876 004556 7 Nut Hex 5 16 18 003823 003823 8 Washer Lock 5 16 005656 005656 9 Screw 5 16 18 x Long 006014 006014 ...

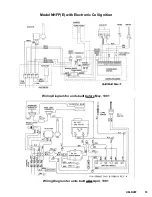
Страница 19: ...OM NHFP 19 OM NHFP 19 Wiring Diagram for units built before May 1991 Wiring Diagram for units built after April 1991 Model NHFP E with Electronic Coil Ignition ...

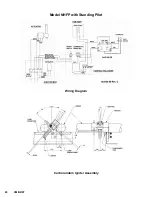
Страница 20: ...20 OM NHFP OM NHFP 20 Wiring Diagram Carborundum Igniter Assembly Model NHFP with Standing Pilot ...

Страница 21: ...ls Ontario M3B 2 R3 ECOLAB INC 370 Wabasha St Paul Minnesota 55102 National Fire Protection Association 60 Battery March Park Quincy Massachusetts 02269 NFPA 54 Installation of Gas Appliances Gas Piping NFPA 70 The National Electrical Code NFPA 96 Ventilating Hoods National Sanitation Foundation 3475 Plymouth Road Ann Arbor Michigan 48106 Underwriters Laboratories Inc 333 Pfingsten Road Northbrook...

Страница 22: ..._____________ Serial No ______________________________ Location _______________________________ Date Purchased _________________________ Date Installed ___________________________ Purchase Order No ______________________ For Service Call _________________________ Date Maintenance Performed Performed by ...

Страница 23: ...d portal to portal transportation costs time mileage for the first twelve 12 months from date of installation or fifteen 15 months from date of shipment from Groen IV This warranty does not cover boiler maintenance calibration periodic adjustments as specified in operating instructions or manuals and consumable parts such as scraper blades gaskets packing etc or labor costs incurred for removal of...

Страница 24: ...1055 Mendell Davis Drive Jackson MS 39272 888 994 7636 601 372 3903 Fax 888 864 7636 groen com PART NUMBER 121010 REV B 10 07 ...

Отзывы:

Похожие инструкции для GROEN NHFP