background image

Installation

Technical Manual

24

1220013692 - 11/2017

dormakaba digital cylinder

4.2.3

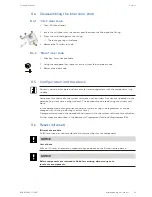
Function check on anti-panic digital cylinder

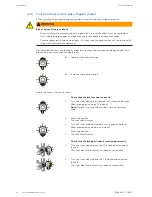
After installing an anti-panic digital cylinder, a function check must be carried out.

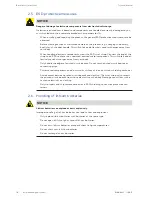
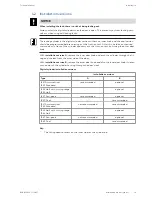
 WARNING

Risk of personal injury or death.

After installing the digital cylinder in a panic lock, a function check must be carried out. 
It must be possible to open the lock with the lever handle in all cam rest areas.

For emergency exit or panic door locks, it is vital that the specifications of the lock and fit-
tings manufacturers are observed.

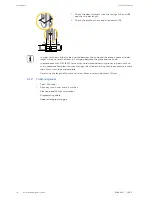
A spring mechanism in the locking cylinder ensures that the cam cannot be positioned in an
area that is not authorised for panic locks.

3

9

6

12

a)

upper authorised rest area

3

9

6

12

b)

lower authorised rest area

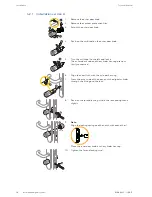
Check the reset function as shown:

Check that the lock functions correctly

3

9

6

12

1.

Turn the inner door knob upwards until it cannot be reset. 
(Rest area pointing up at 12 o'clock).

Note:

 If there is no inner door knob, use the outer door

knob.

2.

Press the handle. 
The lock should unlock.

3

9

6

12

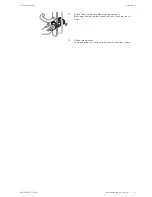
3.

4.

Turn the inner knob downwards until it cannot be reset.
(Rest area pointing down at 6 o'clock.)

Press the handle. 
The lock should unlock.

Check that the locking cylinder is functioning correctly

3

6

12

1.

Turn the inner door knob to the 11 o'clock position and re-
lease it. 
The inner door knob should turn back automatically.

3

6

12

2.

Turn the inner door knob to the 1 o'clock position and re-
lease it. 
The inner door knob should turn back automatically.

Содержание digital cylinder

Страница 1: ...dormakaba digital cylinder 1220013692 11 2017 EN Technical Manual ...

Страница 2: ...stria T 43 0 2782 808 0 www dormakaba com Copyright dormakaba 2017 All rights reserved No part of this document may be reproduced or used in any form or by any means without prior written permis sion of dormakaba Schweiz AG All names and logos of third party products and services are the property of their respective owners Subject to technical changes 1220013692 11 2017 ...

Страница 3: ...der 11 3 3 Accessories 11 3 4 Technical data 12 3 4 1 Dimensions 13 3 5 Conformity 16 4 Installation 17 4 1 Requirements 17 4 1 1 Door components 17 4 1 2 Tools required 18 4 2 Installation versions 19 4 2 1 Installation version A 20 4 2 2 Installation version B 22 4 2 3 Function check on anti panic digital cylinder 24 5 Programming 25 5 1 Initial programming of MRD components 25 5 2 Initial progr...

Страница 4: ...ling the inner door knob 39 8 4 1 Click door knob 39 8 4 2 Small inner knob 39 8 5 Configuration and traceback 39 8 6 Reset INI reset 39 8 6 1 Reset with master media 40 8 6 2 Reset using programmer 1460 40 8 6 3 Reset using tweezers 40 8 7 Emergency power supply 40 9 Troubleshooting 41 9 1 Error analysis 41 9 2 Error analysis for battery life 43 10 Appendix 44 10 1 Summary of various factors infl...

Страница 5: ...f the asymmetrical version all components are available as protected variants with high anti drill protec tion 1 2 Target group This document is intended for specialist personnel only The descriptions are tailored to specialist personnel trained by the manufacturer The descrip tions are no replacement for product training Service personnel are persons who have the appropriate technical training an...

Страница 6: ... on what to do and not to do to prevent injury and material damage are denoted specially Please follow all hazard instructions These are intended to help prevent accidents and pre vent damage These instructions are divided into the following categories DANGER High risk Denotes an immediate danger that could lead to serious injury or death WARNING Medium risk Denotes a potentially dangerous situati...

Страница 7: ... Tips on using the product are useful pieces of information They help to make best use of the product and its functions 1 8 Symbols Symbols with the following meanings are used for hazards depending on hazard source General hazard Hazard from electric shock Risk of explosion Risk to electronic components from electrostatic discharge ...

Страница 8: ... Use in emergency exit or panic door locks WARNING Risk of personal injury or death Improper use or incorrectly installed digital cylinders can lead to emergency exit locks or panic door locks and doors not opening The use of a digital cylinder must be checked carefully before using it in locks with a panic function Before installing the digital cylinder in an escape door a check must be carried o...

Страница 9: ...s at risk of forced entry The following points must be observed for certification as per VdS Class B On doors at risk of forced entry the Protected version of the digital cylinder must be protected with a VdS recognised burglary resistant Class B or C doorplate These doorplates correspond to DIN 18 257 Class ES 2 or ES 3 and EN1906 Class 3 or 4 The cylinder must protrude no more than 3 mm beyond t...

Страница 10: ...s will safely and ef fectively conduct charges away from your body Only handle the edges of printed circuit boards Do not touch printed circuit boards or connecting plugs Put removed components on an anti static surface or in an anti static shielding container Avoid contact between printed circuit boards and clothing The wrist strap only protects the printed circuit boards from static electricity ...

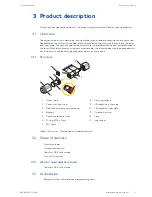
Страница 11: ...ification using authorised media the lock and door can be opened manu ally An acoustic and optical signal denotes access authorisation 3 1 1 Structure 2 3 6 7 11 12 13 8 9 10 5 4 1 1 Outer knob 8 Securing shackle 2 Cover with light ring 9 LA length on outer side 3 Door knob module with antenna 10 LB length on inner side 4 Battery 11 Cylinder housing 5 Contact protection film 12 Cam 6 O ring Ø 15 x...

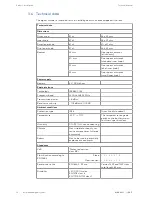
Страница 12: ... CR2 lithium Radio interface Technology IEEE802 15 4 Frequency band 2400 to 2485 5 MHz Transmission power 8 dBm Receiver sensitivity 102 dBm 1 PER Ambient conditions Protection type IP56 Outer knob standard Temperature 25 C 70 C The temperature range de pends on the battery manu facturers specifications Humidity 0 95 rH non condensing Climate Not suitable for heavily cor rosive atmospheres chlorin...

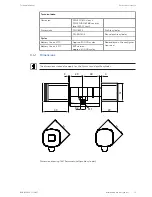
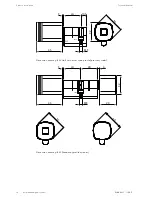
Страница 13: ...ns DIN 18252 Profile cylinder SN EN 1303 Round profile cylinder Cycles Battery life at 20 C Approx 50 000 cycles Dependent on the configura tion used Battery life at 20 C EXT version approx 40 000 cycles 3 4 1 Dimensions The dimensions stated also apply for the 22 mm round profile cylinder 45 29 32 1431 3 4 3 6 3 6 9 2 25 LB M5 Dimension drawing 1431 Asymmetrical profile cylinder ...

Страница 14: ...nual 14 1220013692 11 2017 dormakaba digital cylinder 45 32 M5 LA 3 10 5 3 6 1434 Dimension drawing 1434 Half with outer knob profile profile cylinder 45 29 32 M5 LA 1435 3 4 LB 3 6 3 6 Dimension drawing 1435 Standard profile cylinder ...

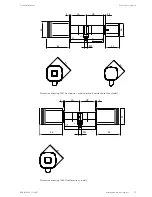
Страница 15: ...5 1220013692 11 2017 dormakaba digital cylinder 45 27 26 M5 LA 3 3 5 LB 3 0 32 3 6 1437 Dimension drawing 1437 Anti panic small inner knob version profile cylinder 45 32 M5 LA 3 3 LB 45 3 6 1439 Dimension drawing 1439 Dual profile cylinder ...

Страница 16: ...kaba digital cylinder 3 5 Conformity This product conforms to the EU directives 2014 53 EU Radio Equipment Directive 2014 35 EU LVD Directive 2011 65 EU RoHS Directive You can download the original declaration of conformity in PDF format at www kaba com con formity ...

Страница 17: ... a digital cylinder must be checked carefully before using it in locks with a panic function Before installing the digital cylinder in an escape door a check must be carried out to en sure that the function of the lever handle or the panic push bar is not obstructed by the inside knob The use of a digital cylinder in emergency exit locks in accordance with EN 179 or in panic door locks in accordan...

Страница 18: ...r lengths so as to retain at least a 2 mm gap between the plate and the knob In accordance with DIN 18257 for security hardware and security plates in doors with se curity hardware burglary resistant fitting the cylinder housing should not protrude more than 3 mm from the external plate Determine the length of the forend screw Forend screw backset 10 mm 4 1 2 Tools required Tool Multitool Allen ke...

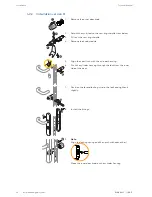
Страница 19: ...er door knob With installation version A remove the inner door knob and push the cylinder through the fit ting and the lock from the outer side of the door With installation version B remove the outer door knob and also the inner door knob if neces sary and push the cylinder housing through the door s lock Digital cylinder installation versions Installation versions Type A B 1431 Asymmetrical 1435...

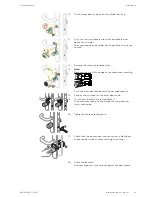
Страница 20: ...titool to the left and lock it The outer door knob and the cylinder housing are now firmly connected 6 7 6 Align the cam flush with the cylinder housing 7 From the outer side of the door push the digital cylinder through the fitting and the lock 8 8 Position the forend locking stud in the lock and tighten it slightly Click 9 9 Note Align the locking spring and the notch with each other Place the i...

Страница 21: ...1220013692 11 2017 dormakaba digital cylinder 11 11 11 Check that the door knobs function correctly Both door knobs can be turned without touching the fit tings 12 Check the backset The door knobs must not knock against the door frame ...

Страница 22: ...ow 3 Pull out the securing shackle 4 Remove the knob module 5 6 5 Align the cam flush with the cylinder housing 6 Push the cylinder housing through the lock from the inner side of the door 7 7 Position the forend locking stud in the lock and tighten it slightly 8 8 8 Install the fittings 9 9 Note Align the locking spring and the notch with each other Place the inner door knob on the cylinder housi...

Страница 23: ...film 13 Note Be careful not to tilt the edge of the knob when installing Push the outer door knob over the door knob module 14 15 14 Position the multitool on the outer door knob 15 Turn the multitool to the left and lock it The outer door knob and the cylinder housing are now firmly connected 16 16 Tighten the forend locking stud 17 17 17 Check that the door knobs function correctly Both door kno...

Страница 24: ... that is not authorised for panic locks 3 9 6 12 a upper authorised rest area 3 9 6 12 b lower authorised rest area Check the reset function as shown Check that the lock functions correctly 3 9 6 12 1 Turn the inner door knob upwards until it cannot be reset Rest area pointing up at 12 o clock Note If there is no inner door knob use the outer door knob 2 Press the handle The lock should unlock 3 9...

Страница 25: ... authorisation types LEGIC LEA or MIFARE MID Note After an INI reset using master media the components must then be re programmed using a master LEGIC or MIFARE 5 2 Initial programming of LEGIC and MIFARE components Prior to first use and on request all components must be programmed with the access au thorisation corresponding to their User media The access authorisations for User media can be tra...

Страница 26: ...ogrammed in an A structure Separate access authorisations to User media can be issued with each B master User media can be programmed with different B masters but not with the same components Each component can be programmed with up to 4000 User media These can be distributed across the various B masters as required For example a B1 master only manages 50 users whilst another master B2 manages up ...

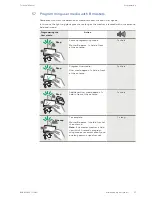
Страница 27: ...Programming the User media Action 1 1 s Beep Launch programming mode Master B approx 1 s hold in front of the antenna 1 x short 2 1 s Beep Program User media User media approx 1 s hold in front of the antenna 1 x short 3 1 s Beep Additional User media approx 1 s hold in front of the antenna 1 x short 4 Beeeep 1 s To complete Master B approx 1 shold in front of the antenna Note If no master medium ...

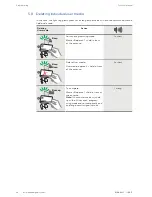
Страница 28: ...d Deleting User media Action 1 1 s Beep Launch programming mode Master B approx 1 s hold in front of the antenna 1 x short 3 s 2 Beep Beep Delete User media User media approx 3 s hold in front of the antenna 2 x short 3 Beeeep 1 s To complete Master B approx 1 shold in front of the antenna Note If no master medium is held up within 20 seconds program ming mode ends automatically and one long acous...

Страница 29: ...within the antenna field and is read Deleting Master Bs Action 1 1 s Beep Launch programming mode hold in front of the antenna Mas ter A approx 1 s 1 x short 10 s 2 Beep Beep Delete Master B and all user media Master B approx hold in front of the antenna 3 s 2 x short 3 Beeeep 1 s To complete Master A approx 1 s hold in front of the antenna Note If no master medium is held up within 20 seconds pro...

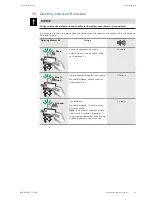
Страница 30: ... in programming mode In this case the light ring glows green for as long as the medium is located within the antenna field and is read Deleting user media Action 10 s 1 Beep Beep hold in front of the antenna Mas ter B approx 10 s All User media under the Master B are deleted 2 x short 1 x long1 1 x short Key 1 Firmware version 42xx ...

Страница 31: ...mode INI reset for whitelist In this case the light ring glows green for as long as the medium is located within the antenna field and is read INI reset with master Action 15 s 1 Beep Beep Master B structure Master B approx 15 s hold in front of the antenna The INI reset will be executed after 15 s After 10 s 1 x long 1 x short after 15 s 2 x short 15 s 1 Beep Beep Master A B structure Master A ap...

Страница 32: ...ong as the medium is located within the antenna field and is read INI reset with master Action 15 s 1 Beep Beep B master Master B approx 15 s hold in front of the antenna The INI reset will be executed after 15 s 2 x short 15 s 1 Beep Beep Master A Master A approx 15 s hold in front of the antenna The INI reset will be executed after 15 s 2 x short ...

Страница 33: ...um with the valid access authorisation in front of the knob 2 2 Access authorisation will be signalled by an acoustic signal1 and a visual display1 Note The digital cylinder s opening time is limited after this time has elapsed the digital cylinder closes automatically Upon delivery the opening time is approx 6 s but this can be adjusted using the 1460 programmer or the system software 3 3 Activat...

Страница 34: ...e with the system soft ware the clock time is updated with every pro gramming procedure 12 months Firmware update For functional modifications as required 7 2 Maintenance of escape doors WARNING Risk of personal injury or death The service life of the digital anti panic cylinder is limited by the spring mechanism Consequently they must be replaced by the manufacturer after 10 years WARNING Risk of...

Страница 35: ...l cylinder 7 3 Cleaning Only disinfection agents that are explicitly formulated for cleaning delicate metal surfaces and plastics may be used The use of unsuitable cleaning agents or methods can damage the components surface 1 Use a soft damp cloth to clean the surface ...

Страница 36: ... tab select the Date category 4 Select the type 14 03 2001 Using this procedure 41038 indicates the manufacturing date of 09 05 2012 8 2 Replacing the battery Whilst the battery is being changed all the data access authorisations configurations and traceback is retained in the battery independent memory The clock settings are lost after 45 seconds Requirements New battery available Tool Multitool ...

Страница 37: ...inserting the battery the LEDs will briefly flash green once The component is now ready again 6 6 Push the outer door knob over the door knob module 7 8 7 Position the multitool on the outer door knob 8 Turn the multitool to the left and lock it The outer door knob and the cylinder are now firmly con nected 9 9 Check that the digital cylinder is functioning correctly 10 Check theclock time 8 5 and...

Страница 38: ...the PCB on the side MIFARE e module The INI reset contacts are on the PCB on the top Procedure for all versions 1 Remove the battery 2 Using the multitool slide 4 2 2 the securing shackle out of the guide 3 Carefully remove the e module 4 Insert the new e module 5 Push the securing shackle into the door knob module from above to the end stop position ð The door knob module and the cylinder housing...

Страница 39: ... to date Components connected to the system software via the wireless function are updated via the gateway e g clock time configurations The traceback can be read using the system soft ware In standalone mode configurations can be transmitted using the programmer or can be changed with this e g adjusting the clock time A programmer can read the traceback and transmit it to the system software for ...

Страница 40: ...t 8 6 3 Reset using tweezers INI reset with tweezers and valid master media The components have INI reset contacts on the e module To perform an INI reset short circuit these contacts with electrically conductive tweezers Before short circuiting present a valid master medium or user medium 1 Disassemble Knob 2 Localise both contacts on the e module See Chapter Replace e module 8 3 3 Using the twee...

Страница 41: ...or does not open author isation by an authorised user medium is confirmed via acoustic and visual signals 8 x short 8 x short red Self test could not be com pleted 3 Check or replace the coup ling unit Door does not open author isation by an authorised user medium is confirmed via acoustic and visual signals 4 x short 4 x short red Medium not programmed Outside the time window Program medium Check...

Страница 42: ...nder Symptoms Possible causes Measures 1 x short green 1 x short red Other errors 1 x short 1 x long 1 x short 2 Unintentional re start Key 2 Components without visual display 3 Function only for c lever mechatronic cylinder and digital cylinder 5 The actuator subsequently opens ...

Страница 43: ... tion Battery was not new Insert new recommended battery Batteries that look identical can contain different amounts of en ergy Insert new recommended battery E module knob with battery in stalled was stored separately from digital cylinder Install new battery Store e module knob without battery Defective electronics Contact customer service Activation of digital cylinder without RFID medium e g b...

Страница 44: ...d INT or extremely low temperature EXT 10 2 Recommendations for battery operation Always use the up to date firmware version for the products Always only activate the functions actually required Record the battery replacement date in a maintenance plan If the battery life does not meet expectations determine the cause in accordance with Chapter 9 2 When the battery is low replace immediately Expla...

Отзывы: