73
ENGINE TROUBLESHOOTING
12/150_23136625
−
C en
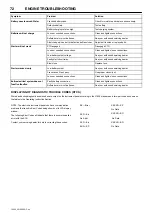
INTERMITTENT FAULT DIAGNOSTICS
(WITH ELECTRONIC CONTROLS)
Intermittent faults are problems that periodically “go away”. A
problem such as a terminal that intermittently doesn’t make contact
can cause an intermittent fault. Other intermittent may be set only
under certain operating conditions such as heavy load, extended
idle, etc. When diagnosing intermittent faults, take special note of the
condition of wiring and connectors, since a high percentage of
intermittent problems originate here. Check for loose, dirty or
disconnected connectors. Inspect the wiring routing, looking for
possible shorts caused by contact with external parts (for example,
rubbing against sharp sheet metal edges). Inspect the connector
vicinity, looking for wires that have pulled out of connectors, poorly
positioned terminals, damaged connectors and corroded or
damaged splices and terminals. Look for broken wires, damaged
splices, and wire
−
to
−
wire shorts. Use good judgement if component
replacement is thought to be required.
NOTE: The engine control unit (ECU) is the component LEAST
likely to fail.
Suggestions for diagnosing intermittent faults:
If the problem is intermittent, try to reproduce the operating
conditions that were present when the diagnostic trouble code
(DTC) set.
Observing these values can help determine the operating
conditions when the fault occurred.
If a faulty connection or wire is suspected to be the cause of the
intermittent problem: clear DTCs, then check the connection or
wire by wiggling it while watching the diagnostic gauge to see if
the fault resets.
Possible causes of intermittent faults:
Faulty connection between sensor and actuator harness.
Faulty contact between terminals in connector.
Faulty terminal/wire connection.
Electromagnetic interference (EMI) from an improperly installed
2
−
way radio, etc., can cause faulty signals to be sent to the ECU.
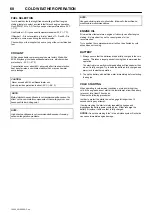
STORAGE
Engine Storage Guidelines
1. Engines can be stored outside for up to three (3) months with no
long term preparation IF COVERED BY WATERPROOF
COVERING.
2. Engines can be stored in a standard overseas shipping container
for up to three (3) months with no long term preparation.
3. Engines can be stored inside, warehoused, for up to six (6)
months with no long term preparation.
Engines expected to be stored more than six (6) months, long term
storage preparation MUST BE taken.
Preparing Engine for Long Term Storage
The following storage preparations are good for long term engine
storage up to one year. After that, the engine should be started,
warmed up, and retreated for an extended storage period.
IMPORTANT: Any time your engine will not be used for over six
(6) months, the following recommendations for storing it and
removing it from storage will help to minimize corrosion and
deterioration.
1. Change engine oil and replace filter. Used oil will not give
adequate protection.
2. Service air cleaner.
3. Draining and flushing of cooling system is not necessary if
engine is to be stored only for several months. However, for
extended storage periods of a year or longer, it is recommended
that the cooling system be drained, flushed, and refilled. Refill
with appropriate coolant.
4. Crank the engine several revolutions with starter (do not allow
the engine to start).
5. Remove fan/alternator poly
−
vee belt, if desired.
6. Remove and clean batteries. Store them in a cool, dry place and
keep them fully charged.
7. Disengage the clutch for any driveline.
8. Clean the exterior of the engine with salt
−
free water and touchup
any scratched or chipped painted surfaces with a good quality
paint.
9. Coat all exposed (machined) metal surfaces with grease or
corrosion inhibitor if not feasible to paint.
10. Seal all openings on engine with plastic bags and tape.
11. Store the engine in a dry protected place. If engine must be
stored outside, cover it with a waterproof canvas or other suitable
protective material and use a strong waterproof tape.
Removing Engine from Long Term Storage
Refer to the appropriate section for detailed services listed below or
have your authorized servicing dealer or engine distributor perform
services that you may not be familiar with.
1. Remove all protective coverings from engine. Unseal all
openings in engine and remove covering from electrical systems.
2. Remove the batteries from storage. Install batteries (fully
charged) and connect the terminals.
3. Install fan/alternator poly
−
vee belt if removed.
4. Fill fuel tank.
5. Perform all appropriate pre
−
starting checks.
IMPORTANT: DO NOT operate starter more than 30 seconds at
a time. Wait at least 2 minutes for starter to cool before trying
again.
6. Crank engine for 20 seconds with starter (do not allow the engine
to start). Wait 2 minutes and crank engine an additional 20
seconds to assure bearing surfaces are adequately lubricated.
7. Start engine and run at low idle and no load for several minutes.
Warm up carefully and check all gauges before placing engine
under load.
8. On the first day of operation after storage, check overall engine
for leaks and check all gauges for correct operation.
Содержание 12/150
Страница 42: ...MACHINE SYSTEMS 40 12 150_23136591 C en ...
Страница 44: ...MACHINE SYSTEMS 42 12 150_23136591 C en WIRING DIAGRAM 23296643_B SHEET 2 ...
Страница 46: ...MACHINE SYSTEMS 44 12 150_23136591 C en WIRING DIAGRAM 23296643_B SHEET 3 ...
Страница 81: ......
Страница 82: ......


