ENGLISH
15
7
ASSEMBLE THE FRONT PANEL TO
THE BACK HOUSING
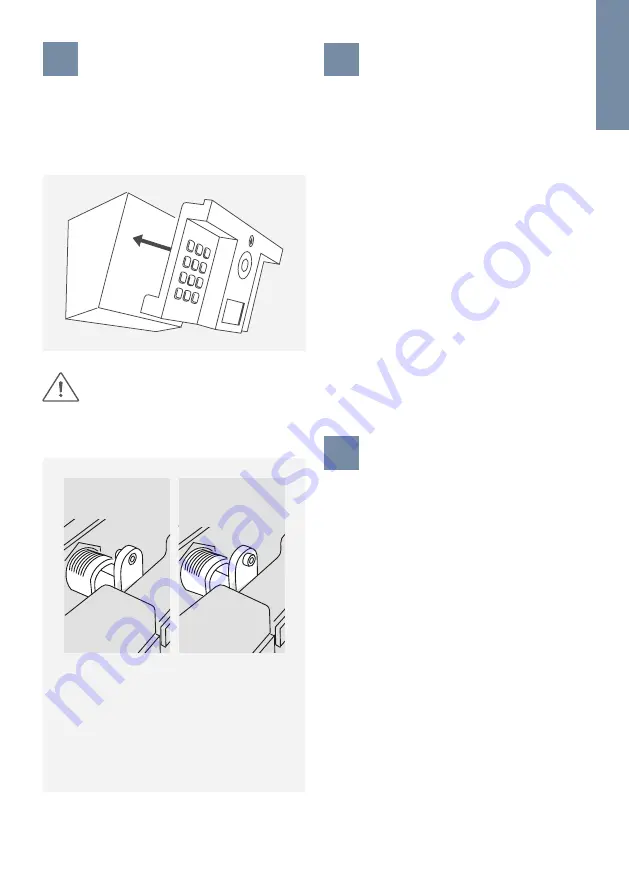
The DoorBird D1812 is designed in such a way that no
nuts are needed to fix it in place. Just slide the front
panel straight into the DoorKing
®
1812 back housing
and secure it with the lock in the front panel and key
provided.
8
ACTIVATE THE DEVICE
Switch on the power to all wires leading to the
assembly location and to your DoorKing
®
1812 control
board.
If the device is to be supplied with power by a mains
adapter, plug the power adapter of the device into
a wall socket. If the device is to be powered via PoE,
switch on the PoE-Switch/ PoE-Injector which is
connected to the device. If the device is to be powered
via DIN-rail power supply, switch on the DIN-rail power
supply.
The Diagnostic-LED indicates whether the device is
supplied with power. This LED lights up in blue color
a few seconds after you have connected the device
to the power supply. The device is now ready for
operation. If the Diagnostic LED does not light up,
please check the power supply. When using a wall
plug power supply and not PoE please check whether
you have connected the positive pole and negative
pole to the device correctly. The device is ready for
operation (booting up process, any software updates,
etc.) once it has emitted a short diagnosis sound from
the integrated loudspeaker. This may last for up to 5
minutes.
9
DOWNLOADING AND INSTALLING
THE APP
Download the “DoorBird” App by Bird Home
Automation onto your mobile device from the Apple
App Store or Google Play Store. You can always find
the most up-to-date version of the App manual on
www.doorbird.com/support
If you use WiFi for connecting the device to your
Internet Router, first go to the DoorBird App > ”WiFi
Setup” and follow the instructions.
If you have finished the WiFi setup or have connected
the device to your Internet Router by means of a
network cable, go to the DoorBird App > “Add device”
and click on the QR code icon in the “User” field.
Scan the user QR code found on the “Digital Passport”
provided with the device.
If you have problems adding the device to the App
please check if the device is online ( www.doorbird.
com/checkonline ). If the device is not online, please
check the WiFi or network cable connection again.
DIAGNOSTIC-LED
You can see if the device is powered by checking the
Diagnostic-LED, which light up a few seconds after the
power is connected.
Make sure no one is working beneath the
DoorKing
®
1812 / DoorBird D1812, as the
DoorKing
®
1812 housing and DoorBird D1812
front panel have sharp edges which may
cause injuries.
Some DoorKing
®
1812 models have the
bracket for the lock in the mounting housing
at a deeper position. If the DoorBird D1812
front panel is moving after you locked it with
the keys provided, adjust the setscrew of the
DoorBird D1812 lock cylinder with your finger
or an Allen
®
key (size 2) accordingly.
Setscrew
default position
Setscrew
adjusted position
(protruding)
Содержание D1812 Series
Страница 1: ...1 Page 2 18 Installation Manual IP Video Door Station D1812 Series VERSION 1 1 MIN HW 1 1 D1812 ...
Страница 19: ......
Страница 20: ...www doorbird com ...


