background image

FR

Consignes de sécurité

SMP301-02/-03

36

2.1

Consignes générales de sécurité

!

AVERTISSEMENT ! 

Les enfants âgés de 8 ans et plus ainsi que les personnes ayant des 
déficiences physiques, sensorielles ou mentales ou un manque 
d'expérience ou de connaissances peuvent utiliser cet appareil à 
condition d'être sous surveillance ou d'avoir reçu des instructions 
concernant l'utilisation de l'appareil en toute sécurité et de com-
prendre les dangers qui en résultent.

Le nettoyage et la maintenance ne doivent pas être effectués par des 
enfants sans surveillance.

N'utilisez le produit que pour un usage conforme à sa destination.

N'utilisez pas

 le produit dans un environnement humide ou mouillé 

ou dans les zones comportant un risque d’explosion de gaz ou de 
poussière.

Seul un personnel qualifié et parfaitement informé des dangers et 
règlements spécifiques à ces manipulations est habilité à effectuer les 
réparations et l'entretien.

2.2

Sécurité lors de l'installation du produit

!

AVERTISSEMENT ! 

Seul un électricien spécialisé est habilité à effectuer l'installation, en 
respectant les directives nationales. Tout raccordement incorrect 
risquerait d'entraîner de graves dangers.

Conservez le produit hors de la portée des enfants.
Ces derniers pourraient s'exposer à des dangers dont ils ne sont pas 
conscients !

A

AVIS ! 

N'exposez pas le produit à des sources de chaleur (rayonnement 
solaire, chauffage, etc.). Vous éviterez ainsi une surchauffe supplé-
mentaire de l'appareil.

SMP301-02_03-IO-7s.book  Seite 36  Donnerstag, 1. Juni 2017  3:40 15

Содержание SMP301-02

Страница 1: ... d alimentation Instructions de montage et de service 34 Fuente conmutada Instrucciones de montaje y de uso 48 Alimentatore a commutazione Istruzioni di montaggio e d uso 62 Voeding Montagehandleiding en gebruiksaanwijzing 76 Koplingsstrømforsyning Monterings og bruksanvisning 90 EN DE FR ES IT NL NO ENERGY LIGHTING ACCESSORIES ...

Страница 2: ......

Страница 3: ...SMP301 02 03 3 1 1 SMP 301 02 2 3 4 5 11 6 7 8 9 10 2 1 2 3 4 5 6 7 8 9 10 11 12 SMP 301 03 ...

Страница 4: ...SMP301 02 03 4 200 mm 50 mm 200 mm 200 mm 100 mm 200 mm A B 3 ...

Страница 5: ...SMP301 02 03 5 A B 1 2 3 4 1 5 ...

Страница 6: ...nd over this instruction manual along with it Table of contents 1 Explanation of symbols 7 2 Safety instructions 7 3 Scope of delivery 9 4 Intended use 10 5 Technical description 10 6 Installing the power supply unit 13 7 Using the power supply unit 16 8 Maintaining and cleaning the power supply unit 17 9 Troubleshooting 18 10 Warranty 18 11 Disposal 19 12 Technical data 19 ...

Страница 7: ...from the manufacturer Use for purposes other than those described in the operating manual DANGER Safety instruction Failure to observe this instruction will cause fatal or serious injury WARNING Safety instruction Failure to observe this instruction can cause fatal or serious injury CAUTION Safety instruction Failure to observe this instruction can lead to injury NOTICE Failure to observe this ins...

Страница 8: ...n areas where there is a risk of gas or dust explosions Maintenance and repair work may only be carried out by qualified per sonnel who are familiar with the risks involved and the relevant regula tions 2 2 Safety when installing the product WARNING The electrical installation may only be connected by qualified person nel and only in accordance with the national regulations Incorrect connection ma...

Страница 9: ... cables which are loose or bent next to electrically conduc tive material metal Do not pull on the cables Do not lay the AC cable and the DC cable in the same duct Fasten the cables securely 2 3 Operating the product safely WARNING Operate the product only if you are certain that the casing and the cables are undamaged Always disconnect the power supply when working on the product A NOTICE Make su...

Страница 10: ...tion The power supply unit can be connected to an external power supply SMP301 03 only The power supply unit can be connected to a battery The integrated priority circuit automatically switches over from battery operation to mains operation when an external power supply is available In mains operation the power supply unit supplies consumer units with a constant DC of 12 7 V The battery is automat...

Страница 11: ...oup 2 maximum 15 A 3 Plug in fuse F3 for output group 3 maximum 15 A 4 Plug in fuse F4 for output group 4 maximum 15 A 5 Plug in fuse F5 for output group 5 maximum 15 A 6 Flat plug P5 6 3 mm for group 5 7 Flat plug P4 6 3 mm for group 4 8 Flat plug P3 6 3 mm for group 3 9 Flat plug P2 6 3 mm for group 2 10 Flat plug P1 6 3 mm for group 1 11 4x flat plug P7 6 3 mm common earth connection ...

Страница 12: ...roup 3 maximum 5 A 4 Plug in fuse F4 for output group 4 maximum 5 A 5 Plug in fuse F5 for output group 5 maximum 10 A 6 3x flat plug P5 6 3 mm for group 5 7 3x flat plug P4 6 3 mm for group 4 8 Flat plug P3 6 3 mm for group 3 9 Flat plug P2 6 3 mm for group 2 10 Flat plug P1 6 3 mm for group 1 11 10x flat plug P7 6 3 mm battery terminal common earth connection 12 2x flat plug P6 for positive termi...

Страница 13: ... installed in a dusty environment The place of installation must be well ventilated A ventilation system must be available for installations in small enclosed spaces Please observe the minimum clearance around the power supply unit fig 3 page 4 There must be free space in front of the ventilation grills When ambient temperatures are higher than those stated above such as in engine or heating compa...

Страница 14: ... arrows and lift the cover off fig 4 2 page 5 Connect the positive terminal of the consumer units to the flat plugs P1 P5 fig 1 6 10 page 3 Connect the negative terminal of the consumer units to one of the flat plugs P7 any pin fig 1 11 page 3 Connect the AC connection cable to the AC plug Secure all cables with strain relief clamps Flat plug Fuse Fuse assignment Maximum permissible current P1 F1 ...

Страница 15: ...egative terminal of the consumer units to one of the flat plugs P7 any pin fig 2 11 page 3 Connect the positive terminal of the battery to one of the flatplugs P6 fig 2 12 page 3 Connect the negative terminal of the battery to one of the flat plugs P7 any pin fig 2 11 page 3 Connect the AC connection cable to the AC plug Ensurethatthecable lengthbetween thebattery andthe powersupplyunitis not more...

Страница 16: ... be restored by switching on the fuses or replacing the plug in fuse 7 1 Using the surge protector optional The optional surge protector ref no 9106505815 is connected on the supply side of the power supply unit The surge protector disconnects the power supply line if the input voltage exceeds approx 270 V Check whether the red LED fig 5 1 page 5 lights up If the red LED lights up this indicates t...

Страница 17: ...he cover to the power supply unit Put the power supply unit back into operation If the plug in fuse is tripped again please contact the manufacturer s branch in your country see the back of the instruction manual for the addresses or your retailer 8 Maintaining and cleaning the power supply unit A Clean the power supply unit using a damp cloth as required NOTE The positioning of the plug in fuses ...

Страница 18: ...g 1 1 page 3 is defec tive The red LED next to the plug in fuse lights up Replace it with a plug in fuse of equivalent quality The power supply unit has switched off as a result of the surge protector The red LED fig 5 1 page 5 lights up The surge protector resets itself automatically as soon as the voltage returns to a permissible value If this is not the case contact a specialist electrician No ...

Страница 19: ...this in accordance with the applicable disposal regulations 12 Technical data SMP301 02 SMP301 03 Ref no 9106504643 9106504717 Model Without relay With relay All outputs are live when there is an external 12 V power supply Rated input voltage 230 Vw 12 Vg Constant output power 350 W Output voltage 12 7 Vg Amperage 27 A Ambient temperature 10 C to 40 C Housing Protection class 20 Dimensions L x W x...

Страница 20: ... Produktes an den Nutzer weiter Inhaltsverzeichnis 1 Erläuterung der Symbole 21 2 Sicherheitshinweise 21 3 Lieferumfang 24 4 Bestimmungsgemäßer Gebrauch 24 5 Technische Beschreibung 24 6 Schaltnetzteil montieren 27 7 Schaltnetzteil benutzen 30 8 Schaltnetzteil pflegen und reinigen 31 9 Fehlerbeseitigung 32 10 Gewährleistung 32 11 Entsorgung 33 12 Technische Daten 33 ...

Страница 21: ...sdrückliche Genehmigung vom Hersteller Verwendung für andere als die in der Anleitung beschriebenen Zwecke GEFAHR Sicherheitshinweis Nichtbeachtung führt zu Tod oder schwerer Verletzung WARNUNG Sicherheitshinweis Nichtbeachtung kann zu Tod oder schwerer Verletzung führen VORSICHT Sicherheitshinweis Nichtbeachtung kann zu Verletzungen führen ACHTUNG Nichtbeachtung kann zu Materialschäden führen und...

Страница 22: ...ie das Produkt nicht in feuchter oder nasser Umgebung oder in Bereichen in denen Gefahr durch Gas oder Staubexplosion besteht Die Wartung und Reparatur darf nur durch eine Fachkraft geschehen die mit den damit verbundenen Gefahren bzw einschlägigen Vor schriften vertraut ist 2 2 Sicherheit bei der Installation des Produkts WARNUNG Die elektrische Installation darf nur von einer Fachkraft nach den ...

Страница 23: ... Leitungsdurchführungen Verlegen Sie Leitungen nicht lose oder scharf abgeknickt an elektrisch leitenden Materialien Metall Ziehen Sie nicht an Leitungen Verlegen Sie Wechselstromleitung und Gleichstromleitung nicht zusammen im gleichen Leitungskanal Leerrohr Befestigen Sie die Leitungen gut 2 3 Sicherheit beim Betrieb des Produkts WARNUNG Betreiben Sie das Produkt nur wenn das Gehäuse und die Lei...

Страница 24: ...sen 5 Technische Beschreibung Das Schaltnetzteil kann an eine externe Stromversorgung angeschlossen werden Nur SMP301 03 Das Schaltnetzteil kann an eine Batterie angeschlossen werden Die integrierte Vorrangschaltung schaltet automatisch von Batterie auf Netzbetrieb um wenn eine externe Stromversorgung zur Verfügung steht Im Netzbetrieb stellt das Schaltnetzteil eine konstante Gleichspannung von 12...

Страница 25: ... 15 A 3 Stecksicherung F3 für Ausgang Gruppe 3 maximal 15 A 4 Stecksicherung F4 für Ausgang Gruppe 4 maximal 15 A 5 Stecksicherung F5 für Ausgang Gruppe 5 maximal 15 A 6 Flachstecker P5 6 3 mm für Gruppe 5 7 Flachstecker P4 6 3 mm für Gruppe 4 8 Flachstecker P3 6 3 mm für Gruppe 3 9 Flachstecker P2 6 3 mm für Gruppe 2 10 Flachstecker P1 6 3 mm für Gruppe 1 11 4x Flachstecker P7 6 3 mm gemeinsamer ...

Страница 26: ...maximal 5 A 4 Stecksicherung F4 für Ausgang Gruppe 4 maximal 5 A 5 Stecksicherung F5 für Ausgang Gruppe 5 maximal 10 A 6 3x Flachstecker P5 6 3 mm für Gruppe 5 7 3x Flachstecker P4 6 3 mm für Gruppe 4 8 Flachstecker P3 6 3 mm für Gruppe 3 9 Flachstecker P2 6 3 mm für Gruppe 2 10 Flachstecker P1 6 3 mm für Gruppe 1 11 10x Flachstecker P7 6 3 mm Batterieanschluss gemeinsamer Masseanschluss 12 2x Fla...

Страница 27: ...en Der Einbauort muss gut belüftet sein Bei Installationen in geschlossenen kleinen Räumen sollte eine Be und Entlüftung vorhanden sein Beachten Sie den Mindestabstand um das Schaltnetzteil Abb 3 Seite 4 Die Belüftungsschlitze müssen frei bleiben Bei Umgebungstemperaturen die höher als die oben genannten sind z B in Motor oder Heizungsräumen direkte Sonneneinstrahlung kann es durch die Eigenerwärm...

Страница 28: ...bb 4 2 Seite 5 ab Schließen Sie den Pluspol der Verbraucher an die Flachstecker P1 P5 Abb 1 6 10 Seite 3 an Schließen Sie den Minuspol der Verbraucher an einen der Flachstecker P7 beliebiger Stift Abb 1 11 Seite 3 an Schließen Sie das Wechselstrom Anschlusskabel an den Wechselstrom Stecker an Sichern Sie alle Kabel mit Zugentlastungen Flach stecker Sicherung Sicherungsbelegung maximal zulässige St...

Страница 29: ... der Flachstecker P7 beliebiger Stift Abb 2 11 Seite 3 an Schließen Sie den Pluspol der Batterie an einen der Flachstecker P6 Abb 2 12 Seite 3 an Schließen Sie den Minuspol der Batterie an einen der Flachstecker P7 beliebiger Stift Abb 2 11 Seite 3 an Schließen Sie das Wechselstrom Anschlusskabel an den Wechselstrom Stecker an Stellen Sie sicher dass die Kabellänge zwischen Batterie und Schaltnetz...

Страница 30: ...ten der Sicherungen oder Austauschen der Stecksicherung nicht wieder herge stellt werden kann 7 1 Überspannungsschutz verwenden optional DeroptionaleÜberspannungsschutz Art Nr 9106505815 wirddemSchaltnetzteil vorgeschaltet Der Überspannungsschutz trennt die Zuleitung wenn die Eingangs spannung ca 270 V überschreitet Prüfen Sie ob die rote LED Abb 5 1 Seite 5 leuchtet Wenn die rote LED leuchtet hat...

Страница 31: ...Sie das Schaltnetzteil wieder in Betrieb Wenn die Stecksicherung erneut auslöst dann wenden Sie sich bitte an die Niederlassung des Herstellers in Ihrem Land Adressen siehe Rückseite der Anleitung oder an Ihren Fachhändler 8 Schaltnetzteil pflegen und reinigen A Reinigen Sie das Schaltnetzteil bei Bedarf mit einem feuchten Tuch HINWEIS Mit der Positionierung der Stecksicherungen werden hersteller ...

Страница 32: ...n 12 V Ausgangs z B Abb 1 1 Seite 3 ist defekt Die rote LED neben der Stecksicherung leuchtet Ersetzen Sie sie durch eine gleichwertige Stecksicherung Das Schaltnetzteil hat durch den Überspannungsschutz abgeschaltet Die rote LED Abb 5 1 Seite 5 leuchtet Der Überspannungsschutz setzt sich automatisch zurück wenn die Spannung einen zulässigen Wert angenommen hat Andern falls kontaktieren Sie eine E...

Страница 33: ...händler über die zutreffenden Entsorgungsvorschriften 12 Technische Daten SMP301 02 SMP301 03 Art Nr 9106504643 9106504717 Ausführung ohne Relais mit Relais bei externer 12 V Versorgung sind alle Ausgänge spannungsführend Eingangsnennspannung 230 Vw 12 Vg Dauer Ausgangsleistung 350 W Ausgangsspannung 12 7 Vg Stromstärke 27 A Umgebungstemperatur 10 C bis 40 C Gehäuse Schutzklasse 20 Abmessungen L x...

Страница 34: ...reur Table des matières 1 Explication des symboles 35 2 Consignes de sécurité 35 3 Contenu de la livraison 38 4 Usage conforme 38 5 Description technique 38 6 Montage du bloc d alimentation 41 7 Utilisation de la commutation d alimentation 44 8 Entretien et nettoyage de la commutation d alimentation 45 9 Réparation des pannes 46 10 Garantie 46 11 Retraitement 47 12 Caractéristiques techniques 47 ...

Страница 35: ...plicite de la part du fabricant une utilisation différente de celle décrite dans la notice DANGER Consigne de sécurité le non respect de ces consignes entraîne la mort ou de graves blessures AVERTISSEMENT Consignedesécurité lenon respectdecesconsignespeutentraîner la mort ou de graves blessures ATTENTION Consignedesécurité lenon respectdecesconsignespeutentraîner des blessures AVIS Le non respect ...

Страница 36: ...sez pas le produit dans un environnement humide ou mouillé ou dans les zones comportant un risque d explosion de gaz ou de poussière Seul un personnel qualifié et parfaitement informé des dangers et règlements spécifiques à ces manipulations est habilité à effectuer les réparations et l entretien 2 2 Sécurité lors de l installation du produit AVERTISSEMENT Seul un électricien spécialisé est habili...

Страница 37: ... faites pas passer de lignes électriques non fixées ou fortement coudées sur des matériaux conducteurs métal Ne tirez pas sur les lignes électriques Ne placez pas les câbles de courant alternatif et la ligne de courant continu dans le même conduit tube vide Fixez bien les lignes 2 3 Consignes de sécurité concernant le fonctionnement du produit AVERTISSEMENT Faites fonctionner le produit uniquement...

Страница 38: ...u 5 Description technique La commutation d alimentation peut être connectée à une alimentation externe SMP301 03 uniquement La commutation d alimentation peut être connectée à une batterie Le raccordement prioritaire intégré passe automatiquement du fonctionnement sur batterie au fonctionnement sur secteur lorsqu une alimentation électrique est dis ponible En fonctionnement sur secteur la commutat...

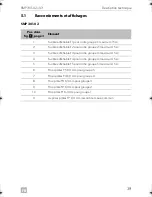
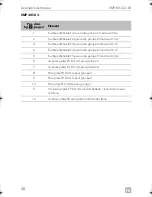
Страница 39: ...5 A 3 Fusible enfichable F3 pour sortie groupe 3 maximum 15 A 4 Fusible enfichable F4 pour sortie groupe 4 maximum 15 A 5 Fusible enfichable F5 pour sortie groupe 5 maximum 15 A 6 Prises plates P5 6 3 mm pour groupe 5 7 Prises plates P4 6 3 mm pour groupe 4 8 Prise plate P3 6 3 mm pour groupe 3 9 Prise plate P2 6 3 mm pour groupe 2 10 Prise plate P1 6 3 mm pour groupe 1 11 4x prises plates P7 6 3 ...

Страница 40: ...m 5 A 4 Fusible enfichable F4 pour sortie groupe 4 maximum 5 A 5 Fusible enfichable F5 pour sortie groupe 5 maximum 10 A 6 3x prises plates P5 6 3 mm pour groupe 5 7 3x prises plates P4 6 3 mm pour groupe 4 8 Prise plate P3 6 3 mm pour groupe 3 9 Prise plate P2 6 3 mm pour groupe 2 10 Prise plate P1 6 3 mm pour groupe 1 11 10x prises plates P7 6 3 mm raccord batterie raccord de masse commun 12 2x ...

Страница 41: ...ux Le lieu de montage doit être bien aéré En cas d installations dans de petits locaux fermés ceux ci doivent disposer d un système d aération et de ventila tion Respectez la distance minimale autour du bloc d alimentation fig 3 page 4 Les fentes d aération ne doivent pas être couvertes En cas de températures ambiantes supérieures à celles indiquées plus haut p ex dans les compartiments moteur ou ...

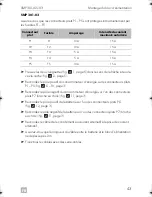
Страница 42: ... Raccordez le pôle positif du consommateur d énergie sur les connecteurs plats P1 P5 fig 1 6 10 page 3 Raccordez le pôle négatif du consommateur d énergie sur l un des connecteurs plats P7 broche au choix fig 1 11 page 3 Raccordez le câble de raccordement au courant alternatif à la prise de courant alternatif Fixez tous les câbles avec des serre câbles Connecteur plat Fusible Ampérage Intensité du...

Страница 43: ...onnecteurs plats P7 broche au choix fig 2 11 page 3 Raccordez le pôle positif de la batterie sur l un des connecteurs plats P6 fig 2 12 page 3 Raccordez le pôle négatif de la batterie sur l un des connecteurs plats P7 broche au choix fig 2 11 page 3 Raccordez le câble de raccordement au courant alternatif à la prise de courant alternatif Assurez vous que la longueur du câble entre la batterie et l...

Страница 44: ... fusibles ou en remplaçant le fusible enfichable 7 1 Utilisation de la protection contre les surtensions en option La protection contre les surtensions en option n d article 9106505815 est raccor dée en amont de la commutation d alimentation La protection contre les surten sions coupe l alimentation si la tension d entrée dépasse env 270 V Vérifiez si la LED rouge fig 5 1 page 5 est allumée Si la ...

Страница 45: ...tion d alimentation Remettez la commutation d alimentation en service Si le fusible enfichable se déclenche de nouveau adressez vous à la succursale du fabricant de votre pays adresses au dos du manuel ou à votre revendeur 8 Entretien et nettoyage de la commutation d alimentation A Si nécessaire nettoyez la commutation d alimentation avec un chiffon humide REMARQUE Le positionnement des fusibles e...

Страница 46: ... est défectueux La LED rouge à côté du fusible enfichable est allu mée Remplacez le par un fusible enfichable de même valeur La commutation d alimentation a été arrêtée par la protection de surtension La LED rouge fig 5 1 page 5 est allumée La protection contre les surten sions se réinitialise de manière autonome dès que la tension atteint à nouveau une valeur autorisée Dans le cas contraire conta...

Страница 47: ...scriptions relatives au retraitement des déchets 12 Caractéristiques techniques SMP301 02 SMP301 03 N d article 9106504643 9106504717 Version sans relais avec relais en cas d alimentation externe 12 V toutes les sorties sont conduisent de la tension Tension nominale d entrée 230 Vw 12 Vg Puissance de sortie continue 350 W Tension de sortie 12 7 Vg Intensité du courant 27 A Température ambiante 10 ...

Страница 48: ...otra persona entregue también estas instrucciones Índice de contenidos 1 Explicación de los símbolos 49 2 Indicaciones de seguridad 49 3 Volumen de entrega 52 4 Uso adecuado 52 5 Descripción técnica 52 6 Montar la fuente conmutada 55 7 Usar el convertidor 58 8 Cuidado y limpieza del convertidor 59 9 Solución de fallos 60 10 Garantía legal 60 11 Gestión de residuos 61 12 Datos técnicos 61 ...

Страница 49: ...n el expreso consentimiento del fabricante utilización del aparato para fines distintos a los descritos en las instrucciones PELIGRO Indicación de seguridad su incumplimiento acarrea la muerte o graves lesiones ADVERTENCIA Indicación de seguridad su incumplimiento puede acarrear la muerte o graves lesiones ATENCIÓN Indicación de seguridad su incumplimiento puede acarrear lesiones AVISO Su incumpli...

Страница 50: ...húmedos o mojados o en áreas en las que exista peligro de explosión por gas o polvo El mantenimiento y reparación solo lo puede llevar a cabo personal especializado y familiarizado con los riesgos y normas pertinentes 2 2 Seguridad a la hora de instalar el producto ADVERTENCIA La instalación eléctrica solo la puede efectuar personal técnico con forme a las normas del país en cuestión Una conexión ...

Страница 51: ...able Los cables no deben quedar sueltos ni muy doblados al colocarlos en materiales conductores de electricidad metales No tire de los cables No tienda el cable de la corriente alterna ni el cable de corriente con tinua en el mismo canal de cableado tubo corrugado Fije bien los cables 2 3 Seguridad durante el funcionamiento del producto ADVERTENCIA Utilice el producto solo si la carcasa y los cabl...

Страница 52: ...cripción técnica El convertidor se puede conectar a un sistema de energía externo y a una batería Sólo SMP301 03 El convertidor se puede conectar a una batería La conexión de prioridad integrada conmuta automáticamente del funcionamiento por batería al funcionamiento con la red en caso de que haya disponible tensión de alimentación externa En funcionamiento con la red el convertidor entrega una te...

Страница 53: ...enchufable F3 para salida del grupo 3 máximo 15 A 4 Fusible enchufable F4 para salida del grupo 4 máximo 15 A 5 Fusible enchufable F5 para salida del grupo 5 máximo 15 A 6 Clavija plana P5 6 3 mm para el grupo 5 7 Clavija plana P4 6 3 mm para el grupo 4 8 Clavija plana P3 6 3 mm para el grupo 3 9 Clavija plana P2 6 3 mm para el grupo 2 10 Clavija plana P1 6 3 mm para el grupo 1 11 4 clavijas plana...

Страница 54: ...le enchufable F4 para salida del grupo 4 máximo 5 A 5 Fusible enchufable F5 para salida del grupo 5 máximo 10 A 6 3 clavijas planas P5 6 3 mm para el grupo 5 7 3 clavijas planas P4 6 3 mm para el grupo 4 8 Clavija plana P3 6 3 mm para el grupo 3 9 Clavija plana P2 6 3 mm para el grupo 2 10 Clavija plana P1 6 3 mm para el grupo 1 11 10 clavijas planas P7 6 3 mm de conexión de batería conexión a mas...

Страница 55: ...e tiene que estar bien ventilado En caso de instalación en recintos cerrados pequeños debe haber ventilación suficiente Respete la dis tancia mínima alrededor de la fuente conmutada fig 3 página 4 Las aberturas de ventilación deben quedar libres En caso de temperaturas ambientales superiores a las arriba mencionadas p ej en habitaciones para motores o calefacción o bajo la radiación directa del so...

Страница 56: ... fig 4 2 página 5 Conecte el polo positivo del aparato conectado en el conector plano P1 P5 fig 1 6 10 página 3 Conecte el polo negativo del aparato conectado a uno de los conectores planos P7 cualquier clavija fig 1 11 página 3 Conecte el cable de conexión de corriente alterna al conector de corriente alterna Asegure todos los cables con alivios de tracción Conector plano Fusible Amperaje Máxima ...

Страница 57: ... de los conectores planos P7 cualquier clavija fig 2 11 página 3 Conecte el polo positivo de la batería a uno de los conectores planos P6 fig 2 12 página 3 Conecte el polo negativo de la batería a uno de los conectores planos P7 cualquier clavija fig 2 11 página 3 Conecte el cable de conexión de corriente alterna al conector de corriente alterna Asegúrese de que la longitud del cable entre la bate...

Страница 58: ...lconectar losfusibles o sustituir el fusible enchufable 7 1 Usar la protección contra sobretensión opcional La protección contra sobretensión opcional n de art 9106505815 se antepone al convertidor La protección contra sobretensión desconecta la alimentación cuando la tensión de entrada es superior a unos 270 V Compruebe si el LED rojo fig 5 1 página 5 está iluminado Si se ilumina el LED rojo se h...

Страница 59: ...l convertidor Vuelva a poner en funcionamiento el convertidor Si vuelve a saltar el fusible enchufable diríjase a la filial del fabricante en su país véanse las direcciones en el dorso de estas instrucciones o a su establecimiento especializado 8 Cuidado y limpieza del convertidor A Limpie el convertidor con un paño húmedo cuando sea necesario NOTA Al posicionar los fusibles enchufables se configu...

Страница 60: ...ina 3 está averiado El LED rojo al lado del fusible enchufable se ilumina Sustitúyalo por un fusible enchufable de las mismas características La fuente conmutada se ha desconec tado debido a la protección contra sobretensión El LED rojo fig 5 1 página 5 se ilumina Laproteccióndesobretensiónse desactiva automáticamente cuando la tensión vuelve a un valor permitido De lo contrario diríjase a un elec...

Страница 61: ...ormas pertinentes de eliminación de materiales 12 Datos técnicos SMP301 02 SMP301 03 N de art 9106504643 9106504717 Versión sin relé con relé con una alimentación externa de 12 V todas las salidas conducen tensión Tensión nominal de entrada 230 Vw 12 Vg Potencia de salida continua 350 W Tensión de salida 12 7 Vg Intensidad de corriente 27 A Temperatura ambiente 10 C hasta 40 C Carcasa Clase de pro...

Страница 62: ...narlo all utente successivo Indice 1 Spiegazione dei simboli 63 2 Istruzioni per la sicurezza 63 3 Dotazione 66 4 Conformità d uso 66 5 Descrizione tecnica 66 6 Montaggio dell alimentatore a commutazione 69 7 Utilizzo dell alimentatore a commutazione 72 8 Cura e pulizia dell alimentatore a commutazione 73 9 Ricerca guasti 74 10 Garanzia 74 11 Smaltimento 75 12 Specifiche tecniche 75 ...

Страница 63: ...mpiego per altri fini rispetto a quelli descritti nel manuale di istruzioni PERICOLO Avvisodisicurezza lamancataosservanzadiquestoavvisocomporta ferite gravi anche mortali AVVERTENZA Avviso di sicurezza la mancata osservanza di questo avviso può causare ferite gravi anche mortali ATTENZIONE Avviso di sicurezza la mancata osservanza di questo avviso può essere causa di lesioni AVVISO La mancata oss...

Страница 64: ...ambienti umidi o bagnati o in zone in cui sussiste il pericolo di esplosioni di gas o polveri I lavori di manutenzione e di riparazione devono essere effettuati solo da uno specialista informato sui pericoli connessi e sulle relative prescrizioni 2 2 Sicurezza durante l installazione del prodotto AVVERTENZA L installazione elettrica deve essere collegata solo da uno specialista conformemente alle ...

Страница 65: ...i Posare i cavi in modo che non siano allentati o notevolmente piegati in corrispondenza dei materiali che conducono elettricità metalli Non tirare i cavi Non posare la linea a corrente alternata e quella a corrente continua nella stessa canalina per cavi tubo vuoto Fissare bene i cavi 2 3 Sicurezza durante il funzionamento del prodotto AVVERTENZA Azionare il prodotto solamente se l alloggiamento ...

Страница 66: ...nuo 5 Descrizione tecnica L alimentatore a commutazione può essere connesso a un alimentazione elettrica esterna Solo SMP301 03 L alimentatore a commutazione può essere connesso a una batteria Il circuito di priorità integrato passa automaticamente da funzionamento a batteria a funzionamento a rete se è presente un alimentazione elettrica esterna Nel funzionamento a rete l alimentatore a commutazi...

Страница 67: ... F3 per uscita gruppo 3 massimo 15 A 4 Fusibile a lama F4 per uscita gruppo 4 massimo 15 A 5 Fusibile a lama F5 per uscita gruppo 5 massimo 15 A 6 Spine femmine piatte P5 6 3 mm per gruppo 5 7 Spine femmine piatte P4 6 3 mm per gruppo 4 8 Spina femmina piatta P3 6 3 mm per gruppo 3 9 Spina femmina piatta P2 6 3 mm per gruppo 2 10 Spina femmina piatta P1 6 3 mm per gruppo 1 11 4 spine femmine piatt...

Страница 68: ...er uscita gruppo 4 massimo 5 A 5 Fusibile a lama F5 per uscita gruppo 5 massimo 10 A 6 3x spine femmine piatte P5 6 3 mm per gruppo 5 7 3x spine femmine piatte P4 6 3 mm per gruppo 4 8 Spina femmina piatta P3 6 3 mm per gruppo 3 9 Spina femmina piatta P2 6 3 mm per gruppo 2 10 Spina femmina piatta P1 6 3 mm per gruppo 1 11 10 spine femmine piatte P7 6 3 mm collegamento batteria collegamento a mass...

Страница 69: ...luogo di montaggio deve essere sufficientemente aerato Se le installazioni vengono eseguite in locali piccoli e chiusi deve essere presente un sistema di aerazione e disaerazione Rispettare la distanza minima intorno all alimentatore a commutazione fig 3 pagina 4 Le fessure di aerazione devono rimanere libere Con temperature ambiente superiori a quelle precedentemente menzionate ad es in vani moto...

Страница 70: ...Collegare il polo negativo delle utenze a una delle spine femmine piatte P7 qualsiasi maschio fig 1 17 pagina 3 Collegare il polo positivo della batteria a una delle spine femmine piatte P6 fig 1 4 pagina 3 Collegare il polo negativo della batteria a una delle spine femmine piatte P7 qualsiasi maschio fig 1 17 pagina 3 Collegare il cavo di collegamento di corrente alternata alla spina di corrente ...

Страница 71: ...qualsiasi maschio fig 2 11 pagina 3 Collegare il polo positivo della batteria a una delle spine femmine piatte P6 fig 2 12 pagina 3 Collegare il polo negativo della batteria a una delle spine femmine piatte P7 qualsiasi maschio fig 2 11 pagina 3 Collegare il cavo di collegamento di corrente alternata alla spina di corrente alternata Assicurarsi che la lunghezza del cavo tra batteria e alimentatore...

Страница 72: ...uale di istruzioni o al rivenditore specializzato di riferimento 7 1 Utilizzo della protezione contro le sovratensioni opzionale La protezione opzionale contro le sovratensioni n art 9106505815 viene installata a monte dell alimentatore a commutazione La protezione contro le sovratensioni interrompe la rete di alimentazione se la tensione di ingresso supera ca 270 V Controllare se il LED rosso fig...

Страница 73: ...ere in funzione l alimentatore a commutazione Se il fusibile a lama scatta nuovamente rivolgersi alla filiale del produttore del proprio paese per gli indirizzi vedi il retro di questo manuale di istruzioni o al rivenditore specializzato di riferimento 8 Cura e pulizia dell alimentatore a commutazione A Se necessario pulire l alimentatore a commutazione con un panno umido NOTA Conilposizionamentod...

Страница 74: ... relativa uscita da 12 V ad es fig 1 1 pagina 3 è guasto Il LED rosso accanto al fusibile a lama è acceso Sostituire il fusibile a lama con uno equivalente L alimentatore a commutazione si è disinserito per effetto della protezione contro le sovratensioni Il LED rosso fig 5 1 pagina 5 è acceso La protezione contro le sovraten sioni si azzera automaticamente quando la tensioneraggiunge un livello a...

Страница 75: ... sulle prescrizioni adeguate concernenti lo smaltimento 12 Specifiche tecniche SMP301 02 SMP301 03 N art 9106504643 9106504717 Versione senza relè con relè con alimentazione esterna da 12 V tutte le uscite sono sotto tensione Tensione nominale di ingresso 230 Vw 12 Vg Potenza di uscita continua 350 W Tensione di uscita 12 7 Vg Intensità di corrente 27 A Temperatura ambiente da 10 C a 40 C Box Clas...

Страница 76: ...aan de gebruiker Inhoudsopgave 1 Verklaring van de symbolen 77 2 Veiligheidsinstructies 77 3 Omvang van de levering 80 4 Reglementair gebruik 80 5 Technische beschrijving 80 6 Voeding monteren 83 7 Geschakelde voeding gebruiken 86 8 Geschakelde voeding onderhouden en reinigen 87 9 Verhelpen van storingen 88 10 Garantie 88 11 Afvoer 89 12 Technische gegevens 89 ...

Страница 77: ...tdrukkelijke toestemming van de fabrikant gebruik voor andere dan de in de handleiding beschreven toepassingen GEVAAR Veiligheidsaanwijzing Het niet naleven leidt tot overlijden of ernstig letsel WAARSCHUWING Veiligheidsaanwijzing Het niet naleven kan leiden tot overlijden of ernstig letsel VOORZICHTIG Veiligheidsaanwijzing Het niet naleven kan leiden tot letsel LET OP Het niet naleven ervan kan l...

Страница 78: ...ct niet in vochtige of natte omgevingen of in berei ken waarin gevaar door gas of stofexplosie bestaat Het onderhoud en de reparaties mogen alleen door een vakman wor den uitgevoerd die bekend is met de eraan verbonden gevaren en de betreffende voorschriften 2 2 Veiligheid bij de montage van het product WAARSCHUWING De elektrische aansluiting mag uitsluitend worden uitgevoerd door een vakman die z...

Страница 79: ...bruik dan holle buizen of leidingdoorvoeringen Installeer de leidingen niet los of scherp geknikt op elektrisch gelei dend materiaal metaal Trek niet aan leidingen Plaats de wisselstroomleiding en de gelijkstroomleiding niet samen in dezelfde doorvoer holle buis Bevestig de leidingen goed 2 3 Veiligheid bij gebruik van het product WAARSCHUWING Gebruik het product alleen als de behuizing en de leid...

Страница 80: ...Het apparaat is toegelaten voor continubedrijf 5 Technische beschrijving De geschakelde voeding kan op een externe stroomvoorziening worden aangesloten SMP301 03 alleen De geschakelde voeding kan op een accu worden aangesloten De geïntegreerde prioriteitsschakeling schakelt automatisch van accu naar netbe drijf als een externe stroomvoorziening beschikbaar is Innetbedrijflevertdegeschakeldevoeding...

Страница 81: ...eekzekering F3 voor uitgangen groep 3 maximaal 15 A 4 Steekzekering F4 voor uitgangen groep 4 maximaal 15 A 5 Steekzekering F5 voor uitgangen groep 5 maximaal 15 A 6 Platte stekker P5 6 3 mm voor groep 5 7 Platte stekker P4 6 3 mm voor groep 4 8 Platte stekker P3 6 3 mm voor groep 3 9 Platte stekker P2 6 3 mm voor groep 2 10 Platte stekker P1 6 3 mm voor groep 1 11 4x platte stekker P7 6 3 mm geme...

Страница 82: ... A 4 Steekzekering F4 voor uitgangen groep 4 maximaal 5 A 5 Steekzekering F5 voor uitgangen groep 5 maximaal 10 A 6 3x platte stekker P5 6 3 mm voor groep 5 7 3x platte stekker P4 6 3 mm voor groep 4 8 Platte stekker P3 6 3 mm voor groep 3 9 Platte stekker P2 6 3 mm voor groep 2 10 Platte stekker P1 6 3 mm voor groep 1 11 10x platte stekker P7 6 3 mm accuaansluiting gemeenschappelijke massa aanslu...

Страница 83: ...omgeving worden gemonteerd De montageplaats moetgoed geventileerd zijn Bij installaties in gesloten kleine ruimtes moet er ventilatie mogelijk zijn Houd rekening met de minimale afstand tot de voeding afb 3 pagina 4 De ventilatieopeningen moeten vrij blijven Bij omgevingstemperaturen die hoger zijn dan hierboven genoemd bijv in de motorruimte de verwarmingsruimte of door directe zonnestraling kan ...

Страница 84: ... los Sluit de pluspool van de verbruiker aan op de vlakke stekker P1 P5 afb 1 6 10 pagina 3 Sluit de minpool van de verbruiker aan op een van de vlakke stekkers P7 willekeurige pen afb 1 11 pagina 3 Sluit de wisselstroomaansluitkabel aan op de wisselstroomstekker Zet alle kabels vast met trekontlastingen Vlakke stekker Zekering Zekeringclassificatie Maximaal toelaatbare stroomsterkte P1 F1 15 A 15...

Страница 85: ...n de vlakke stekkers P7 willekeurige pen afb 2 11 pagina 3 Sluit de pluspool van de accu aan op een van de vlakke stekkers P6 afb 2 12 pagina 3 Sluit de minpool van de accu aan op een van de vlakke stekkers P7 willekeurige pen afb 2 11 pagina 3 Sluit de wisselstroomaansluitkabel aan op de wisselstroomstekker Controleer of de kabellengte tussen de accu en de voeding maximaal 2 m is Zet alle kabels ...

Страница 86: ...e zekeringen of het vervangen van de steekzekering niet meer tot stand kan worden gebracht 7 1 Overspanningsbeveiliging gebruiken optioneel De optionele overspanningsbeveiliging Artikelnr 9106505815 wordt voor de geschakelde voeding aangebracht De overspanningsbeveiliging scheidt de toe voerleiding als de ingangsspanning ca 270 V overschrijdt Controleer of de rode led afb 5 1 pagina 5 brandt Als d...

Страница 87: ...geschakelde voeding Neem de geschakelde voeding weer in bedrijf Als de steekzekering opnieuw wordt geactiveerd neem dan contact op met de vestiging van de fabrikant in uw land adressen zie achterkant van de handlei ding of uw dealer 8 Geschakelde voeding onderhouden en reinigen A Reinig de geschakelde voeding nodig met een vochtige doek INSTRUCTIE Met de positionering van de steekzekeringen worden...

Страница 88: ...behorende 12V uitgang bijvoorbeeld afb 1 1 pagina 3 is defect De rode led naast de steekzekering brandt Vervang deze door een gelijk waardige steekzekering De geschakelde voeding werd door de overspanningsbeveiliging uitge schakeld De rode led afb 5 1 pagina 5 brandt De overspanningsbeveiliging schakelt vanzelf terug als de spanning weer een toegestaan niveau heeft bereikt Raadpleeg anders een ele...

Страница 89: ...afvoervoorschriften 12 Technische gegevens SMP301 02 SMP301 03 Artikelnr 9106504643 9106504717 Uitvoering zonder relais met relais bij externe 12V voeding staan alle uitgangen onder spanning Nominale ingangsspanning 230 Vw 12 Vg Continu uitgangsvermogen 350 W Uitgangsspanning 12 7 Vg Stroomsterkte 27 A Omgevingstemperatuur 10 C tot 40 C Behuizing Beschermklasse 20 Afmetingen l x b x h 240 x 207 x ...

Страница 90: ...uks anvisningen videre også Innholdsfortegnelse 1 Forklaring av symbolene 91 2 Sikkerhetsregler 91 3 Leveringsomfang 94 4 Tiltenkt bruk 94 5 Teknisk beskrivelse 94 6 Montere koplingsstrømforsyning 97 7 Bruke svitsjenettdel 100 8 Pleie og rengjøre svitsjenettdelen 101 9 Feilsøking 102 10 Garanti 102 11 Avfallshåndtering 103 12 Tekniske spesifikasjoner 103 ...

Страница 91: ...odusenten Bruk til andre formål enn det som er beskrevet i veiledningen FARE Sikkerhetsregel Hvismanikkeoverholderdenneregelen fører dettil død eller alvorlig skade ADVARSEL Sikkerhetsregel Hvis man ikke overholder denne regelen kan det føre til død eller alvorlig skade FORSIKTIG Sikkerhetsregel Hvis man ikke overholder denne regelen kan det føre til personskader PASS PÅ Hvis man ikke overholder d...

Страница 92: ...er beregnet for Ikke bruk produktet i fuktige eller våte omgivelser eller i områder hvor det er fare for gass eller støveksplosjon Vedlikehold og reparasjoner må kun utføres av fagfolk som er kjent med farene hhv gjeldende forskrifter 2 2 Sikkerhet ved installasjon av produktet ADVARSEL Den elektriske installasjonen skal bare tilkobles av en fagperson i hen hold til nasjonale forskrifter Ved ufagk...

Страница 93: ...er du tomme rør hhv ledningsgjennomføringer Ikke legg ledninger løst eller skarpt bøyd på materiell som leder elek trisk strøm metall Ikke trekk i ledninger Ikke legg vekselstrømsledninger og likestrømsledninger sammen i den samme ledningskanalen tomrør Fest ledningene godt 2 3 Sikkerhet ved bruk av produktet ADVARSEL Bruk produktet kun når kapslingen og ledningene er uskadd Ved arbeid på produkte...

Страница 94: ...ttdelen er tillatt for kontinuerlig drift 5 Teknisk beskrivelse Svitsjenettdelen kan tilkobles til en ekstern strømforsyning SMP301 03 bare Svitsjenettdelen kan tilkobles til et batteri Den integrerte prioritetskoblingen skifter automatisk fra batteri til nettdrift når en ekstern strømforsyning er tilgjengelig I nettdrift gjør svitsjenettdelen tilgjengelig en konstant likespenning på 12 7 V til fo...

Страница 95: ...ruppe 2 maks 15 A 3 Pluggsikring F3 for utgang gruppe 3 maks 15 A 4 Pluggsikring F4 for utgang gruppe 4 maks 15 A 5 Pluggsikring F5 for utgang gruppe 5 maks 15 A 6 Flatplugg P5 6 3 mm for gruppe 5 7 Flatplugg P4 6 3 mm for gruppe 4 8 Flatplugg P3 6 3 mm for gruppe 3 9 Flatplugg P2 6 3 mm for gruppe 2 10 Flatplugg P1 6 3 mm for gruppe 1 11 4x flatplugg P7 6 3 mm felles jordtilkobling ...

Страница 96: ...ruppe 3 maks 5 A 4 Pluggsikring F4 for utgang gruppe 4 maks 5 A 5 Pluggsikring F5 for utgang gruppe 5 maks 10 A 6 3x flatplugg P5 6 3 mm for gruppe 5 7 3x flatplugg P4 6 3 mm for gruppe 4 8 Flatplugg P3 6 3 mm for gruppe 3 9 Flatplugg P2 6 3 mm for gruppe 2 10 Flatplugg P1 6 3 mm for gruppe 1 11 10x flatplugg P7 6 3 mm batteritilkobling felles jordtilkobling 12 2x flatplugg P6 for batteriets pluss...

Страница 97: ...yningen må ikke monteres i støvete omgivelser Monteringsstedet må være godt luftet Ved installasjon i lukkede rom må man sørge for skikkelig lufting Ta hensyn til minsteavstanden rundt koplingsstrøm forsyningen fig 3 side 4 Lufteåpningene må være frie Ved omgivelsestemperaturer som er høyere enn dem som er nevnt ovenfor f eks i motor eller varmerom direkte sollys kan det på grunn av egenoppvar min...

Страница 98: ... og løft av dekselet fig 4 2 side 5 Koble til plusspolen på forbrukeren til flatstiftplugg P1 P5 fig 1 6 10 side 3 Koble minuspolen til forbrukerne til en av flatstiftpluggene P7 tilfeldig pinne fig 1 11 side 3 Koble vekselstrømtilkoblingskabelen til vekselstrømpluggen Sikre alle kabler med strekkavlastning Flatstift plugg Sikring Sikringsbelegg Maks tillatt strømstyrke P1 F1 10 A 15 A P2 F2 10 A ...

Страница 99: ... en av flatstiftpluggene P7 tilfeldig pinne fig 2 11 side 3 Koble plusspolen til batteriet til en av flatstiftpluggene P6 fig 2 12 side 3 Koble minuspolen til batteriet til en av flatstiftpluggene P7 tilfeldig pinne fig 2 11 side 3 Koble vekselstrømtilkoblingskabelen til vekselstrømpluggen Forsikre deg om at kabellengden mellom batteri og koplingsstrømforsyning er på maks 2 meter Sikre alle kabler...

Страница 100: ... slå på sikringen eller skifte ut pluggsik ringen 7 1 Bruke overspenningsvern ekstrautstyr Det valgfrie overspenningsvernet Art nr 9106505815 kobles foran svitsjenettde len Overspenningsvernet kobler fra turledningen når inngangsspenningen overskri der ca 270 V Sjekk om den røde LED en fig 5 1 side 5 lyser Hvis den røde LED en lyser har det vært en overspenning Vent 20 30 minutter Overspenningsver...

Страница 101: ...enettdelen igjen Sett svitsjenettdelen i drift igjen Hvis pluggsikringenutløser på nytt må du kontakte produsentens filial i ditt land du finner adressene på baksiden av veiledningen eller din faghandler 8 Pleie og rengjøre svitsjenettdelen A Rengjør svitsjenettdelen ved behov med en fuktig klut MERK Med plassering av pluggsikringene konfigureres produsentspesifikke funksjoner Ved skifte av en plu...

Страница 102: ...2 V utgangen f eks fig 1 1 side 3 er defekt Den røde LED en ved siden av pluggsikringen lyser Skift den ut med en likeverdig pluggsikring Svitsjenettdelen har koblet ut via over spenningsvernet Den røde LED en fig 5 1 side 5 lyser Overspenningsvernet tilbake stiller seg automatisk når spenningen ligger på et godkjentnivå Ellerskontakterdu en fagelektriker 12 V utganger blirikkeforsynti batteridrif...

Страница 103: ...rkulerings stasjon eller hos din faghandler 12 Tekniske spesifikasjoner SMP301 02 SMP301 03 Art nr 9106504643 9106504717 Utførelse uten relé med relé ved ekstern 12 V forsy ning er alle utganger spenningsførende Nominell inngangsspenning 230 Vw 12 Vg Kontinuerlig utgangseffekt 350 W Utgangsspenning 12 7 Vg Strømstyrke 27 A Omgivelsestemperatur 10 C til 40 C Kapsling Kapslingsgrad 20 Mål L x B x H ...

Страница 104: ...2 1490 64 9 622 1573 Mail customerservices dometic co nz NORWAY Dometic Norway AS Østerøyveien 46 N 3232 Sandefjord 47 33428450 47 33428459 Mail firmapost dometic no POLAND Dometic Poland Sp z o o Ul Puławska 435A PL 02 801 Warszawa 48 22 414 3200 48 22 414 3201 Mail info dometic pl PORTUGAL Dometic Spain S L Branch Office em Portugal Rot de São Gonçalo nº 1 Esc 12 2775 399 Carcavelos 351 219 244 ...

Отзывы: