13
CONTAINER DURING THE FIRST CYCLE.
The first few cycles may have small cubes due to air
trapped in the water lines. The first container of ice
cubes should be dumped if the water system has been
winterized or not used for several weeks.
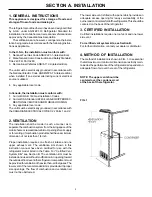
4. HOW TO ADJUST SIZE OF ICE CUBES
If the ice maker has run through several cycles and the
cubes are to small or sticking together, adjustments is
necessary on the amount of water entering the mold. To
adjust the amount of water entering the mold, remove the
protective cover from the ice maker mechanism (See FIG.
13).
To increase the size of the cubes turn the adjusting screw
counterclockwise. To decrease the size of the ice cubes,
turn the adjusting screw clockwise.
CAUTION: DO NOT turn the screw more than one turn at a
time. The ice maker should be allowed to cycle several
times before another adjustment is made. Be sure to replace
protective cover on the cycle after adjustments have been
made.
SECTION E. ICE MAKER OPERATING INSTRUCTIONS
1. WATER CONNECTION
The water supply system must have a minimum pressure of
15 psig and maximum pressure of 100 PSI. A water line 1/
4 inch in diameter shall be used to the water valve connection
at the rear of the refrigerator. The water line must have a
manual shutoff valve placed where it is easily accessible,
and connected to only the cold water supply.
2. 120 VOLT AC ELECTRICAL CONNECTION
The ice maker is equipped with a three-prong (grounded) plug
for protection against shock hazards, and should be plugged
directly into a properly grounded three-prong receptacle. DO
NOT cut or remove the grounding prongfrom this plug. The
free length of the cord is 2 feet and therefore recommended
that the receptacle be located to the right side of the
refrigerator (viewed from the rear) and approximately 6
inches from the floor. This allows easy access through the
vent door. The cord should be routed to avoid direct contact
with the burner cover, flue cover or any other components
that could damage the cord insulation.
3.
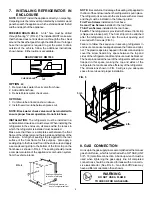
HOW TO OPERATE THE ICE MAKER
The refrigerator must be allowed to precool properly before
starting the ice maker. The refrigerator has to be connected
to 120 volts AC before the ice maker can operate. The water
line manual shutoff valve must be open. To start the ice
making, move the ice level bail arm to down position, see
FIG. 12. To shut off the ice making, move the ice level bail
arm to fully up position, see FIG. 12.
When the ice maker thermostat senses the preset tempera-
ture for ejection of the ice cubes, the fingers will start to rotate
dumping any ice cubes and filling the mold with water.
When storage container is full of ice, the ice level bail arm
can not return to the down position. This will stop further
production of ice until the container is emptied and the bail
arm is return to the start position.
The absorption system will keep the compartment at the
proper temperature for storage of ice. Ice making is acceler-
ated if the temperature is set to the coldest position. It is a
good idea to do this a few hours before an anticipated need
for ice.
NOTE: IF THE ICE MAKER WAS CLEANED AND DRAINED,
NO ICE CUBES WILL BE DUMPED INTO THE STORAGE
All installations, adjustments and repair of
the Ice Maker must be done by a qualified
technician.
Ice level
bail arm
Down
Position
FIG. 12
FIG. 13
5. If you plan to put the RV into winter storage or continue
its use in temperatures below 32°F/0°C without the use of
heat strip/tape (on the refrigerator water solenoid valve and
its outlet tube), the ice maker should be drained to prevent
component damage and leaks.
CAUTION
: The heat strip/tape must be approved for
use on polyethylene tubing rated at 100 PSI max. at
70°F., maximum temperature 125°F.
Follow these steps:
1. Shut off water supply valve to ice maker.
2. Place a shallow pan under water solenoid valve.
3. Remove inlet fitting to ice maker water solenoid valve. Drain
water from the supply line.
4. Remove the plastic nut and water line from outlet side of water
solenoid valve. Drain water from the line.
5. Cycle ice maker several times while blowing compressed air
through water solenoid valve. Be sure all water is out of the
solenoid.
6. Reconnect and tighten lines on water solenoid valve. Leave
the water supply turned off until temperatures are above 32°F/
0°C.
7. Dry out ice maker mold assembly with soft cloth. Place bail
arm in UP/OFF position.


