11
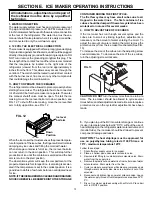
10) Reinstall burner, being careful that the end of the
burner fits into the slot on the burner bracket. Check
to make sure slots are centered under the flue tube
and the thermocouple is positioned properly (tip of
thermocouple extends over two slots of burner).
11) Be sure to reconnect the wire to high voltage elec-
trode. Check the electrode for proper location and
gap. (See FIG. 11).
G. CLIMATE CONTROL
During the summer months of high temperatures and humid-
ity, the metal frame between the freezer and fresh food
compartments may have water droplets forming. The num-
ber of water droplets will increase if the vehicle isn't air
conditioned during these months.
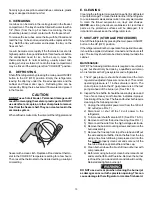
FIG. 10
GAS EQUIPMENT ASSEMBLY
This refrigerator comes standard with a 12 volt (DC) climate
control that will evaporate the water droplets when they form.
To have this climate control on, you position the switch (See
"F", Fig. 9) located behind freezer door on the panel under
the freezer to ON. The climate control can be left on
continuously or only used when temperatures require it.
NOTE: The climate control will draw 12 volts DC power
continuously when in the ON position. It should be turned
OFF when a charging source is not available.
Most LP gas appliances used in recreational ve-
hicles are vented to the outside of the vehicle. When
parked close to a gasoline pump, it is possible that
the gasoline fumes could enter this type of appli-
ance and ignite from the burner flame, CAUSING A
FIRE OR AN EXPLOSION.
FOR YOUR SAFETY, when refueling, shut off all LP
gas appliances which are vented to the outside.
BURNER T UBE
BURNER JET
SPARK
ELECTRODE
THERMOCOUPLE
BURNER MOUNT ING SCREW S
PRESSURE T EST P ORT
SOLENOID VA LVE
MANUAL SHUT -OFF VA LVE
INLET F ITTING
CLEAR BLUE
COLOR OF FLAME
12) Turn on manual gas shutoff valve and check all
fittings for leaks.
ELECTRODE
BURNER TUB
1/8" TO 3/16"
(3-5 mm)
13) Connect 120 volt power cord to the outlet and
reconnect or turn on the 12 volt DC power.
14) Check LP gas safety shutoff. See
Section A. Instal-
lation, Item 9. Testing LP Gas Safety Shutoff.
FIG. 11


