background image

Disposal

RCD10.5XES

EN

36

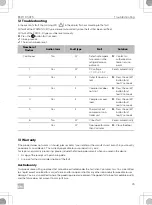
New Zealand only

This warranty policy is subject to the conditions and guarantees which are mandatory as implied by the Consumer 
Guarantees Act 1993(NZ).

Local support

Please find local support at the following link address: dometic.com/dealer

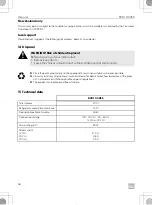
14  Disposal

!

15  Technical data

WARNING! Risk of child entrapment

Before disposing of your old product:
• Remove any doors.
• Leave the shelves in the product so that children cannot climb inside.

Place the packaging material in the appropriate recycling waste bins wherever possible.

Consult a local recycling center or specialist dealer for details about how to dispose of the prod-
uct in accordance with the applicable disposal regulations.

The product can be disposed free of charge.

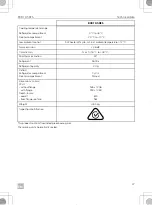
RCD10.5XES

Total volume

200 l

Refrigerator compartment volume

159 l

Freezer compartment volume

40.6 l

Connection voltage

100 – 240 V

w

, 50 – 60 Hz

12 V

g

 or 24 V

g

Power rating (AC)

85 W

Rated current
12 V

g

24 V

g

240 V

w

9.5 A

4.6 A
0.5 A

Содержание RCD10.5XES

Страница 1: ...RCD10 5XES Compressor refrigerator Installation and Operating Manual EN REFRIGERATION 10 SERIES...

Страница 2: ...is manual is protected by copyright and design law The underlying technical design and the products contained herein may be protected by design patent or be patent pending The trademarks mentioned in...

Страница 3: ...an injury to yourself and others damage to your product or damage to other property in the vicinity This product manual including the instructions guide lines and warnings and related documentation ma...

Страница 4: ...t outlets or portable power supplies at the rear of the refrigerator Plug the device to sockets that ensure proper connection especially when the device needs to be earthed Fire hazard For refrigerato...

Страница 5: ...njury Health hazard To avoid a hazard due to instability of the refrigerator it must be fixed in accordance with the installation instructions Do not use mechanical devices or other means to accelerat...

Страница 6: ...t the device is sufficiently far away from walls and other objects so that the air can circulate 2 3 Safety when operating D DANGER Failure to obey these warnings will result in death or serious injur...

Страница 7: ...ventilation so that the heat generated during operation can dissipate Ensure that the refrigerator is sufficiently far away from walls and other objects so that the air can circulate Do not fill the...

Страница 8: ...dstuffs and storing frozen foodstuffs The device is suitable for instal lation into caravans motor homes or boats The device is designed to be operated from a 12 V DC or 24 V DC on board supply as wel...

Страница 9: ...rations to the product without express permission from the manufacturer Use for purposes other than those described in this manual Dometic reserves the right to change product appearance and product s...

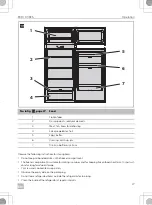
Страница 10: ...reezer compartment 1 2 Freezer compartment shelf 1 3 Control and display elements 1 4 Refrigerator shelf 3 5 Refrigerator compartment 1 6 Fruit and vegetable section 1 7 Freezer compartment door 1 8 R...

Страница 11: ...at the refrigerator is level 3 Install the refrigerator so that it is easily accessible for service work easy to de install and install and can be eas ily removed from the vehicle 4 Install the refrig...

Страница 12: ...acks while operating 2 Install the refrigerator so that it is protected from excessive heat as this leads to poor performance and increases the power consumption of the refrigerator 3 Perform the elec...

Страница 13: ...e lower air inlet vent LS300 flush to the vehicle floor Install the upper air outlet vent LS300 with the top of the vent no lower than the top of the refrigerator Higher than the refrigerator is allow...

Страница 14: ...oor 2 Install a roof vent instead of a rear upper air outlet vent Install the roof vent fig 4 2 directly above the back of the refrigerator as far as this is possible If needed use an air duct to inst...

Страница 15: ...er hose 1 To avoid damage to the drain water hose position the hole for the drain water hose in a way that the hose does not kink 2 Drill a hole through the vehicle floor at the rear of the refrigerat...

Страница 16: ...ake a cut out in the wall to fit an appropriate upper and lower vent system choose LS300 check the dimen sions required for the vent See chapter Installation location on page 11 No in fig 6 page 16 De...

Страница 17: ...rame is water resistant fig 7 3 Insert the installation frame and screw it down tightly fig 8 Use all the fixing holes for this 4 Fit the ventilation grille 1 and 2 in fig 9 5 Insert the slider and lo...

Страница 18: ...e roof Refer to the roof vent instruction manual for the required dimensions When doing so observe the information see chapter Installation location on page 11 2 Ensure the installation frame is water...

Страница 19: ...ng the refrigerator I 1 Push the refrigerator firmly into its final location with the front flange sitting hard against the recess front WARNING Electrocution hazard Only screw through the bushes buil...

Страница 20: ...C A The refrigerator can be operated with a 12 V or 24 V DC voltage supply For safety reasons the refrigerator is equipped with an electronic system to prevent the polarity being reversed This protect...

Страница 21: ...ccording to the figure above Legend to the figure A 2 Before starting up the device for the first time check whether the operating voltage and the battery voltage match see type plate 12 V 24 V Cut of...

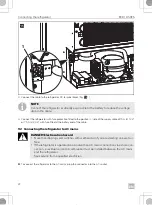
Страница 22: ...o connect the refrigerator to the AC mains plug the connector into the AC socket NOTE Connect the refrigerator as directly as possible to the battery to reduce the voltage drop in the cable DANGER Ele...

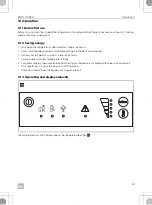
Страница 23: ...d to cool down first before placing it in the device to keep cool Defrost your refrigerator as soon as a layer of ice forms Avoid unnecessarily low temperature settings For optimal energy consumption...

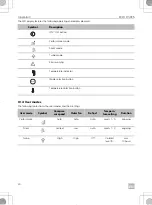
Страница 24: ...Description ON OFF button Performance mode Silent mode Turbo mode Error warning Temperature indicator Mode selection button Temperature selection button User mode Symbol Compres sor speed Outer fan D...

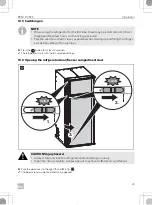
Страница 25: ...ocked and can be opened NOTE When using the refrigerator for the first time there may be a mild odor which will disappear after a few hours Air the living space well Park the vehicle so that it is lev...

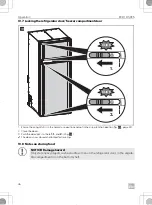
Страница 26: ...the airing function position fig m page 33 2 Close the doors 3 Push the door locks to the left 1 and 2 in fig h The door is now closed and locked for traveling 10 8 Notes on storing food A NOTICE Dama...

Страница 27: ...le for long term food storage Pack raw and cooked items separately Observe the expiry date on the packaging Do not leave refrigerated items outside the refrigerator for too long Clean the inside of th...

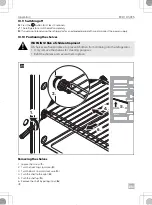
Страница 28: ...oning the shelves Removing the shelves 1 Loosen the screw 1 2 Turn the front ring clockwise 2 3 Turn the back ring anti clockwise 3 4 Push the shelf to the right 4 5 Push the shelf up 5 6 Remove the s...

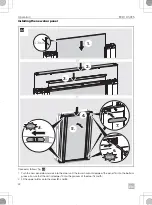
Страница 29: ...RCD10 5XES Operation EN 29 Refitting the shelves Refit the shelf in the reverse order 10 11 Replacing the door panel Removing the door panel...

Страница 30: ...Operation RCD10 5XES EN 30 4 5 3 CLICK CLICK 1 2 6 7 k...

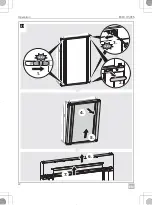
Страница 31: ...oceed as follows fig k 1 Push the door locks to the right 1 2 Remove the door lock plates 2 3 Push the hinge side locks to the left 3 4 Tilt the door 4 5 Remove the door 5 6 Remove the upper plates 6...

Страница 32: ...ig l 1 Push the new panel downwards into the door until the lower horizontal edge of the panel fits into the bottom groove Ensure that the vertical edges fit into the grooves of the door frame 1 2 Fit...

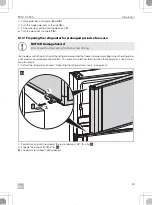
Страница 33: ...igerator door and the freezer compartment door when the refrigerator is not used for a prolonged period of time This prevents mold from forming when the refrigerator is not in use or put into storage...

Страница 34: ...ommended The freezer compartment will require periodic manual defrosting recommended if the frost layer is more than 3 mm A 1 Disconnect the power supply 2 Empty the contents 3 Put a cloth in the comp...

Страница 35: ...ot be excluded under the Australian Consumer Law You are entitled to a replacement or refund for a major failure and for compensation for any other reasonably foreseeable loss or damage You are also e...

Страница 36: ...eave the shelves in the product so that children cannot climb inside Place the packaging material in the appropriate recycling waste bins wherever possible Consult a local recycling center or speciali...

Страница 37: ...control 5 W heater off cycle cut in at ambient temperature 12 C Noise emission 36 dB Climatic class N or T 16 C to 43 C Short term inclination 30 Refrigerant R600a Refrigerant quantity 34 g Defrost Re...

Страница 38: ......

Страница 39: ......

Страница 40: ...AL SALES OFFICE dometic 0 0 s YOUR LOCAL DEALER dometic com dealer YOUR LOCAL SUPPORT dometic com contact dometic com 1 01 1 0 4 0 1 1 2 2 1 2 9 0 DOMETIC GROUP AB 3E 0 1 4 4445103493 54 695 MAW40A 20...

Отзывы: