background image

7


Y

Y

Y

Y

Y

English

L-2347K Installation

Controls

Two types of controls are used with these self-contained
units. Model ASCF7 has a built-in mechanical control. All
other models use the SMXir digital keypad/display which is
sold separately.

If you have model ASCF7, then read the below section
“Mechanical Controls” and ignore all information on the
SMXir control. Review the sections “Troubleshooting” and
“System Maintenance” for future reference.

If your system uses the SMXir digital keypad/display, then
you may skip the “Mechanical Controls” section and start
with the section “SMXir Controls”, reading through to the end
of this manual.

Mechanical Controls

The mechanical control on model ASCF7 is built-in and
requires no additional installation. To operate the mechanical
control, follow these instructions:

1. Turn power on to the system.

2. Set the thermostat to the coldest setting by rotating it fully

clockwise.

3. Set the FAN/COOL selector switch to HI COOL.

4. Close all doors and windows to your sleeper compart-

ment.

5. Once the temperature reaches a comfortable level, rotate

the thermostat slowly counterclockwise, stopping at the
point where the unit cycles off. That is now the setpoint.

The fan will run faster on HI COOL and slower on LO COOL
as the system cycles on and off in the cooling mode. Or, if
you just want the fan only, then choose the LO FAN or HI
FAN settings. Model ASCF7 with the mechanical control
does not supply heat.

SMXir Controls

The SMXir digital keypad/display may be mounted in any
convenient location, on a bulkhead or in a cabinet or closet,
for instance. Choose a location that is easy to reach, but not
in the way of daily routines. Make sure that the mounting
location is within the display cable (CXP) length of the A/C
unit. Route the CXP cable prior to mounting SMXir control.

Use the enclosed instructions for mounting the SMXir. Drill a
hole for the CXP cable to feed through. Mount the display
backing plate centered over that hole. Run the cable through
the hole and plug it into the display. Then snap the display
onto the backing plate, being careful not to crimp the cable.

The other end of the CXP should be plugged into the SMX
circuit board/elec box socket marked “DISPLAY”. The other

cable that is plugged into the SMX circuit board/elec box is
the TSEP (temperature sensing element). That cable is
mounted on the unit in front of the evaporator coil in the
return air stream and is plugged into the socket marked
“TEMP”. CXP cables are available in a variety of lengths,
please contact your dealer if need be. Although the CXP
looks like a standard telephone cable, it is not; phone cables
will not work as a display cable. Access the elec box by
removing the panel on the end of the unit, above the cable
feed-thru holes.

Warning

Make sure all power is off before opening any
electrical box.

Warning

The SMX interconnect (CXP) and temperature sensor
cables (TSEP) transmit low voltage DC signals, and
outside interference can affect their operation. Do not
route these cables beside A/C power cables, high
voltage wiring, or antenna wires. Keep the cable runs as
short as possible to reduce the chance of interference.

Wiring The Unit

Warning

Care must always be exercised when dealing with
electricity. Wiring should be done only by a qualified
technician. Contact an electrician if you have any
questions.

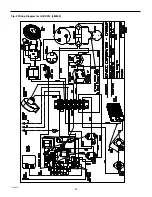
Refer to the wiring diagrams in the back of this manual or the
diagram that is located inside the electrical panel of the unit.
The unit should be wired according to power requirements
given on the data plate and per NEC recommendations. The
unit must alwasy be grounded. Always refer to NEC or state/
local codes for further wiring recommendations.

Ducting The Supply Air

The supply air grill should be mounted in a place that will
allow for the best air distribution, preferably up high. Locate
the best place to mount the grill and verify that you have
enough duct to cover the length between the unit and the
grill. Cut out for the grill, and mount securely. Use the large
hose clamps to secure the duct to the unit and to the back of
the grill. Air discharged through low-mounted grills should be
directed upward by tuning the louvers 45° up.

Содержание Kohler 7APU

Страница 1: ...Heavy Duty Truck Auxiliary Self Contained Heating Air Conditioning System Models 7APU TP 6512 2 07a Operation and Installation by ...

Страница 2: ......

Страница 3: ...r On 11 System Off 11 Selecting Setpoint 11 Displaying Temperature 11 Cool Mode 11 Heat Mode 11 Automatic Changeover 11 Manual Fan Speed Control 11 Automatic Fan Speed Control 11 Adjusting Brightness 11 Using The Humidity Control Routine 11 Anti Ice Routine 12 Programming the SMXir System 12 Factory Memory Reset 12 Fahrenheit Celsius Display 12 Compressor Differential 12 Fan Response Differential ...

Страница 4: ...peratures The unit is designed for full capacity at 95 F 35 C outside temperature If the temperature rises above this the performance of the unit will drop However the unit should still provide some cooling even in temperatures as high as 125 F 52 C Heat is provided by an electric heat element and heat output is not affected by outside temperature These systems are designed to cool or heat most co...

Страница 5: ...nical controls In addition over 20 programmable functions allow the user to customize the system to suit the specific needs of their environment The SMXir System consists of the following components Power Logic P L board Monitors and controls all functions of the air conditioning unit Keypad Display A 10 button user interface with a digital readout and LED indicators Temperature Sensing Element Ai...

Страница 6: ...ystem for Truck Sleepers Installation Required Tools Tools that will aid in installation drill and bits 1 5 8 hole saw reciprocating saw with metal blades Phillips and straight blade screwdrivers measuring tape and Teflon tape or equivalent Choosing The Correct Place For Your Unit The self contained unit is easier to install than the remote system but it will take up more room under the bunk A rem...

Страница 7: ...the hole and plug it into the display Then snap the display onto the backing plate being careful not to crimp the cable The other end of the CXP should be plugged into the SMX circuit board elec box socket marked DISPLAY The other cable that is plugged into the SMX circuit board elec box is the TSEP temperature sensing element That cable is mounted on the unit in front of the evaporator coil in th...

Страница 8: ...ed Fashion the hose such that is forms a trap such as a plumber s running trap The trap will help keep fumes and bugs out by providing a water seal Installing the Return Air Grill Install the return air grill so that the path between the grill and the coil face of the unit is open and unrestricted The path should not be any smaller in square inch area than the size of the coil face Place the grill...

Страница 9: ...us 8 OFF Key Turns system off Note that the data display remains on You can continue to adjust setpoint display temperature readings and activate the manual fan to circulate air while the system is in the OFF mode 9 Cool Mode Indicator Lights when you press the COOL key to select the cooling mode 10 Heat Mode Indicator Lights when you press the HEAT key to select the heating mode 11 COOL Key Turns...

Страница 10: ...at the keypad display In addition to the standard keys the SMXir remote also has two quick hit buttons that allow easy access to the humidity control program and the automatic changeover mode The remote control has three buttons that are not used on this system Aux Heat Aux Heat Auto Switchover and Aux 1 The SMXir remote control must be pointed at the SMXir keypad display which has the IR remote r...

Страница 11: ...tem is in the cooling mode and the compressor is running When the compressor cycles off the Cooling Indicator goes off but the Cool Mode Indicator stays on Heat Mode Press the HEAT key to select HEAT Mode The Heat Mode Indicator will light to show that you have selected the heating mode The Heating Indicator will be lit whenever the system is in the heating mode and the electric heat element is en...

Страница 12: ...program the system Factory Memory Reset You can use the memory reset sequence to restore all programmed functions to the factory default settings To restore programmed functions to factory setting Press OFF SET and FAN simultaneously Press SET After a delay the memory will be reset from stored values After another delay the display will come back on nor mally Fahrenheit Celsius Display Factory Def...

Страница 13: ...ase the low fan speed setting in your sleeper compartment to minimize fan noise To adjust low fan speed Enter the programming mode Press OFF Press SET Press DOWN and SET simultaneously The current low speed reference number will be displayed factory set at 32 Press UP or DOWN to raise or lower speed reference number Press OFF to exit the programming mode Hint For most efficient operation of your s...

Страница 14: ... appears as 95 100V as 00 and 120V as 20 For 230V systems the reading shows 1 2 of line voltage therefore 190V will appear as 95 200V as 00 and 230V as 15 To check accuracy or to calibrate turn off all on board AC loads and measure the line voltage with an accurate voltmeter If the SMX displayed voltage is not correct press the UP or DOWN key to enter the correct value Press OFF to exit the progra...

Страница 15: ...ps and remains below 100 volts 200 volts for a 230V system for more than three minutes the SMX shuts down the entire system The display will flash LO AC for low AC This is a sustained shutdown and the system will not resume operation even if the line voltage rises to normal levels To reset press the OFF key Hint For the low voltage shutdown function to work properly the SMX internal voltmeter shou...

Страница 16: ...aker is ON and not tripped Symptom Unit doesn t make cold air Suggested Solutions 1 Check the temp setpoint to make sure it is sufficient for the unit to cool 2 Check the evaporator air filter clean as needed 3 Make sure switch is set to COOL 4 Make sure evaporator blower is running by checking for airflow from the grill 5 Make sure that the condenser blower is running by checking for airflow unde...

Страница 17: ...xygen and will not support life Refrigerant gas tends to settle in the lowest areas of the compartment If you experience a leak evacuate all personnel and ventilate area Do not allow open flames in the area of leaks because refrigerant gas when burned decomposes into other potentially LETHAL gases Refrigerant components operate at high pressure and no servicing should be attempted without gloves l...

Страница 18: ...47K Fig 1 Unit Specifications Fig 2 Wiring Diagram for ASCDX14 080359 Fig 3 Wiring Diagram for ASCDX10 080343 Fig 4 Wiring Diagram for ASCEX7 080356 Fig 5 Wiring Diagram for ASCF7 080344 Description of Figures ...

Страница 19: ...10 10 000 2 00 12 50 20 87 28 25 92 00 12 90 19 10 ASCDX14 14 000 2 50 12 50 20 87 31 50 104 00 15 70 24 00 Full Load Amperage NOTES The system is rated to provide full capacity at 95 F 35 C outside temperature Actual performance will be affected by factors such as ambient temperature and humidity insulation direct sunlight and reflected heat Full Load Amperage at 120VAC Heat option not available ...

Страница 20: ...20 L 2347K Fig 2 Wiring Diagram for ASCDX14 080359 ...

Страница 21: ...21 L 2347K Fig 3 Wiring Diagram for ASCDX10 080343 ...

Страница 22: ...22 L 2347K Fig 4 Wiring Diagram for ASCDX7 080356 ...

Страница 23: ...23 L 2347K Fig 5 Wiring Diagram for ASCF7 080344 ...

Страница 24: ...isconsin 53044 Phone 920 565 3381 Fax 920 459 1646 For the nearest sales service outlet in the US and Canada phone 1 800 544 2444 KohlerPowerSystems com Kohler Power Systems Asia Pacific Headquarters 7 Jurong Pier Road Singapore 619159 Phone 65 6264 6422 Fax 65 6264 6455 by ...

Отзывы: