1
2
3
4
5
6
7
8
9
10
11
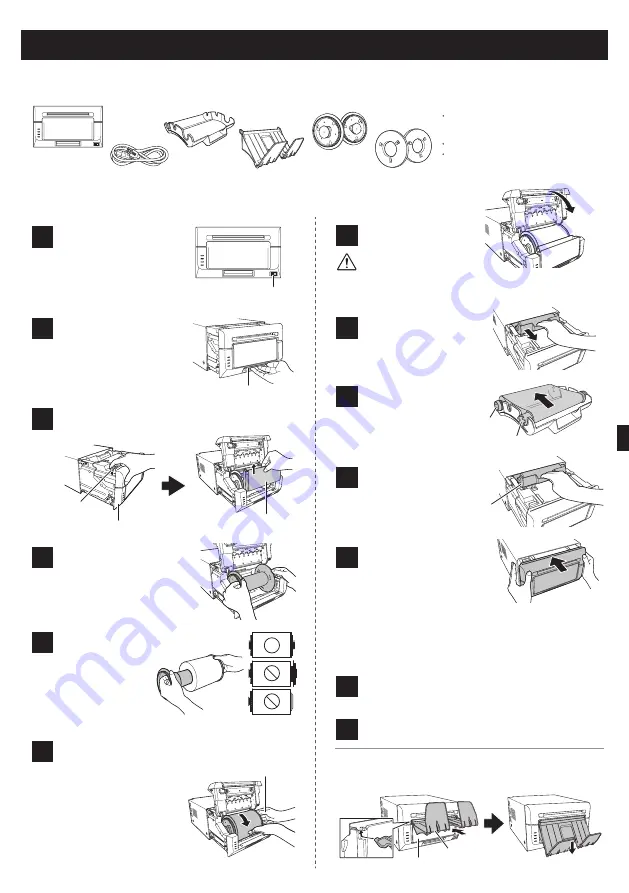
Use the opening lever to
open the lock, and then
pull out the mechanism
unit.
Remove the paper holder
from the printer.
Connect the power cord
(supplied) and the USB
cable, and make sure that
the ON/Standby switch of
the printer is turned ON.
Lift the paper lever, raise the front
cover and remove the scrap box.
Set the paper roll on
the paper holder.
Set the roll so that
there is no gap
between the paper
and the holder.
Set the paper holder in
the printer, and then
rotate the roll in the
direction of the arrow.
Insert the leading edge
of the paper until you
hear the buzzer sound.
The flashing LED
(orange) turns off.
Opening lever
ON/Standby
switch
Scrap box
Paper tray
Scrap box
Paper lever
Front cover
Hold the paper holder to
prevent it from turning
when rotating the paper.
Set the scrap box and
close the front cover.
Remove the ribbon
cassette from the
printer unit.
Set the new ribbon into
the ribbon cassette.
Rotate the roller in the
direction of the arrow
to take up the slack.
12
Install the printer driver.
For more information, refer to "Printer Driver User’s
Manual" including in the supplied CD-ROM.
Install the ribbon
cassette to the printer
unit.
Close the mechanism
unit.
13
Connect the printer to the computer with a USB
cable.
When using L or PC size paper, you may install the paper
tray to the scrap box.
When the mechanism unit is closed, the printer starts
paper initialization. (Five blank sheets are output.) Paper
initialization cuts off the outer layer of the paper that may
be dirty. Note that paper initialization is not carried out if
the printer ON/Standby switch is set to ON after the paper
is set.
Take-up
side
Supply
side
Install the cassette so
that the supply side is
at the front.
Printer installation
Checking the contents
Printer unit
Power cord
Ribbon
cassette
Paper holder
Paper tray
(for L and PC sizes)
L size spacer
Explanation booklet (this document)
For Safe Operation
Start up guide
CD-ROM
Printer Driver User's Manual
Paper tray installation
Make sure that the scrap box is installed when printing.
If not installed, your fingers may get caught in the moving
parts and be injured.
Caution
Start Up Guide
Before using the product, read “For Safe Operation” carefully.
Содержание DP620
Страница 20: ...1 3 2 3 Dai Nippon Printing Co Ltd DP DS620 1999 5 EC...
Страница 21: ...12 26 46...
Страница 22: ...USB USB USB USB USB 2 0 100 3 9 240 1 6 275 366 170 5 C 35 C 12 100 240 50 60 35 80...
Страница 23: ...1 2 3 4 5 6 7 8 9 10 11 USB ON Standby ON ON Standby 12 13 USB L PC ON Standby ON L PC L...
Страница 24: ......
Страница 25: ...12 kg...
Страница 26: ......
Страница 28: ...1 2 3 4 5 6 ON Standby L PC L CD ROM LED USB ON Standby ON...
Страница 29: ...7 8 9 10 11 12 13 5 ON Standby ON CD ROM USB L PC...
Страница 30: ......
Страница 31: ...12 kg...
Страница 33: ...1 USB ON Standby ON 2 3 4 5 LED 6 7 8 9 5 ON Standby ON CD ROM 10 11 12 13 USB ON Standby L PC L CD ROM L PC L...
Страница 34: ......
Страница 35: ...12kg 1 1...
Страница 37: ...1 USB ON Standby ON 2 3 4 5 LED 6 7 8 9 12 13 USB CD ROM 10 11 5 ON Standby ON ON Standby L PC L CD ROM L PC...
Страница 38: ......
Страница 39: ...12 kg...
Страница 41: ...1 ON Standby ON 2 3 4 5 LED 6 7 8 9 5 ON Standby ON CD ROM 10 11 12 13 USB ON Standby L L PC CD ROM L PC...
Страница 43: ......
Страница 44: ...Printed in JAPAN 70904640_00...


