background image

31

CARE AND MAINTENANCE

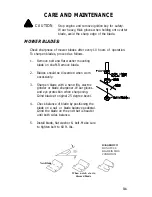
CAUTION

Stop engine and remove ignition key for safety.
Wear heavy, thick gloves when holding onto cutter
blade, avoid the sharp edge of the blade.

DANGEROUS!
DO NOT USE
BLADE IN THIS
CONDITION!

When notch starts,
    discard blade

New Blade

MOWER BLADES:

Check sharpness of mower blades after every 10 hours of  operation.
To sharpen blades, proceed as follows.

1.

Remove bolt and flat washer mounting
blade on shaft. Remove blade.

2.

Blades should be discarded when worn
excessively.

3.

Sharpen blade with a hand file, electric
grinder or blade sharpener. Wear gloves
and eye protection when sharpening.
Grind blade at original 25 degree bevel.

4.

Check balance of blade by positioning the
blade on a nail  or blade balance pedestal.
Grind the blade on the end that is heavier
until both sides balance.

5.

Install blade, flat washer & bolt. Make sure
to tighten bolt to 60 ft. lbs.

Содержание ZTR 2560

Страница 1: ...Model Year 2004 Model Year 2004 Model Year 2004 Model Year 2004 Model Year 2004 ZTR Model 2560 Model 2560 Model 2560 Model 2560 Model 2560...

Страница 2: ...ot a toy or a recreational vehicle Before you start to use the mower read the operator s manual carefully and become completely familiar with the controls The information contained in this manual appl...

Страница 3: ...12 Warranty Policy 13 Specifications 14 Seat Adjustment Instructions 15 Controls 16 19 Operation Instructions 20 28 Care Maintenance 29 38 Standard Service Parts List 39 Troubleshooting 40 41 Model 25...

Страница 4: ...IF IMPROPERLY OPERATED CAN CAUSE SERIOUS INJURY OR DEATH The most common causes of injury to the operator or bystander read and understand this manual to prevent injuries BLADE CONTACT TIP OVER RUN O...

Страница 5: ...s injury WARNING highlighted in orange indicates a potentially hazardous situation which if not avoided could result in death or serious injury CAUTION highlighted in yellow indicates a potentially ha...

Страница 6: ...up and thrown by the blade Be sure the area is clear of other people before mow ing Stop mower if anyone enters the area NEVER carry passengers Do not mow in reverse unless absolutely necessary Alway...

Страница 7: ...wear safety goggles or safety glasses withside shields when operating mower Data indicates that operators age 60 years and above are involved in a large percentage of riding mower related injuries The...

Страница 8: ...r Dixon ZTR never up or down Remove obstacles such as rocks tree limbs etc Watch for holes ruts or bumps Uneven terrain could overturn the mower Tall grass can hide obstacles Use slow speed Tires may...

Страница 9: ...t turn on slopes unless necessary and then turn slowly and gradually downhill if possible Do not mow near drop offs ditches or embankments The mower could suddenly turn over if a wheel is over the edg...

Страница 10: ...children out of the mowing area and under the watchful care of another responsible adult Be alert and turn mower off if a child enters the area Before and during backing look BEHIND and DOWN for small...

Страница 11: ...fire and explosion caused by static electricity Never fill containers inside a vehicle or on a truck or trailer bed with a plastic liner Always place contain ers on the ground away from your vehicle...

Страница 12: ...ting Never make adjustments or repairs with the engine running unless otherwise specified Grass catcher components are subject to wear damage and deterioration which could expose moving parts or allow...

Страница 13: ...be approved by Dixon Industries Inc 5 Battery Warranty limited to 90 days from date of purchase 6 Accessories Warranty grass catchers snow blades covers etc Limited to 90 days from date of purchase 7...

Страница 14: ...Valve Air Cooled Gasoline Vertical Shaft Aluminum Head and Crankcase with Cast Iron Liners Full Pressure Lubrication Full Flow Filter Pulse type Fuel Pump Fixed Jet Carburetor w Smart Choke Electronic...

Страница 15: ...15 SEAT ADJUSTMENT INSTRUCTIONS Model 2560 1 Grasp seat slide adjuster and move it into adjustment position 2 Slide seat forward or backward 3 Release seat slide adjuster Seat Slide Adjuster...

Страница 16: ...16 CONTROLS...

Страница 17: ...l levers toward you TURNING Turning is controlled by moving one control lever slightly forward or rearward of the other To turn left move left lever rearward of the right lever move right lever rearwa...

Страница 18: ...d operated parking brake is located on the left of the mower It is designed to hold the mower from moving and is not intended for use in stopping the mower while it is in motion To engage brake pull l...

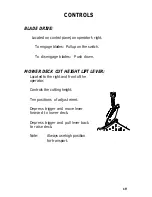
Страница 19: ...disengage blades Push down MOWER DECK CUT HEIGHT LIFT LEVER Located to the right and front of the operator Controls the cutting height Ten positions of adjustment Depress trigger and move lever forwa...

Страница 20: ...t knowledge of all controls used on the mower and making good judgements about the terrain to be mowed NEVER allow anyone to operate the mower with out complete knowledge of all controls and their fun...

Страница 21: ...ead engine manufacturer s operating and maintenance instructions 3 Discuss proper maintenance with your dealer 4 Check engine oil 5 Check fuel cap to be sure it is in place 6 Be sure parking brake is...

Страница 22: ...r your safety 1 The mower blades must be disengaged before the engine will start 2 The brake lever must be engaged upward position before engine will start 3 The engine will stop if the mower blade cl...

Страница 23: ...start when key switch is moved to the start position 2 In a safe area away from bystanders start the engine place throttle setting at maximum or full Engage the blade drive through the electric clutch...

Страница 24: ...urn to RUN position 4 Once engine starts to warm up slowly push choke control down to fully open position 5 Move throttle control lever to the wide open or maximum setting for actual operation of the...

Страница 25: ...R 2560 may require a partial choke setting to start even if the engine has been operated for a period of time 4 Engine must be operated at wide open or maximum setting to ensure adequate lubrication c...

Страница 26: ...og the underside of the deck and discharge area 3 If the grass is tall place the mower deck cut height lever inthe top or second notch Initially overlap cutting swaths instead of taking a full swath w...

Страница 27: ...f more than 1 3 of the total grass blade length Correct mowing height can reduce weeds and disease by 50 to 80 The following grass cut heights are based on adequate moisture conditions and normal that...

Страница 28: ...at between the fuel tank and hydro pumps To access release valves tilt seat plate forward Use a 5 8 wrench to rotate bolt counter clockwise two full turns to disengage pump Repeat procedure for opposi...

Страница 29: ...manifold area before each use Check air intake screen after each use Clean grass under deck after each use Check tire pressure every 10 hours Check mower blades for sharpness every 10 hours Clean air...

Страница 30: ...is a maintenance free battery and the fluid level cannot be checked OFF SEASON BATTERY STORAGE DO NOT remove battery from mower Clean top of battery and terminals with baking soda and water Identify...

Страница 31: ...harpen blades proceed as follows 1 Remove bolt and flat washer mounting blade on shaft Remove blade 2 Blades should be discarded when worn excessively 3 Sharpen blade with a hand file electric grinder...

Страница 32: ...g fins and fans of the pumps and wheelmotors are clean Excessive accumulation of oil dirt or trash may cause the transmissions to overheat NEVER WASH ACROSS TOP OF RESERVOIR WITH WATER OR STEAM Fill r...

Страница 33: ...the mower deck for a few minutes to disperse any water that may have accumulated in bearings pulleys or fans Note Allow mower to cool before washing If bearings are hot they will draw moisture inside...

Страница 34: ...l tank Replenish as needed with SAE 20W 50 motor oil DO NOT OVERFILL When checking the oil level be very careful to keep the reservoir clean Change the oil in the reservoir and hydrostat transmis sion...

Страница 35: ...the deck such as the tractor would be traveling in reverse E Attach a hoist to the deck lift bolt Lift the nose of the deck until the deck is standing vertical and the deck latch engages F Reverse pr...

Страница 36: ...36 CARE AND MAINTENANCE MOWER SHOWN IN OPERAT ION POSITIO N...

Страница 37: ...37 MOWER SHOWN IN SERVICING POSITION CARE AND MAINTENANCE...

Страница 38: ...he tractor to a hard level surface 4 Put the mower deck in the number 3 deck height position 5 Rotate the 2 outer spindles so the blades point out board 6 Adjust front hangers to level deck side to si...

Страница 39: ...L FILTER Refer to engine manufacturer s manual for recommenda tions regarding frequency of service required for engine oil changes and air filter maintenance Protect your engine investment use only or...

Страница 40: ...l line clogged clean fuel line and check fuel filter Faulty fuel pump consult dealer Spark plug wire loose or grounded check spark plug wires Spark plug s faulty or improperly gapped check spark plug...

Страница 41: ...OWER OR TRANSMISSION OVERHEATS Hydrostat transmission oil too low or high add oil or drain as needed Transmission damage consult dealer Transmission blowing oil out cap consult dealer 9 ENGINE STALLS...

Страница 42: ...42 NOTES...
Страница 43: ..._ ___________________ ___________________ ___________________ ___________________ ___________________ ___________________ ___________________ ___________________ ___________________ __________________...

Страница 44: ...IXON INDUSTRIES INC a BLOUNT International Inc Co P O Box 1569 Coffeyville Ks 67337 0945 620 251 2000 Model2560 PartNo 61935 0603 W W W W WARNING ARNING ARNING ARNING ARNING The engine exhaust from th...

Отзывы: