background image

4

Chapter 2: Camera Configuration

Chapter 2: Camera Configuration

Accessing the Camera’s Configuration Menu 
(Graphical User Interface)

The camera’s default IP address is 192.168.0.250, make sure the IP address of 
the computer accessing the camera is on the same network subnet before 
proceeding.

You can access the camera via a web browser or CAM-FINDER software. The 
following information outlines the instructions for each method. 

Installing CAM-FINDER Software

1.  Download the CAM-Finder installer file.
2.  Unzip the CAM-FINDER file to a location on the hard drive.
3.  Once unzipped, double click on the setup file to start the installation 

program.

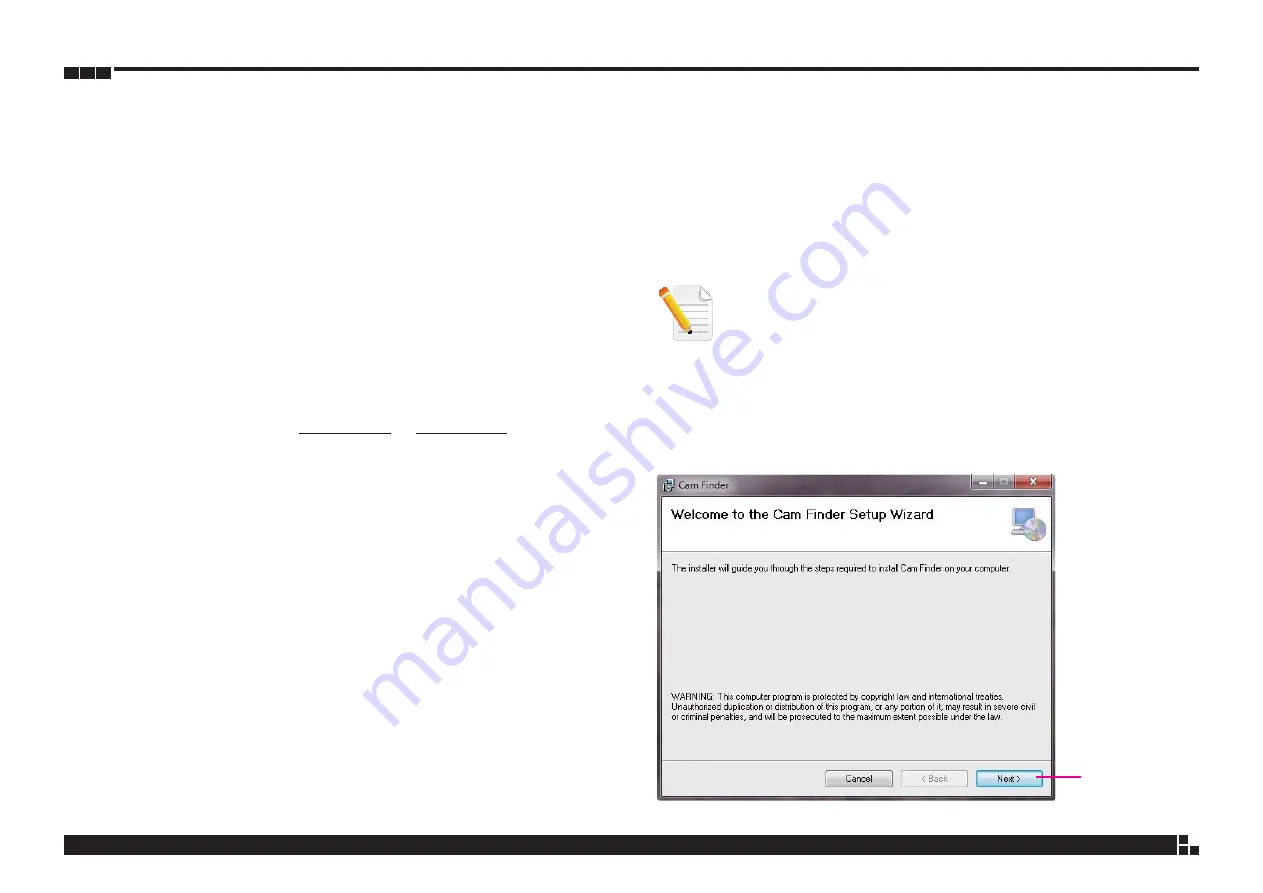
4.  Click the Next button on the welcome screen to continue.

Next button

Note: If CAM-FINDER is already installed, you can skip this section and continue 

to the next section CAM-FINDER on page 7. 

Содержание NBR124

Страница 1: ...User Manual Network Camera The manual is applied to the following model Model no Resolution Lens NBR124 2MP 30fps 2 8 12mm varifocal lens Note The manual is subject to change without notice ...

Страница 2: ...nfiguring the Camera s Setting 10 Browsing Through the Configuration Menu 11 Video Video Stream 12 Basic Settings 12 Camera Name 12 Primary Stream 1 12 Secondary Stream Stream 2 13 Third Stream Stream 3 13 Video Exposure 15 Auto Exposure 15 Manual Exposure 15 ICR Control IR Cut Filter 16 BLC Backlight Compensation 16 Digital WDR Wide Dynamic Range 16 Save 16 Video White Balance 17 White Balance Mo...

Страница 3: ...ime 26 Save 26 System Maintenance 27 Current Version Description 27 Specify the Firmware to Update 27 Restart Camera 27 Factory Default 27 Hardware Factory Default 27 System User Management 28 User List 28 Add Modify User 28 Access Level 28 System Log 29 Log 29 Clear Log File 29 Download Log File 29 Events Motion Detection 30 Setting up Motion Detection 30 Save 30 Event Tampering Detection 31 Tamp...

Страница 4: ...sed Maintaining CE compliance also requires proper cable and cabling techniques SAFETY INFORMATION Before installing and using the device note the following precautions ƒ Read all instructions carefully ƒ Follow all warnings and cautions in this manual ƒ Do not place the unit on an unstable surface cart or stand ƒ Do not use the camera in extreme temperature conditions Please use the camera within...

Страница 5: ...d Using your fingers can disconnect most of the connections It is recommended that you do not use needle nose pliers to disconnect connections as these can damage the soft metal or plastic parts of the connectors CONVENTIONS USED IN THIS MANUAL Warning Information about certain situations which if not observed can cause personal injury This will prevent injury to yourself when performing a task T ...

Страница 6: ...VI Preface PACKAGE CONTENTS The IR Indoor Mini Dome IP Camera package contains the following accessories NAME QUANTITY IP camera 1 Quick installation guide 1 Accessory pack 1 ...

Страница 7: ...roduct Introduction Overview Cable No Name Functional Description 1 Waterproof LAN RJ45 Connect to a router or switch on your network using RJ45 Ethernet cable Cat5e or better 100Mbps connection PoE supported class 3 PoE switch required n NBR124 ...

Страница 8: ... 1280x960 720P 1280x720 XGA 1024x768 SVGA 800x600 D1 720x480 VGA 640X480 2CIF 704x240 CIF 352x240 ƒ Frame rate 1920 x 1080 30 fps 1280 x 960 30 fps 1280 x 720 30 fps 1024 x 768 30fps 800 x 600 30 fps 720 x 480 30 fps 640 x 480 30 fps 704 x 240 30 fps 352 x 240 30 fps ƒ Bit rate H 264 500K 8Mbps Network ƒ Interface 10 100 Mbps Ethernet RJ 45 ƒ Supported protocols IPv4 HTTP SSL TCP IP UDP UPnP RTSP ...

Страница 9: ...nd insert the bolts into the drilled holes No Name 1 IP camera 2 Mounting screws 3 Expansion bolts 4 Placement sticker 5 Wall or ceiling surface 4 Align the IP camera to the expansion bolts then secure the camera to the surface with the screws included in the accessory bag 5 Connect the external cables to the IP camera according to the usage requirements 6 To adjust the camera angle to the desired...

Страница 10: ...ra via a web browser or CAM FINDER software The following information outlines the instructions for each method Installing CAM FINDER Software 1 Download the CAM Finder installer file 2 Unzip the CAM FINDER file to a location on the hard drive 3 Once unzipped double click on the setup file to start the installation program 4 Click the Next button on the welcome screen to continue Next button Note ...

Страница 11: ... desired installation folder Next button Browse button Disk Cost button User accounts 8 Click on the Next button to continue 6 To check the available drives you can install the software to and their available and required disk space please click on the Disk Cost button 7 Specify which user accounts on the computer can access the program the options are Everyone and Just me ...

Страница 12: ...mera Configuration Next button 9 Click on the Next button to begin installation Close button 10 Once the installation process is complete click on the Close button to finish A shortcut will be created on the desktop ...

Страница 13: ...Camera List The IE will be opened automatically 2 When the program is launched it will begin searching the network for IP cameras automatically the search will last for up to 90 seconds You can also manually search cameras by clicking on the Search button 3 Once the camera is discovered it will show the following information ƒ Model Name ƒ IP address ƒ MAC address ƒ UUID ƒ Serial Number ƒ Version ...

Страница 14: ...ox etc shortcut on the desktop 2 In the address bar type 192 168 0 250 default IP address of the camera and then press the Enter button 3 You will be prompted with a pop up window asking for login information type in Admin default login name and 1234 default password 4 Once logged in you will see the main screen Web Browser ...

Страница 15: ...ew Snapshot Takes a image snapshot from the camera you will be prompted to store the image file onto the computer s hard drive Start Stop Press to stop the live video press again to restart Viewer Views the live video of the camera Setup Options for configuring the IP camera ...

Страница 16: ...10 Chapter 2 Camera Configuration Configuring the Camera s Setting 1 To configure the camera s setting click on the Setup button on the main screen to enter the configuration menu Setup ...

Страница 17: ...ide of the interface clicking on them will open their corresponding sub menu on the right The following are the camera settings available on the left hand side ƒ Video Video Stream Exposure White Balance Basic Settings ROI Privacy Mask ƒ Network Basic FTP SMTP NTP RTSP ƒ System Date Time Maintenance User Management Log ƒ Events Motion Detection Tampering Detection ƒ Recording Video File FTP ...

Страница 18: ...on Configures the resolution of the video stream The available options are 1920x1080 1080P 1280x960 SXVGA 1280x720 720P 1024x768 XGA 800x600 SVGA and 720x480 D1 Bit Rate Configures the bit rate manually the range is 500 8000kbps Frame Rate Adjusts the frame rate of the video stream the range is 1 30FPS if H 264 is selected as the codec However if MJPEG is selected the range is 1 10FPS GOP Length C...

Страница 19: ...o disable or enable stream 3 as MJPEG Select OFF to disable stream 3 Resolution Configures the resolution of the video stream The available options are 640x480 VGA and 352x240 CIF Quality Configures the video quality of the stream The options are High Normal and Low Frame Rate Adjusts the frame rate of the video stream the range is 1 30FPS Note Please make sure to enable Stream 2 Codec is ON and s...

Страница 20: ... the image will be flipped horizontally then vertically Rate Control Configures the Rate Control mode as VBR variable bit rate or CBR constant bit rate for the stream Save Save button to apply the configurations click on this button once all the settings are confirmed for the new changes to take effect ...

Страница 21: ...Auto Exposure Configures the IP camera to adjust the exposure automatically based on the settings specified in Method EV Max Exposure Min Exposure Sensitivity and Max Gain Manual Exposure Options to adjust the camera s exposure time and gain manually ...

Страница 22: ...y color regardless of the current lighting level BLC Backlight Compensation Enables or disables backlight compensation function enable this option if an image in the camera is too dark Digital WDR Wide Dynamic Range Enables or disables WDR function enable this option if the camera is exposed to bright backlight glare or high contrast lighting You can specifiy the WDR constrast level from level 1 t...

Страница 23: ... automatically adjusts the white balance to suit the current lighting condition The sensitivity of Auto White Balance can be selected from the drop down menu You can also adjust the white balance manually through R G B gain the range is 0 4 4 0 Save Save button to apply the configurations click on this button once all the settings are confirmed for the new changes to take effect Video White Balanc...

Страница 24: ...or button to increase the value The default value is 128 Saturation Configures the color saturation of the image the range is 0 255 with 0 being the lowest saturation Press the button to decrease the value or button to increase the value The default value is 128 Sharpness Configures the sharpness of the image the range is 0 255 with 0 being the lowest sharpness Press the button to decrease the val...

Страница 25: ...le ROI function The default is OFF 2 Set the image quality of the ROI in the Level drop down menu the options are High or Low 3 Select the area to set the ROI by holding down the mouse button and drag to make a rectangular square release the button once the desired area is covered 4 Press the Save Window button and Save button for the setting to take effect 5 The ROI area will then be seen on the ...

Страница 26: ...the area to set the privacy mask by holding down the mouse button and drag to make a rectangular square release the button once the desired area is covered 3 Press the Save Window button and the masked area will be filled with black 4 Press the Save button to save all the settings 5 The masked area with the label Mask will then be seen on the video stream To delete the privacy mask area select OFF...

Страница 27: ...Static IP Address You can manually configure network settings including IP Address Subnet Mask Default Gateway and DNS server address HTTP Port Configures the HTTP port number of the web configuration menu Save Save button to apply the configurations click on this button once all the settings are confirmed for the new changes to take effect ...

Страница 28: ...fy the port number of the FTP server User Name Specify the login username for the FTP server Password Specify the login password for the FTP server File Upload Path Specify the directory that the camera will upload data to Save Save button to apply the configurations click on this button once all the settings are confirmed for the new changes to take effect ...

Страница 29: ...Specify the login username for the SMTP mail server Password Specify the login password for the SMTP mail server Sender Specify the email address of the sender Receiver Specify the email address to send the email when an event is triggered by motion detection Save Save button to apply the configurations click on this button once all the settings are confirmed for the new changes to take effect ...

Страница 30: ...ant to your location in the drop down list DST Check this option to enable automatic daylight saving or uncheck it for manual configuration of daylight saving The Start End date and time for daylight saving can be manually configured in the text boxes beneath the option Save Save button to apply the configurations click on this button once all the settings are confirmed for the new changes to take...

Страница 31: ...URL of stream 1 to 3 The range is 554 65535 ƒ Default URL of Stream 1 rtsp cameraIP 554 stream1 ƒ Default URL of Stream 2 rtsp cameraIP 8556 stream2 ƒ Default URL of Stream 3 rtsp cameraIP 8555 stream3 Save Save button to apply the configurations click on this button once all the settings are confirmed for the new changes to take effect ...

Страница 32: ...n to manually configure the date and time ƒ Synchronize with Computer Time Select this option to synchronize the date and time to the computer connected to the camera ƒ Synchronize with NTP Server Select this option to synchronize the date and time with a NTP server Save Save button to apply the configurations click on this button once all the settings are confirmed for the new changes to take eff...

Страница 33: ...C C C C C C U U CA A CA A A AU U U U U U O C O N N N N N N N T T T T T T TI I I I I I I IO O O O O O O CAUTION CAUTION During update please do not disconnect the network cable reset or power off the IP camera as you may damage the device Restart Camera Click this button to reboot the camera Factory Default Click this button to restore all the camera s setting back to factory default except IP addr...

Страница 34: ...d must be at least 3 and up to 33 characters retype the password to confirm then choose the access level for the account in the Authority option A total of ten accounts can be created for Admin Viewer Press the Add Modify User button once all the settings are confirmed for the new changes to take effect Access Level Admin Has full control read write over every configuration menu item Viewer Only h...

Страница 35: ...on System Log Log Records all the status information of the camera in list format when the camera is connecting to the PC Clear Log File Deletes all the records Download Log File Downloads the log file to the computer as a text file ...

Страница 36: ... box The border of the box will turn red indicating that it is selected You can select multiple boxes up to 5x5 boxes can be selected Press the Save Motion Area button to save the selected area 3 Select one of the following actions to perform when alarm is triggered ƒ OFF The stream will not be sent out ƒ FTP The stream will be uploaded to a FTP server ƒ SMTP The stream will be sent out by an emai...

Страница 37: ...s 10 600 Action Select one of the following actions to perform when tamper detection is triggered ƒ OFF The stream will not be sent out ƒ FTP The stream will be uploaded to a FTP server ƒ SMTP The stream will be sent out by an email Note Please refer to page 22 23 for more information about FTP and SMTP settings Save Save button to apply the configurations click on this button once all the setting...

Страница 38: ...ration Recording Video File AVI Format Selects which video format to store on the FTP server Save Save button to apply the configurations click on this button once all the settings are confirmed for the new changes to take effect ...

Страница 39: ...ttings of the Network section refer to page 22 Storage Setting Configures which file format to store on the FTP server the options are AVI or JPEG Save Save button to apply the configurations click on this button once all the settings are confirmed for the new changes to take effect ...

Отзывы: