Displays2go INTWHITWRD, Руководство пользователя
Товар Displays2go INTWHITWRD - это отличный выбор для вашего бизнеса. С помощью бесплатного руководства пользователя вы сможете легко установить и использовать этот продукт. Скачайте его с нашего сайта manualshive.com прямо сейчас и получите доступ к подробной информации о товаре.
Поделиться
Скачать


Отзывы:
Нет отзывов
Похожие инструкции для INTWHITWRD
CDT861M-NEW
Бренд: AAVARA Страницы: 12
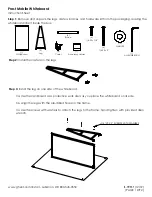
Prest Mobile
Бренд: Ghent Страницы: 2

WB55F1D1
Бренд: Westinghouse Страницы: 27

aquos PN-L603B
Бренд: Sharp Страницы: 4

aquos PN-L603B
Бренд: Sharp Страницы: 66

Webster IRP
Бренд: PolyVision Страницы: 115

DB578
Бренд: 3M Страницы: 2

WallDisplay 8000PD
Бренд: 3M Страницы: 52

8084i-G4-SMP
Бренд: SMART Страницы: 3

KAPP-IQ65-V2
Бренд: SMART Страницы: 12

Board 8000 series
Бренд: SMART Страницы: 14

Board 600 Series
Бренд: SMART Страницы: 14

Board 600i3
Бренд: SMART Страницы: 44

Board 685ix
Бренд: SMART Страницы: 48

Board MX
Бренд: SMART Страницы: 51

Board 6065
Бренд: SMART Страницы: 58

KAPP iQ 75
Бренд: SMART Страницы: 66

Podium 500 Series
Бренд: SMART Страницы: 70


