background image

Applies to:

 SMART Board™ 600 series interactive whiteboards

Overview

Introduction

Use this guide to help identify and resolve problems that may occur with your SMART Board 600 series interactive 
whiteboard. This guide assumes that you’re experiencing problems after a period in which the interactive 
whiteboard was working properly.

Most problems result from incorrect cabling, an incorrect computer setting, or software that’s improperly installed or 
configured. Use the flowcharts and tables in this guide to determine which component is causing the problem, and 
then take steps to correct it.

Resetting the Interactive Whiteboard

If your interactive whiteboard is behaving erratically (possibly because of a static discharge or power fade) you may 
be able to restore normal operation by resetting the interactive whiteboard. 

To reset your interactive whiteboard

You can reset the interactive whiteboard completely by disconnecting and then reconnecting the USB cable. 
This cycles the power off and back on, resetting all components of the SMART Board interactive whiteboard.

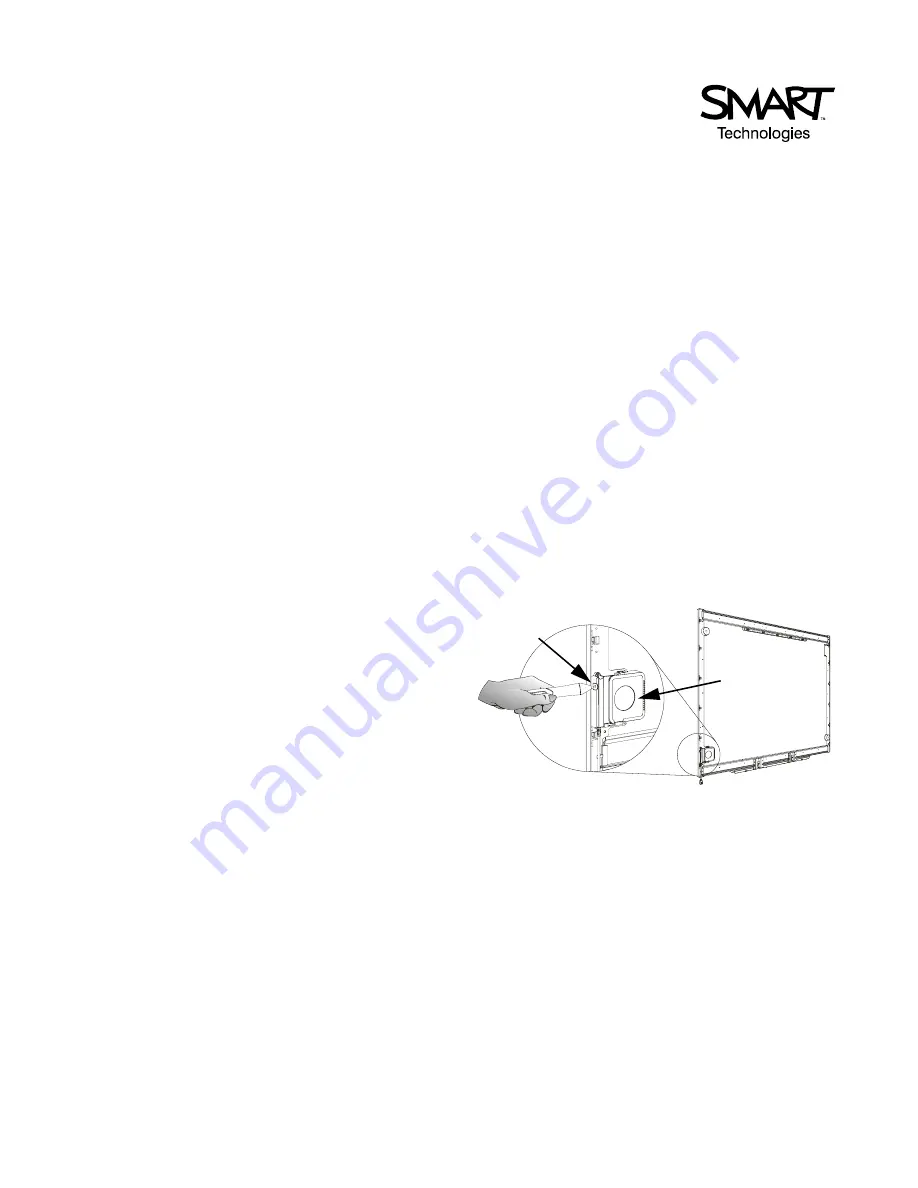
You can also reset only the SC9 controller’s 
microprocessor by pressing its 

Reset

 button with the 

tip of a pen tray pen for less than three seconds. The 

Reset

 button is located behind the lower-right side of 

the interactive whiteboard when viewed from the front.

NOTE:

 If you press and hold the 

Reset

 button for longer 

than three seconds, any saved 4- or 9- point orientation 
data is cleared from the SC9’s memory, and the alignment 
defaults to factory settings. However, 20-point orientation 
data is stored on the computer, so it is retained after a 
reset.

Troubleshooting SMART Board™ 600 Series Interactive 
Whiteboards

SC9

Controller

Reset

Button

Summary of Contents for Board 600 Series

Page 1: ...restore normal operation by resetting the interactive whiteboard To reset your interactive whiteboard You can reset the interactive whiteboard completely by disconnecting and then reconnecting the US...

Page 2: ...green Ready light may be normal if you want touch only operation of the interactive whiteboard If you want to use the SMART Board tools or use the pen tray pens go to Flowchart 4 on page 5 A steady g...

Page 3: ...el of support to ensure that all other possibilities have been checked Replace the SC9 with another that has been tested on an interactive whiteboard Ready light not on Is the computer turned on Turn...

Page 4: ...t upgrades installed The Windows 98 and 98SE operating systems require the system installation disk to install the HID drivers The computer s USB port might have become disabled or been assigned to an...

Page 5: ...SMART Board tools or the pen tray pens See the previous notes You can install SMART Board software from the CD provided with your interactive whiteboard or you can download it from the SMART Technolog...

Page 6: ...the detection of pen or eraser removal or show that they are removed when they are not Remove any obstructions and clean the IR sensors with a cotton swab and glass cleaner If a sensor or the pen tra...

Page 7: ...appears A pen is missing or not positioned properly in its pen tray recess A pen dry erase marker or old style black SMART stylus is not reflective to infrared light so pen tray sensors can t detect i...

Page 8: ...one of the messages listed in the following table NOTE Although the Status message displayed by the SMART Board Software Diagnostics program doesn t actually identify problems with the SMART Board in...

Page 9: ...from a SMART Board interactive whiteboard This message does not necessarily mean that the port is receiving data If it isn t this message changes to No data is being received on this port Data is bein...

Page 10: ...exists that the path is correct and that the SMARTBoardServices exe file exists This SMART Board interactive whiteboard is not currently active This message shouldn t appear It indicates that the SMAR...

Page 11: ...ervice log ReportLog html This file contains a summary of the computer s hardware software and communications configuration followed by a detailed table showing the allowed ranges and current values o...

Page 12: ...contact either as segments dots or dotted segments 3 Use a pen tray pen not your finger or a dry erase marker to draw a pattern that includes a rectangle around the edges of the screen two diagonal st...

Page 13: ...g and the Ready light will also reflect the loss of communication When you stop or uninstall the service the menu selections change to allow you to start or reinstall the service Message Description S...

Page 14: ...software service should start automatically when you start your computer If it doesn t perform the first of the following procedures By default the SMART Board tools do not start automatically when yo...

Reviews: