background image

1

1

© 2005 Directed Electronics, all rights reserved

N9405T  11-05

IInnttrroodduuccttiioonn

Congratulations on your purchase of the 9405T
back up sensor, designed to aid operation when
backing up your vehicle. Simple to operate and
use, the 9405T back up sensor notifies you with a
series of beeps, voice announcements, and incor-
porates an LED display to notify you when the
rear of your vehicle approaches an object or
obstruction.

Before using the 9405T back up sensor, be sure to
practice and test the product in order to familiar-
ize yourself with the display, beep indicators, and
detection zones as they vary by vehicle.

W

Waarrn

niin

ng

g:: Improper use of the back up

sensor could result in injury or death!
This back up sensor is strictly a drive
assist device. It is not a substitute of
driver's responsibilities when backing up

the vehicle. Please drive carefully and follow all local
and federal laws when backing up your vehicle.
Directed Electronics does not guarantee or assume any
liability for injuries or damage that occur while backing
your vehicle. This product should not be considered a
safety device for any purpose. Proper driving skills,
including slowing down, using your  mirrors, and having
another person as a visual assist are all proper precau-
tions to be taken in order to safely back your vehicle.

N

No

ottee:: Changes or modifications to this unit not

expressly approved by the party responsible for compli-
ance will void the user's authority to operate the
equipment. Any change(s) to the equipment will void
FCC compliance.

N

No

ottee:: This equipment has been tested and found to

comply with the limits for a Class B digital device, pur-
suant to part 15 of the FCC Rules. These limits are
designed to provide reasonable protection against
harmful interference in a residential installation. This
equipment generates, uses and can radiate radio fre-
quency energy and, if not installed and used in
accordance with the instructions, may cause harmful
interference to radio communications. However, there
is no guarantee that interference will not occur in a par-

ticular installation. If this equipment does cause
harmful interference to radio or television reception,
which can be determined by turning the equipment off
and on, the user is encouraged to try to correct the
interference by one or more of the following measures:

--Re-orient or relocate the receiving antenna.
--Increase the separation between the equipment and
the receiver.
--Connect the equipment into an outlet on a circuit
different from that to which the receiver is connected.
--Consult the dealer or an experienced radio/TV tech-
nician for help.

1. Detection distance: 1~ 8.4 feet

2. Wireless from ECU to Digital Matrix LED

Display

3. Self-test function activated by reverse gear

4. 3–Color matrix LED dashboard display shows

the object's location

5. Anti-false alert technology

6. All weather design (water resistant)

7. Volume switch (low/medium/high)

Operating Voltage: 9V to 16V

Display current required: less than 200mA

Buzzer: 70–90dB

Temperature: -40° to 176° F (-40° to +80° C)

ECU (Electronic Control Unit)

Digital Matrix LED Display

4–ultrasonic sensors

4–ultrasonic sensor connecting cables

3–sheet metal screws

18.5mm hole saw

W

Whhaatt  iiss  IInncclluuddeedd

SSppeecciiffiiccaattiioonnss

FFeeaattuurreess

9405T Back Up

Sensor

Содержание Valet 9405T

Страница 1: ...e This equipment has been tested and found to comply with the limits for a Class B digital device pur suant to part 15 of the FCC Rules These limits are designed to provide reasonable protection against harmful interference in a residential installation This equipment generates uses and can radiate radio fre quency energy and if not installed and used in accordance with the instructions may cause ...

Страница 2: ...e sensors when the reversing gear is engaged see Self Test Function and then the system starts sensing objects to the rear of your vehicle a The object distance is greater than 8 5Ft Zone 1 Green LED of display will flash b The object distance is 8 4 1Ft The display will show the distance by the digital number displayed and show the object s location in the Matrix LED Display c When the object dis...

Страница 3: ...top left of the display has three settings This switch has the following options z Beeps only low volume zz Beeps with voice low volume zzz Beeps with voice high volume D Di ig gi it ta al l M Ma at tr ri ix x L LE ED D D Di is sp pl la ay y Volume switch 1Ft Zone 5 Red LED 1 0 1 9Ft Zone 4 Red LED 2 0 2 8Ft Zone 3 Orange LED 2 9 4 8Ft Zone 2 Orange LED 4 9 8 4Ft Zone 1 Green LED ...

Страница 4: ...ow at less than 1 foot from the object If the volume switch is on a voice support position the distance and stop command will also be announced as you back up D Di ig gi it ta al l M Ma at tr ri ix x N Nu um me er ri ic c D Di is sp pl la ay y The digital number on display will show every 0 1M change of distance Audio warning Distance on display LED matrix display Zone 1 Zone 2 Zone 3 Zone 4 Zone ...

Страница 5: ...ult is a false reading The back up system only activates when the vehicle is placed in reverse gear When placed in reverse gear the system first does a diagnostic check to ensure the system is fully functional and reports any sensor malfunctions within the back up system If all the sensors are normal the system will beep once and the LED display will flash once If there is any malfunction with the...

Страница 6: ...ration 0 0 3L 0 4L 0 3L 5 8 inches 5 8 inches 1 foot 8 inches 2 feet 3 inches S Se en ns so or r I In ns st ta al ll la at ti io on n 6 6 2005 Directed Electronics all rights reserved N9405T 11 05 I In ns st ta alllla at tiio on n N No ot te e Before installing system let the components of the exhaust system cool down This will make the installation safer and preclude heat damage to the back up se...

Страница 7: ... and install the sensors Sensors A and D should N NO OT T be mounted on the curve of the bumper N No ot te e Before drilling any holes ensure the the area behind is clear of any electrical hydraulic or support members etc N No ot te e Wiring is shown and described is for a positive reverse indicator system The ECU is water resistant however it is recom mended that the module be mounted in the trun...

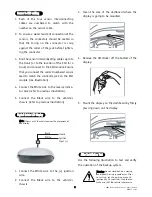
Страница 8: ...s with the vehicle owner the placement of the display 1 Connect the White wire to the ignition wire 2 Connect the Black wire to the vehicle s chassis 3 Clean the area of the dashboard where the display is going to be mounted 4 Remove the 3M sticker off the bottom of the display 5 Mount the display on the dashboard by firmly pressing down on the display Use the following illustration to test and ve...

Страница 9: ...tion 4 Have you connected to the correct reversing indicator wire 5 Do you have a minimum of 12V and ground at the display False warning tone or false LED flashing 1 Is the sensor mounted too low or pointing to the ground Sensors do not detect any objects 1 Is the vehicle s exhaust smoking Correct or allow it to clear before proceeding with testing 2 Are sensors properly plugged into the correct s...

Отзывы: