Dimplex ENG56-400 E Скачать руководство пользователя страница 8

8

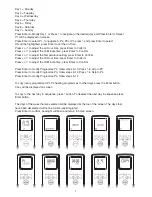
Getting the Desired Flame Effect

Using the remote control press MENU, FIRE on the display will be flashing, press ENTER. The current setting 
will be displayed. Press ^ or v to toggle between F1 and F6. F1 being the lowest setting and F6 being the 
highest setting.
Generally the flames appear more realistic when the flame control is turned down.
Give the flame generator time to react to changes you may make.
The fire will use less water if the flame effect is set to a lower level.
Do not tilt or move the fire while there is water in the tank or sump.
Make sure that the fire is on a level floor.

Customising the display

The maximum temperature set point on the product is 32ºC You have the option to reduce this set point. You 
can also change ºC to ºF
Press the Menu button.
Press the ADV button twice - SP will be blinking.
Press Enter to confirm.
Press v or ^ to choose between ºC and ºF.
Press Enter to confirm.
Press v or ^ to choose your maximum temperature set point.
Press Enter to confirm.
Press BACK three times to return to the home screen.

Adaptive Start

The built-in electronics in this appliance hava a learning function with regards to how long it takes to heat up 
a room. Having learnt how quickly it can heat up your room, the appliance is able to turn on at just the right 
time in order to get the room up to a comfortable temperature when you want it. For example, if you get up at 
7am, you would normally have to guess when to turn the heating on in order for it to pre-heat the room in time. 

Manual Mode

 - To choose a constant heat mode. This mode ignores the User Timer and maintains the 

displayed temperature.
• Press Menu Button
• Press ^ twice to highlight the Hand icon
• Press Enter to Confirm
• Use v and ^ to adjust to the desired temperature

Frost protect

 - Frost protect mode maintains a room temperature of 7ºC throughout a 24 hour period. This 

mode should be used to provide protection against frost as indicated by the Frost icon.
• Press the Menu button
• Press ^ three times to highlight the snowflake icon
• Press Enter to confirm
• Press v or ^ to exit this mode and enter manual mode.

Содержание ENG56-400 E

Страница 1: ...lerte rom eller sporadisk bruk RO Acest produs este adecvat exclusiv spa iilor bine ventilate sau utiliz rii ocazionale CZ Tento v robek je vhodn pouze do dob e izolovan ch prostor nebo k p le itostn...

Страница 2: ...ly switch on off the appliance provided that it has been placed or installed in its intended normal operating position and they have been given supervision or instruction concerning use of the applian...

Страница 3: ...tion of the flame effect This is normal and should not be a cause for concern If this product experiences a power surge for whatever reason the product may cut out This is a normal safety feature and...

Страница 4: ...cing brackets as a guide There is to be an air vent at the front of the structure of at least 88cm2 It is essential to ensure that air can circulate into the appliance otherwise the Opti myst flame ef...

Страница 5: ...o put fire in to standby mode This will be indicated by one beep REMOTE CONTROL The remote control is packed with 2 AA batteries in a bag Lift off the battery cover on the back of the remote control a...

Страница 6: ...ress either up or down on the home screen until the display shows the temperature you require Thermal Safety Cut out A thermal safety cut out is incorporated in the fan heater to prevent damage due to...

Страница 7: ...or to adjust the off Hour time press Enter to Confirm Press v or to adjust the off Minute time press Enter to Confirm Press Enter to modify Programme P2 follow steps 5 12 Press to skip to P3 Press En...

Страница 8: ...emperature set point Press Enter to confirm Press BACK three times to return to the home screen Adaptive Start The built in electronics in this appliance hava a learning function with regards to how l...

Страница 9: ...will automatically activate when you use the Timer Mode Maintenance GENERAL TIPS Only use filtered tap water in this appliance Always ensure that the appliance is sitting on a level surface If you in...

Страница 10: ...pins from the lamp holder Fig 4 and 4a 7 Replace with an OPTIMYST 12V 45W Gu5 3 base 8 beam angle coloured lamp Purchased from www dimplex co uk spares 8 Carefully insert the two pins of the new lamp...

Страница 11: ...2402206B United States US8413358 US8136276 US7967690 US8574086 Russia RU2434181 European EP2029941 EP2315976 EP1787063 A1 EP2388527 China CN101883953A CN102105746A CN101057105 A CN101438104 Australia...

Страница 12: ...transducer might be dirty Fig 14 The wire from the Transducer Unit is sitting over the metal disc Increase the level of fire with the remote control Clean the Metal Disc with soft brush supplied Fig 1...

Страница 13: ...13 Fig 4 Fig 4a Fig 2 Fig 3 Fig 1 X W 255 168 Y H MODEL H W X Y ENG56 400 700mm 490mm 413mm 395mm ENG68 400 823mm 490mm 413mm 517mm ENG56 600 700mm 646mm 569mm 395mm...

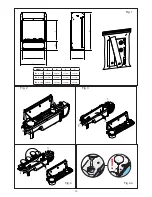
Страница 14: ...14 Fig 5 Fig 5a Fig 5b Fig 6 Fig 7 Fig 8...

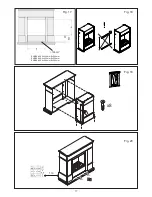
Страница 15: ...15 Fig 10 Fig 11 Fig 12 Fig 13 Fig 14 Fig 9...

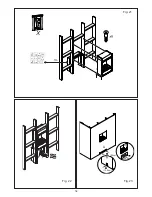
Страница 16: ...16 Fig 15 Fig 16...

Страница 17: ...17 x8 100cm2 ENG56 400 A 440mm B 386mm ENG68 400 A 440mm B 509mm ENG56 600 A 566mm B 386mm 1m Fig 17 Fig 18 Fig 19 Fig 20...

Страница 18: ...18 88cm 2 2 2 1m B C A 100cm2 100cm2 100cm2 Fig 21 Fig 22 Fig 23 X...

Страница 19: ...19...

Страница 20: ...N SO30 2DF TEL 0844 879 3588 FAX 0844 879 3583 WEBSITE www dimplex co uk Republic of Ireland Tel 01 8424833 c GDC Group Ltd All rights reserved Material contained in this publication may not be reprod...

Отзывы: