


5
Filling the Water Tank
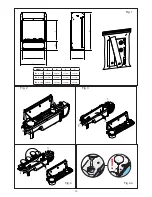
9. Place Water Tank in sink and remove cap (turn anti-clockwise to open) (Fig 7)
10. Fill Water Tank with filtered tap water only. This is necessary to prolong the life of the flame and smoke
producing unit. The water should be filtered through a conventional domestic water filter unit and the filter
should be replaced regularly. Distilled water must not be used.
11. Screw the cap back on – do not overtighten.
12. Place the Water Tank in the Sump, with the tank cap facing down and the flat side of the tank facing
outward (Fig 8)
Assembling the fire
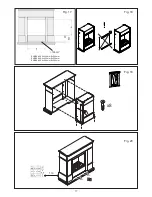
13. Place the Fuelbed on top of the Water Tank and Mist Nozzle (Fig 9)
Operating The Product
WARNING:
FAILURE TO FOLLOW THESE OPERATING INSTRUCTIONS MAY RESULT IN INJURY AND/
OR DAMAGE.
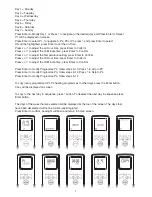
MANUAL CONTROLS
The manual controls are located beneath the hinged flap. (Fig.10 for Manual Control lay out)
Switch ‘A’:- Controls the electricity supply to the Fire.
Note: This switch must be in the ‘ON’ ( I ) position for the Fire to operate either with or without heat.
Switch ‘B’:- Press once to turn on the flame effect. This will be indicated by an audible beep. Although
the main lights operate immediately it will take a further 30 seconds before the flame effect starts.
Press to put fire in to standby mode. This will be indicated by one beep.
REMOTE CONTROL
The remote control is packed with 2 AA batteries in a bag. Lift off the battery cover on the back of the
remote control and insert the batteries taking note of the polarity.
Switching on the appliance
Press and hold the ENTER button for 3 seconds to activate the remote control. FIRE will be displayed and
ON will be blinking. Press ENTER to swtich on the appliance. To turn off the appliance press MENU so that
FIRE is blinking, press ENTER twice.
Adjust the Flame Setting
With the remote control activated press MENU once. FIRE will be blinking on the display. Press ENTER.
The current flame setting will be displayed F1-F6. Press the UP and DOWN buttons to adjust the setting.
After you have selected your flame setting press BACK twice to exit the menu and return to the home
screen.
Switching on the Heat
With the remote control activated press MENU once. FIRE will be blinking on the display. Press ADV once,
HEAT will be blinking. Press ENTER. The current heat setting will be displayed OFF LO HI. Press the UP
and DOWN buttons to adjust the setting. After you have selected your flame setting press ENTER
Setting the Thermostat
The temperature shown on the display is the room temperature set point. This is the temperature that the
heater will maintain during the heating periods. If the room temperature is above this temperature then the
Содержание ENG56-400 E
Страница 14: ...14 Fig 5 Fig 5a Fig 5b Fig 6 Fig 7 Fig 8...
Страница 15: ...15 Fig 10 Fig 11 Fig 12 Fig 13 Fig 14 Fig 9...
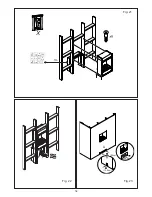
Страница 16: ...16 Fig 15 Fig 16...
Страница 18: ...18 88cm 2 2 2 1m B C A 100cm2 100cm2 100cm2 Fig 21 Fig 22 Fig 23 X...
Страница 19: ...19...


