background image

10

Remote Control  

Initialization

Follow these steps for remote 


control initialization and if 


required, re-initialization:

1.  Ensure that power is  

supplied through the  main  

service panel.

2.  Access the manual controls.

3.  Locate manual controls. 


4.  Activate main power switch. 
5.  Press and hold the side of 


the Manual Selection  

Switch marked “ 

I

 ” for five 


(5) seconds (red indicator light will flash).

6.  Press the ON button located on the remote control transmitter.  

This will synchronize the remote control transmitter and receiver.

Battery Replacement

To replace the battery:

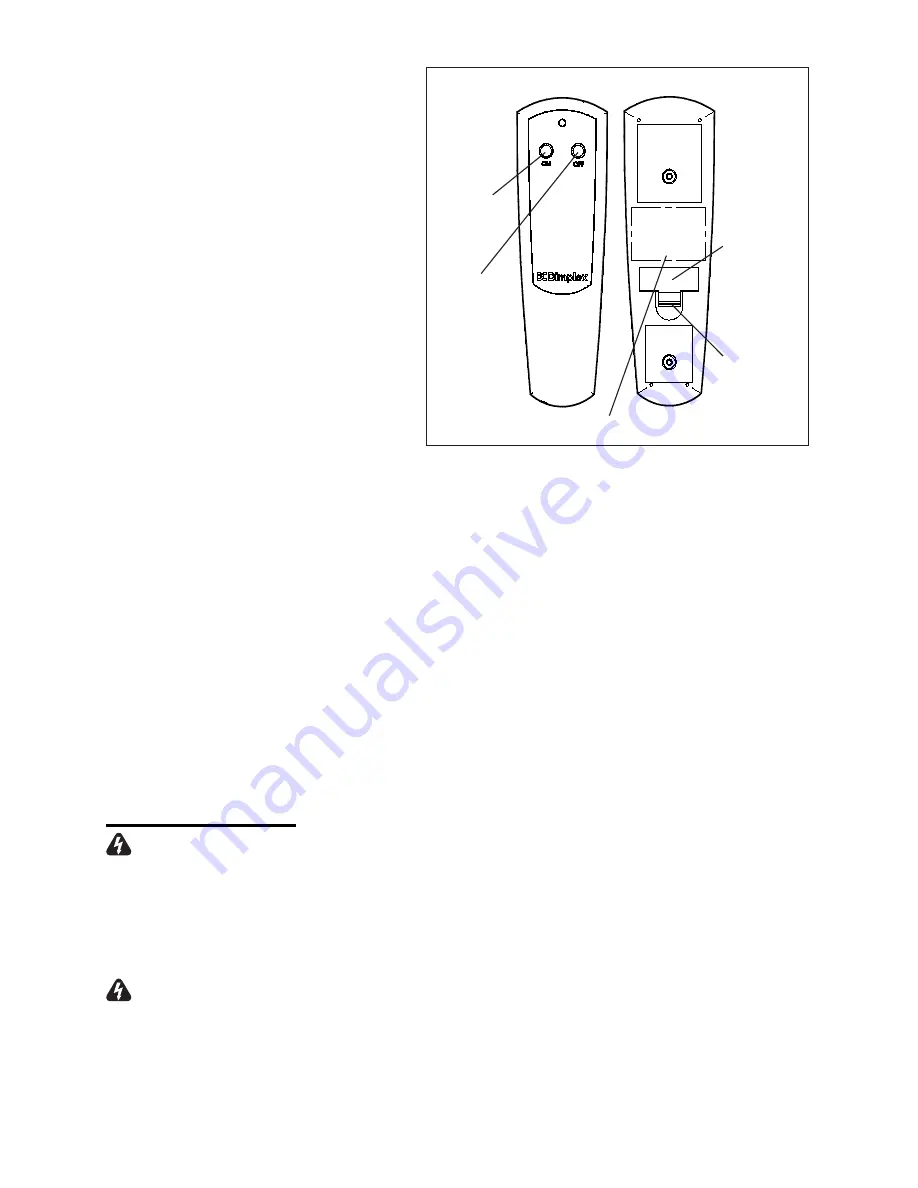
1.  Slide battery cover open on the hand held transmitter (Figure 4).
2.  Correctly install one (1) 12 Volt (A23) battery in the battery holder.

3.  Close the battery cover.

Maintenance

 WARNING:  

Disconnect power before attempting any maintenance 

or cleaning to reduce the risk of fire, electric shock or damage to 

persons.

Light Bulb Replacement

 WARNING:  

Allow at least five (5) minutes for light bulbs to cool off 

before touching bulbs to avoid accidental burning of skin.

Light bulbs need to be replaced when you notice a dark section of 

the flame or when the clarity and detail of the log exterior disappears.  

Figure 4

On

Button

Off

Button

Battery

Battery

Cover

Frequency Code

Содержание CDS8515

Страница 1: ...u and congratulations for purchasing a Dimplex electric stove Over the years valuable memories will occur around the warmth and comfort of your stove Thank you for allowing our product to be the backdrop for those special moments Serial Number Model Number Part Number Quality checked by ...

Страница 2: ...he heater may emit a slight harmless odor when first used This odor is a normal condition caused by the initial heating of internal heater parts 3 The information regarding the model of your unit can be found on the rating plate See Page 6 for an illustration on how to locate the rating plate 4 If you have any questions or concerns regarding the operation of your stove contact Dimplex customer ser...

Страница 3: ...ith the instructions may cause harmful interference to radio or television reception which can be determined by turning the equipment off and on the user is encouraged to try to correct the interference by one or more of the following measures Reorient or relocate the receiving antenna Increase the separation between the equipment and the receiver Connect the equipment into an outlet on a circuit ...

Страница 4: ...ord or plug or if the heater has malfunctioned or if the stove has been dropped or damaged in any manner Return heater to authorized service facility for examination electrical or mechanical adjustment or repair 6 Do not use outdoors 7 The stove is not intended for use in bathrooms laundry areas and similar indoor locations Never locate heater where it may fall into a bathtub or other water contai...

Страница 5: ...an 1875 Watts 15 Do not burn wood or other materials in the stove 16 Do not strike the clear door panel 17 Always use a certified electrician should new circuits or outlets be required 18 Always use properly grounded fused and polarized outlets 19 Disconnect all power supply before performing any cleaning maintenance or relocation of the unit 20 When transporting or storing the unit and cord keep ...

Страница 6: ...ll be required if after installation the circuit breaker trips or fuse blows on a regular basis when the heater is operating Additional appliances on the same circuit may exceed the current rating of the circuit breaker WARNING Ensure the power cord is not installed so that it is pinched or against a sharp edge and ensure that the power cord is stored or secured to avoid tripping or snagging to re...

Страница 7: ... OFF refer to operating instruction section 2 Plug the unit into a 15 Amp 120 Volt outlet If the cord does not reach you may use an extension cord rated for a minimum of 1875 Watts Operation To access the controls go to the back of the stove Figure 2 Figure 2 A B C D Back View Front View E A Main Power ON OFF Switch The Main Power ON OFF Switch supplies power to all unit functions flame Purifire a...

Страница 8: ...3 The flame effect and Purifire remain on the heater is activated and all three red indicator lights are activated C Interior Light ON OFF Switch The Interior Light On Off Switch supplies power to the interior light D Heater Thermostat Control To adjust the temperature to your individual requirements turn the thermostat control clockwise all the way to turn on the heater When the room reached the ...

Страница 9: ...have to be pointed at the stove and can pass through most obstacles including walls It is supplied with one of 243 independent frequencies to prevent interference with other units The frequency designation is indicated on the back of the transmitter Figure 4 The remote control operates the stove levels sequentially The level is increased every time the ON button on the transmitter is pressed The s...

Страница 10: ...ceiver Battery Replacement To replace the battery 1 Slide battery cover open on the hand held transmitter Figure 4 2 Correctly install one 1 12 Volt A23 battery in the battery holder 3 Close the battery cover Maintenance WARNING Disconnect power before attempting any maintenance or cleaning to reduce the risk of fire electric shock or damage to persons Light Bulb Replacement WARNING Allow at least...

Страница 11: ...screws at the upper corners of the back panel Lift the back end of the top to clear the brackets and pull back Lift top carefully and place to the side of the stove Figure 5 Caution should be taken as the top mounting brackets may scratch the finish 2 Remove the burnt bulb by pushing in and turning counter clockwise 3 Replace the upper light bulb 4 Reassemble in the reverse order as above Lower Li...

Страница 12: ...ce a year To clean the filter gently tap filter on a hard surface to dislodge any loose dirt or debris and then clean with water No soap or cleaning products are recommended The filter size is 20 inches x 10 inches x 1 inch rated at MERV 10 If using an after market filter follow the manufacturers recommended replacement instructions To replace filter Figure 7 1 Remove the two 2 screws at the upper...

Страница 13: ...t dust particles these can be removed by dusting lightly with a clean dry cloth To remove fingerprints or other marks the clear door can be cleaned with a damp cloth The clear door should be completely dried with a lint free cloth to prevent water spots CAUTION Do not use abrasive cleaners on glass surface or spray liquids directly onto any surface Stove Surface Cleaning Use a cloth dampened with ...

Страница 14: ...pair What this limited warranty covers and for how long Products covered by this limited warranty have been tested and inspected prior to shipment and subject to the provisions of this warranty Dimplex warrants such products to be free from defects in material and workmanship for a period of 12 months from the date of the first purchase of such product The limited 12 month warranty period also app...

Страница 15: ...ASER OR ANY THIRD PARTY WHETHER IN CONTRACT IN TORT OR ON ANY OTHER BASIS FOR ANY INDIRECT SPECIAL PUNITIVE EXEMPLARY CONSEQUENTIAL OR INCIDENTAL LOSS COST OR DAMAGE ARISING OUT OF OR IN CONNECTION WITH THE SALE MAINTENANCE USE OR INABILITY TO USE THE PRODUCT EVEN IF DIMPLEX OR ITS directors officers or AGENTS HAVE BEEN ADVISED OF THE POSSIBILITY OF SUCH LOSSES COSTS OR DAMAGES OR IF SUCH LOSSES C...

Отзывы: