Dimplex CDFI400C Скачать руководство пользователя страница 13


13

 Maintenance

in front of the fire and ob

-

serve which lamp needs to be 

changed.

3. 

Turn the unit off, and unplug 

the cassette.

4. 

Leave the appliance for 5 min

-

utes to allow the lamps to cool 

down before removing them.
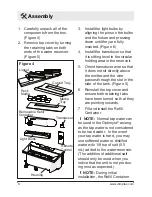
5. 

Remove the water tank and 

top cover (Figure 5) by lifting 

upwards and place in a sink. 

6. 

Remove the defective bulb, 

by gently lifting vertically and 

disengaging the pins from the 

lamp holder. 

7. 

Carefully insert the two pins of 

the new bulb into the two holes 

in the lamp holder. Push lamp 

firmly in place.

8. 

Gently place the media tray 

and media (if applicable) back 

into position.

Cleaning

It is recommended that all of the 

components that contain water are 

cleaned with soap and water on a 

biweekly

 basis.  A small brush has 

been included to assist in cleaning 

difficult items/areas, i.e. the trans

-

ducer.

 CAUTION: 

Do not put plastic 

components in the dishwasher.

Filter Cleaning

The air filter can be removed and 

gently rinsed with water to clean 

and dried on a towel before rein

-

stalling.

!

 NOTE: 

Replace the filter so that 

the course black filter is facing the 

front of the cassette.

Surface Cleaning

Use a warm damp cloth only to 

clean surfaces of the cassette. Do 

not use abrasive cleaners.

!

 NOTE: 

If you need to move the 

unit ensure that all of the compo

-

nents that contain water have been 

emptied before relocating.

Servicing

Except for installation and cleaning 

described in this manual, an autho

-

rized service representative should 

perform any other servicing.

Содержание CDFI400C

Страница 1: ...0R02 IMPORTANT SAFETY INFORMATION Always read this manual first before attempting to install or use the Optimyst cassette For your safety always comply with all warnings and safety instructions contai...

Страница 2: ...emphasize CAUTION Procedures and techniques which if not carefully followed will result in damage to the equipment WARNING Procedures and techniques which if not carefully followed will expose the use...

Страница 3: ...void the warranty Please record your model and serial numbers below for future reference model and serial numbers can be found on the Model and Serial Number Label of your cassette NO NEED TO RETURN T...

Страница 4: ...ons Do not use attach ments not recommended by the manufacturer Never operate this furnishing if it has a damaged cord or plug if it is not working properly if it has been dropped or damaged or droppe...

Страница 5: ...required Always use properly grounded fused and polarized outlets When transporting or storing the unit and cord keep in a dry place free from excessive vibration and store so as to avoid damage This...

Страница 6: ...electrician or serviceman if you are in doubt as to whether the product is properly grounded Do not modify the plug provided with the product if it will not fit the outlet have a proper outlet install...

Страница 7: ...in stallation surface and any surface above should be maintained 3 Secure unit through the two holes in the bottom of the unit into supports to prevent the unit from hanging from the top flange see fi...

Страница 8: ...gh the slot in the side of the tank Figure 5 6 Reinstall the top cover and ensure both retaining tabs have been turned so that they are pointing inwards 7 Fill and install the Refill Container NOTE No...

Страница 9: ...f applicable so that the opening is not blocked Figure 6 CAUTION Do not arrange the media while the unit is running since the media and or tray may be hot 9 Make sure the On Off switch is switched to...

Страница 10: ...ed by an audible beep Although the lights turn on immediately it will take 30 seconds before the flame effect starts Press to put fire in to standby mode This will be indicated by one beep C Flame Int...

Страница 11: ...to turn fireplace on push the Standby button to turn the fire place off Battery Replacement To replace the battery 1 Slide battery cover open on the remote control Figure 8 2 Install two 1 5 Volt AAA...

Страница 12: ...mL added to the water reservoir The addi tion of additional salt should only be when you notice that the unit is not producing mist as expected 5 Screw the cap back on do not overtighten 6 Return the...

Страница 13: ...e components that contain water are cleaned with soap and water on a biweekly basis A small brush has been included to assist in cleaning difficult items areas i e the trans ducer CAUTION Do not put p...

Страница 14: ...is limited warranty have been tested and inspected prior to shipment and subject to the provisions of this warranty Dimplex warrants such products to be free from defects in mate rial and workmanship...

Страница 15: ...s Such costs shall be the purchaser s responsibility What Dimplex and its dealers and service agents are also not responsible for IN NO EVENT WILL DIMPLEX OR ITS DIRECTORS OFFICERS OR AGENTS BE LIABLE...

Страница 16: ...I600C 69094961BBRP Light Holder Assembly 9600610200RP Removable Refill Container with Cap 0441440100RP Cap for Refill Container 0441440300RP Top Cover Assembly 9600670100RP Water Reservoir Sump 044138...

Отзывы: