background image

13


Setup Wizard 

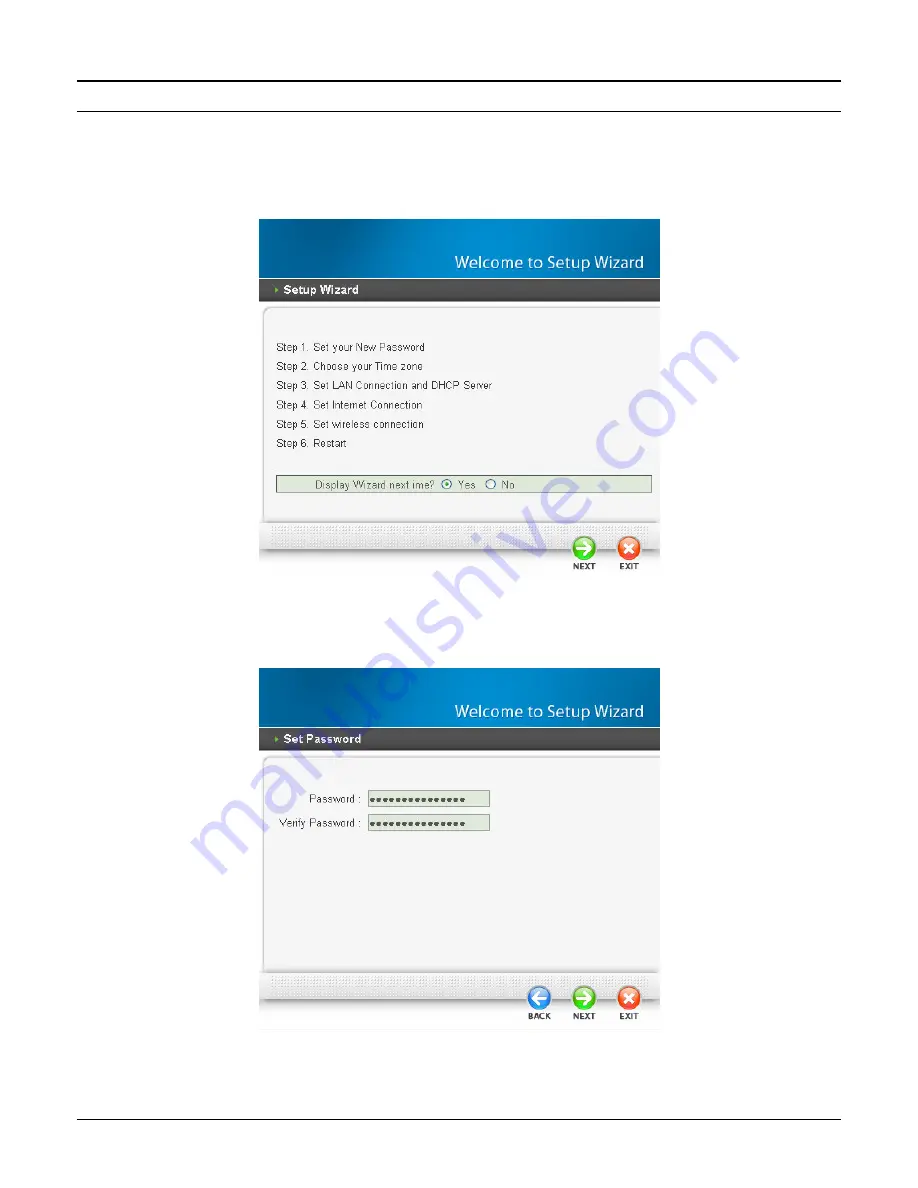
Setup wizard is provided as the part of the web configuration utility. User can simply follow the 

step-by-step  process  to  get  the  wireless  router  configuration  ready  to  run  in  6  easy  steps  by 

clicking on the “Wizard” button on the function menu. The following screen will appear. Please 

click “Next” to continue. 


Figure 13. Setup Wizard


Step 1: Set up new Password 

User can change the password and then click “Next” to continue. 


Figure 14. Setup Wizard – Set Password


Содержание DN-7019

Страница 1: ...IEEE 802 11g Wireless Broadband Router User s Guide ...

Страница 2: ...Any changes or modifications not expressly approved by the party responsible for compliance could void the user s authority to operate this equipment This device complies with Part 15 of the FCC Rules Operation is subject to the following two conditions 1 This device may not cause harmful interference and 2 this device must accept any interference received including interference that may cause und...

Страница 3: ...ember states and EFTA countries except in France and Italy where restrictive use applies In Italy the end user should apply for a license at the national spectrum authorities in order to obtain authorization to use the device for setting up outdoor radio links and or for supplying public access to telecommunications and or network services This device may not be used for setting up outdoor radio l...

Страница 4: ...uipment type atitinka esminius reikalavimus ir kitas 1999 5 EB Direktyvos nuostatas Nederlands Dutch Hierbij verklaart naam van de fabrikant dat het toestel type van toestel in overeenstemming is met de essentiële eisen en de andere relevante bepalingen van richtlijn 1999 5 EG Malti Maltese Hawnhekk isem tal manifattur jiddikjara li dan il mudel tal prodott jikkonforma mal ħtiġijiet essenzjali u m...

Страница 5: ...tallation 7 PC NETWORK TCP IP SETTING 8 Windows 95 98 ME 8 Windows 2000 9 Windows XP 10 WIRELESS BROADBAND ROUTER CONFIGURATION 11 Login to the Wireless Broadband Router through WLAN 11 Login to the Wireless Broadband Router through LAN 11 Using the Web Browser 11 Configuration Menu 12 Setup Wizard 13 WAN Setting 23 DHCP Client or Fixed IP 23 PPPoE with Obtain IP Automatically 24 PPPoE with Specif...

Страница 6: ...ol Setting 35 Filter 35 Virtual Server 40 Special AP 41 DMZ 42 Firewall Rule 43 System Setting 44 Password 44 Time 45 Device Information 46 Log 47 Log Setting 48 Statistic 49 Restart 49 Configuration 51 UPnP 51 Ping Test 52 Remote Management 53 TECHNICAL SPECIFICATIONS 54 ...

Страница 7: ...IEEE 802 11g Wireless Broadband Router Overview of this User s Guide Introduction Describes the Wireless Broadband Router and its features Unpacking and Setup Helps you get started with the basic installation of the Wireless Router Identifying External Components Describes the front panel rear panel and LED indicators of the Wireless Router Connecting the Router Tells how you can connect the Wirel...

Страница 8: ... addresses and using a shared Internet connection through an Internet sharing device can solve high network access costs All linked computers can make full use of broadband capabilities over such a device This device not only comes equipped with a wide range of features but also can be installed and configured right out of the box This device supports a simple local area network and Internet acces...

Страница 9: ...nced Security Supports MAC Address Protocol Filters and UPnP Universal Plug Play Traffic Control with Virtual Server Virtual PC mapping and DMZ Provides Additional Security with SPI NAT firewall and Attack Alert via emails Provides Additional Security of Enable Disable SSID Password Protection Flash Memory for Firmware Upgrade Save Restore Settings and Traffic Log Compliant with Windows 95 98 NT 2...

Страница 10: ...f the Wireless Broadband Router can be performed properly using the following methods The power outlet should be within 1 82 meters 6 feet of the Broadband Router Visually inspect the DC power jack and make sure that it is fully secured to the power adapter Make sure that there is proper heat dissipation from and adequate ventilation around the Broadband Router Do not place heavy objects on the Br...

Страница 11: ...ns the function of the Internet Broadband Router is fail WAN Link ACT The indicators light green when the WAN port was connected to an xDSL Cable modem successfully The indicators blink green while the WAN port was transmitting or receiving data on the xDSL Cable modem WLAN ACT This indicator lights green when there are wireless devices connected and transmitting data to the Wireless Router LAN Li...

Страница 12: ...l be useful too when the manager forgot the password to login but the setting will be back to default setting Hardware connections Connect the Router using LAN 1 Plug in one end of the network cable to the WAN port of the Wireless Internet Broadband Router 2 Plug in the other end of the network cable to the Ethernet port of the xDSL or Cable modem 3 Use another network cable to connect to the Ethe...

Страница 13: ...ireless Internet Broadband Router are clearly visible and the status of the network link can be seen instantly 1 With the power source on once the device is connected to the broadband modem the Power CPU LAN WLAN and WAN port link LEDs of the Internet Broadband Router will light up indicating a normal status 2 While the WAN is link up to the ADSL Cable modem the WAN port s Link ACT LED will light ...

Страница 14: ... ME 1 Click on the Network neighborhood icon found on the desktop 2 Click the right mouse button and a context menu will be show 3 Select Properties to enter the TCP IP setting screen 4 Select Obtain an IP address automatically on the IP address field Figure 4 Windows 95 95 Me IP setup 5 Select Disable DNS in the DNS field Figure 5 Windows 95 98 Me DNS setup ...

Страница 15: ...en open the Network dialup connection applet Double click on the Local area network connection icon Select Properties to enter the TCP IP setting window 1 In the Local area network status window click on Properties 2 In the Local area network connection window first select TCP IP setting and then select Properties 3 Set both IP address and DNS to Automatic configuration Figure 7 Windows 2000 IP an...

Страница 16: ...the right button on the My Network Place icon Select properties to enter the TCP IP setting window 1 Set IP address to Obtain an IP address automatically 2 Set DNS to Obtain DNS server address automatically Figure 8 Windows XP IP and DNS setup ...

Страница 17: ...band Router is configured through an Ethernet connection make sure the host PC must be set on the IP sub network that can be accessed by the xDSL Cable modem For example when the default network address of the xDSL Cable modem Ethernet interface is 192 168 1 x then the host PC should be set at 192 168 1 xxx where xxx is a number between 2 and 254 and the default subnet mask is 255 255 255 0 Using ...

Страница 18: ...e information Configuration Menu When the main page appears find the Configuration menu in the left side of the screen Click on the setup item that you want to configure There are six main options WAN Wireless LAN Access Control System and Wizard as shown in the Configuration Menu screen Figure 12 Configuration Menu ...

Страница 19: ... to get the wireless router configuration ready to run in 6 easy steps by clicking on the Wizard button on the function menu The following screen will appear Please click Next to continue Figure 13 Setup Wizard Step 1 Set up new Password User can change the password and then click Next to continue Figure 14 Setup Wizard Set Password ...

Страница 20: ...Set LAN and DHCP Server Set user s IP address and mask The default IP is 192 168 1 1 If user likes to enable DHCP please click Enabled DHCP enabled is able to automatically assign IP addresses Please assign the range of IP addresses in the fields of Range start and Range end Please click Next to continue Figure 16 Setup Wizard Set LAN DHCP Server ...

Страница 21: ...the WLAN Router is unable to auto detect your Internet connection you will need to manually select the Internet connection type Obtain IP automatically Fixed IP PPPoE PPTP L2TP or BigPond Obtain IP automatically DHCP client If user has enabled DHCP server choose Obtain IP automatically DHCP client to have the router assign IP addresses automatically Figure 18 ...

Страница 22: ...16 If your ISP requires you to enter a specific host name or MAC address please enter it in Figure 19 Fixed IP Address Figure 20 ...

Страница 23: ... the Internet Service Providers assign a fixed IP address choose this option and enter the assigned IP address subnet mask gateway IP and DNS IP addresses for your Broadband Router Figure 21 PPPoE Figure 22 ...

Страница 24: ...assword and User Name and then the ISP uses PPPoE Choose this option and enter the required information Figure 23 Specify IP If connected to the Internet using a PPPoE Dial up xDSL Modem the ISP will provide a Password User Name and a Fixed IP Address choose this option and enter the required information Figure 24 ...

Страница 25: ... enter the your IP Address Subnet Mask Gateway Server IP PPTP Account and PPTP Password Your Subnet Mask required by your ISP in the appropriate fields If your ISP has provided you with a Connection ID enter it in the Connection ID field otherwise leave it zero Figure 26 ...

Страница 26: ... enter the your IP Address Subnet Mask Gateway Server IP L2TP Account and L2TP Password Your Subnet Mask required by your ISP in the appropriate fields If your ISP has provided you with a Connection ID enter it in the Connection ID field otherwise leave it zero Figure 28 ...

Страница 27: ...BigPond Figure 29 If your ISP is Big Pond Cable the ISP will provide a User Name Password Authentication Server and Login Server IP Optional Choose this option and enter the required information Figure 30 ...

Страница 28: ...nel The SSID and channel must be the same as wireless devices attempting communication to the router Figure 31 Step 6 Restart The Setup wizard is now completed The new settings will be effective after the Wireless router restarted Please click Restart to reboot the router If user does not want to make any changes please click Exit to quit without any changes Figure 32 ...

Страница 29: ...lly When Specify IP is selected type the IP address subnet mask and default gateway in the text boxes User s ISP will provide with this information IP Address For the Specify mode enter the specific IP address that provided by your ISP Subnet Mask For the Specify mode enter the specific subnet mask that provided by your ISP Gateway For the Specify mode enter the specific gateway IP address that pr...

Страница 30: ...in IP Automatically If connected to the Internet using a PPPoE Dial up xDSL Modem the ISP will provide a Password and User Name and then the ISP uses PPPoE Choose this option and enter the required information Figure 34 ...

Страница 31: ... with Specify IP If connected to the Internet using a PPPoE Dial up xDSL Modem the ISP will provide a Password User Name and a Specify IP Address choose this option and enter the required information Figure 35 ...

Страница 32: ... if your ISP has provided you with a DNS IP address enter it in the DNS field otherwise leave it zero Figure 36 PPTP Figure 37 L2TP PPTP L2TP with Specify IP If connected to the Internet using a PPTP L2TP Dial up xDSL connection enter the your IP Address Subnet Mask Gateway IP address DNS IP address Server IP address PPTP Account and PPTP Password Figure 38 PPTP Figure 39 L2TP ...

Страница 33: ...s option and enter the required information Dynamic DNS This synchronizes the DDNS server with your current Public IP address when you are online First you need to register your preferred DNS with the DDNS provider Then please selected one of DDNS server than fill the related information in the below fields Host Name User Name and Password Figure 40 ...

Страница 34: ...vice must match the SSID typed here in order for the wireless device to access the LAN and WAN via the router Extended Range Mode Enable and disable the wireless Extended Range enhancement SSID Broadcast While SSID Broadcast is enabled all wireless clients will be able to view the WLAN Router s SSID For security purposes users may want to disable SSID Broadcast to ensure only authorized clients ha...

Страница 35: ... allows public access to the router via wireless communications Shared Key requires the user to set a WEP key to exchange data with other wireless clients that have the same WEP key This router also supports WPA WPA2 and WPA PSK WPA2 PSK Figure 42 Security Enable or Disable the wireless LAN security WEP Figure 43 ...

Страница 36: ...n list The WLAN Router supports 64 and 128 bit encryption WEP Key 1 4 Enables users to create up to 4 different WEP keys Manually enter a set of values for each key Select a key to use by clicking the radio button next to the key Click Clear to erase key values WPA PSK WPA2 PSK Figure 44 Figure 45 If WPA or WPA2 PSK is selected the above screen is shown Encryption Type Select the encryption type f...

Страница 37: ... the encryption key and the parameters for the RADIUS server Encryption Type Select the encryption type for TKIP or AES encryption RASIUS Server 1 Enter the IP address Port used and Shared Secret by the Primary Radius Server 2 Enter the IP address Port used and Shared Secret by the Secondary Radius Server optional ...

Страница 38: ...ow is normalized Fragmentation Threshold Type the fragmentation threshold in the text box If packet transfer error rates are high choose values between 1500 and 2346 until packet transfer rates are minimized NOTE set this fragmentation threshold value may diminish system performance DTIM Interval Type a DTIM Delivery Traffic Indication Message interval in the text box User can specify a value betw...

Страница 39: ...name IP address and subnet mask Figure 49 Host Name Type the host name in the text box The host name is required by some ISPs The default host name is Wireless Router IP Address This is the IP address of the router The default IP address is 192 168 1 1 Subnet Mask Type the subnet mask for the router in the text box The default subnet mask is 255 255 255 0 ...

Страница 40: ... IP addresses to all LAN devices connected to the router Lease Time The lease time specifies the amount of connection time a network user be allowed with their current dynamic IP address Add Static DHCP Selected Enable the Static DHCP allows you to assign a static IP address to the PC that has the IP address and MAC address mapping set in the Static DHCP List Static DHCP List The static DHCP mappi...

Страница 41: ...s within the LAN based upon the MAC address of their network interface Click the radio button next to Disabled to disable the MAC filter Disable Disable the MAC filter function Allow Only allow computers with MAC address listed in the MAC Table Deny Computers in the MAC Table are denied Internet access MAC Table Use this section to create a user profile which Internet access is denied or allowed T...

Страница 42: ... page Note Click anywhere in the item Once the line is selected the fields automatically load the item s parameters which you can edit Figure 52 Enable Click to enable or disable the IP address filter function Range Start Type the minimum address for the IP range IP addresses falling between this value and the Range End are not allowed to access the Internet Range End Type the minimum address for ...

Страница 43: ... those specified URL in the text box Figure 53 Enable Disable Enable or Disable the URL blocking function of the WLAN Router Add Click to add the specific URL to the URL blocking list Delete Selected a URL from the blocking list then click the Delete button to remove the URL from the URL Blocking list ...

Страница 44: ...e the Domain Blocking function Allow Allow users to access all domains except Blocking Domains Deny Deny users to access all domains except Permitted Domains Blocked Permitted Domains List domains you will Blocked or Permitted Apply Click to add domain to the Blocked Permitted Domains list Del Select a user from the table at the bottom of the list and click Del to remove the user profile ...

Страница 45: ...ch you can edit Figure 55 Enable Click to enable or disable the Protocol filter Name Type the name of the user to be denied access Protocol Select a protocol TCP UDP or ICMP to use for the virtual server Port Type the port range of the protocol Add Click to add the protocol filter to the table at the bottom of the screen Update Click to update information for the protocol filter if user have selec...

Страница 46: ...it Figure 56 Enable Click to enable or disable the virtual server Name Type a descriptive name for the virtual server Protocol Select a protocol TCP or UDP to use for the virtual server Private Port Type the port number of the computer on the LAN that is being used to act as a virtual server Public Port Type the port number on the WAN that will be used to provide access to the virtual server LAN S...

Страница 47: ...outgoing communication that determines whether the user has legitimate access to the application Protocol Select the protocol TCP or UDP that can be used to access the application the is meaning to both of TCP and UDP protocols Port Range Type the port range that can be used to access the application in the text boxes Incoming Defines which incoming communications users are permitted to connect wi...

Страница 48: ...and associated security settings Note Any clients added to the DMZ exposes the clients to security risks such as viruses and unauthorized access Enable Click to enable or disable the DMZ DMZ Host IP Type a host IP address for the DMZ The computer with this IP address acts as a DMZ host with unlimited Internet access Apply Click to save the settings ...

Страница 49: ...applied to IP Range Start Type the start IP address that the rule is applied to IP Range End Type the end IP address that the rule is applied to Destination Defines the destination of the incoming packet that the rule is applied to Interface Select which interface WAN or LAN the rule is applied to IP Range Start Type the start IP address that the rule is applied to IP Range End Type the end IP add...

Страница 50: ... rule click Update Priority to save the changes System Setting This system setting enables users to change password set the device time view the device information restart the system save and load different settings as profiles restore factory default settings upgrade the firmware and ping remote IP addresses etc Password This function enables users to set administrative and user passwords These p...

Страница 51: ...uter automatically adjust the system time from NTP Server NTP server The Simple Network Time Protocol SNTP server allows the WLAN Router to synchronize the system clock to the global Internet through the SNTP Server Specify the NTP domain name or IP address in the text box Manually Date and Time Setting Manually setting the WLAN Router system time press the Set Time button to update the system tim...

Страница 52: ...configuration information including the MAC address the Connection status SSID Channel and Authentication type LAN This section displays the LAN interface configuration including the MAC address IP Address Subnet Mask and DHCP Server Status Click DHCP Table to view a list of client stations currently connected to the WLAN Router LAN interface Click DHCP Release to release all IP addresses assigned...

Страница 53: ...s Figure 62 The Log screen commands are as follows Click First Page to view the first page of the log Click Last Page to view the final page of the log Click Previous Page to view the page just before the current page Click Next Page to view the page just after the current page Click Clear Log to delete the contents of the log and begin a new log Click Refresh to renew log statistics ...

Страница 54: ...here SMTP Password If the SMTP Authentication enabled fill in the password of the SMTP account here Syslog Server Type the IP address of the Syslog Server if user wants the WLAN Router to listen and receive incoming Syslog messages Log Type Enables users to select what items will be included in the log System Activity Displays information related to WLAN Router operation Debug Information Displays...

Страница 55: ...ket transmission via the WLAN Router s LAN WAN and Wireless ports in bytes per second Figure 64 Click Reset to erase all statistics and begin logging statistics again Restart Click Restart to restart the system in the event the system is not performing correctly Figure 65 ...

Страница 56: ...date Figure 66 Please follow the below instructions Download the latest firmware from the manufacturer s Web site and save it to disk Click Browse and go to the location of the downloaded firmware file Select the file and click Upgrade to update the firmware to the latest release ...

Страница 57: ...cumstances User can also load the factory default settings and run a setup wizard to configure the WLAN Router and Router interface Figure 67 UPnP This function enables users to enable or disable the UPnP function on the WLAN Router Figure 68 UPnP Select to enable or disable the UPnP function on the WLAN Router ...

Страница 58: ...g Test The ping test enables users to determine whether an IP address or host is present on the Internet Type the host name or IP address in the text box and click Ping button to start the Ping test Figure 69 ...

Страница 59: ...resses that can be pinged from remote locations Gaming mode If user is experiencing difficulties when playing online games or even certain applications that use voice data user may need to enable Gaming Mode for these applications to work correctly When not playing games or using these voice applications it is recommended that Gaming Mode be disabled PPTP Enables users to set up PPTP access for re...

Страница 60: ...e TX Power 15 2dBm typically 802 11g 13 2dBm typically 802 11b Network Cables 10BASE T 2 pair UTP Cat 3 4 5 100 m EIA TIA 568 100 ohm STP 100 m 100BASE TX 2 pair UTP Cat 5 100 m EIA TIA 568 100 ohm STP 100 m Frequency Range 2400 2483 5 MHz ISM band Modulation Schemes DBPSK DQPSK CCK OFDM Security 64 128 bits WEP Encryption WPA WPA PSK WPA2 WPA2 PSK Channels 1 11 channels FCC 1 13 channels ETSI 1 1...

Отзывы: