background image

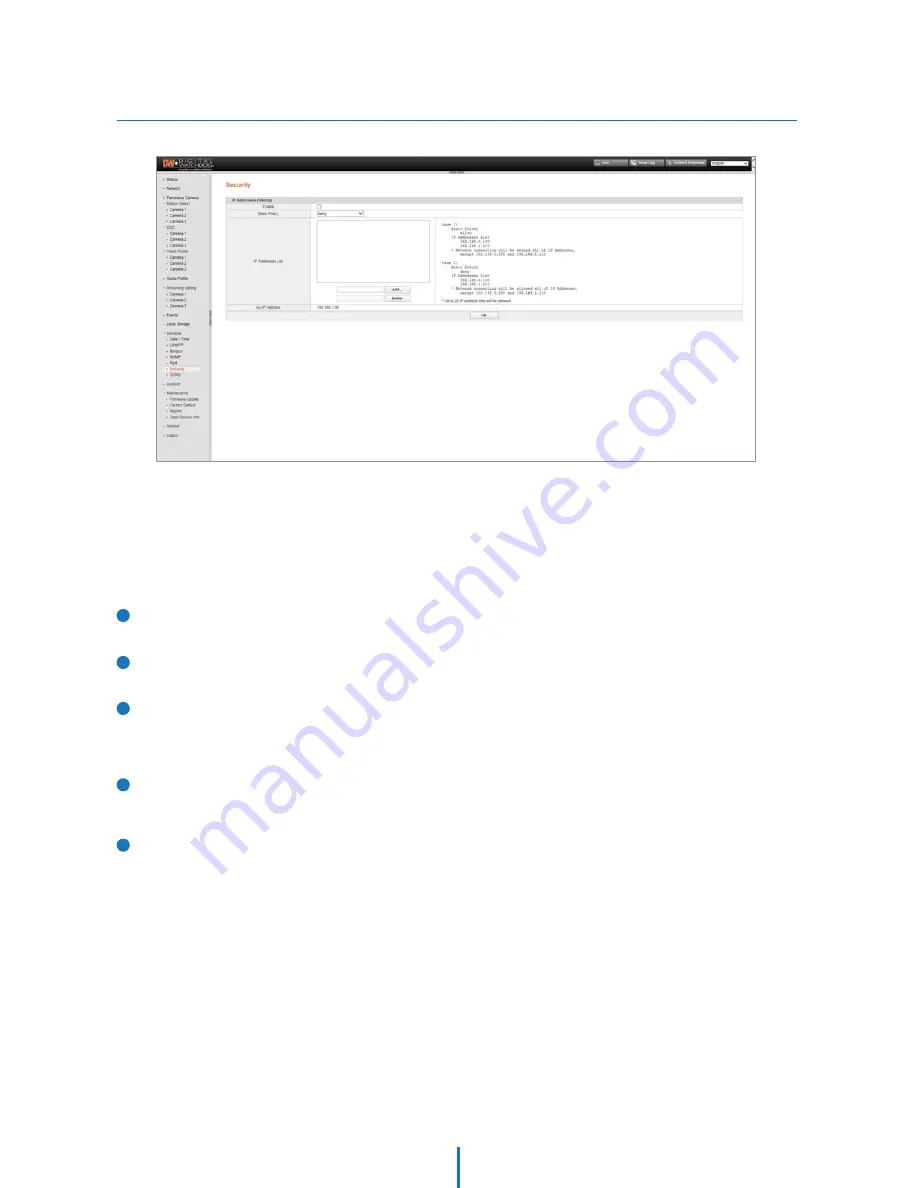
Security

Webviewer - Settings

This menu allows you to restrict access to the camera according to IP addresses.

1

Enable

Check to enable.

Basic Policy

Select “allow” / “deny”

IP Addresses Lisk

Create the IP address list for filtering. Press the ‘Add’ button
to add new IP addresses to the list, or ‘delete’ to remove 
them from the list.

2

3

My IP Address

Displays the IP address of the PC currently connected to 
the camera.

4

5

Click OK to apply any changes to the settings.

Содержание DWC-PB6M4T

Страница 1: ...er sManual 7FS FGPSF JOTUBMMJOH BOE VTJOH UIF DBNFSB QMFBTF SFBE UIJT NBOVBM DBSFGVMMZ F TVSF UP LFFQ JU IBOEZ GPS GVUVSF SFGFSFODF QJY 1 0 FHBQJYFM 5ISFF 4FOTPS OEPPS 0VUEPPS VMMFU 1 BNFSB 8 1 5 l 8 1 5 ...

Страница 2: ...P GJSF FMFDUSJD TIPDL PS GBMMJOH PCKFDUT P OPU JOTUBMM UIF VOJU JO IVNJE EVTUZ PS TPPUZ MPDBUJPOT PJOH TP NBZ DBVTF GJSF PS FMFDUSJD TIPDL G BOZ VOVTVBM TNFMMT PS TNPLF DPNF GSPN UIF VOJU TUPQ VTJOH UIF QSPEVDU NNFEJBUFMZ EJTDPOOFDU UIF QPXFS TPSDF BOE DPOUBDU UIF TFSWJDF DFOUFS POUJOVFE VTF JO TVDI B DPOEJUJPO NBZ DBVTF GJSF PS FMFDUSJD TIPDL G UIJT QSPEVDU GBJMT UP PQFSBUF OPSNBMMZ DPOUBDU UIF O...

Страница 3: ... JO B XFU CBTFNFOU OFBS B TXJNNJOH QPPM FUD MFBO POMZ XJUI ESZ DMPUI 6OQMVH UIJT QSPEVDU GSPN UIF XBMM PVUMFU CFGPSF DMFBOJOH P OPU VTF MJRVJE DMFBOFST P OPU CMPDL BOZ WFOUJMBUJPO PQFOJOHT OTUBMM JO BDDPSEBODF XJUI UIF NBOVGBDUVSFS T JOTUSVDUJPOT 4MPUT BOE PQFOJOHT JO UIF DBCJOFU BSF QSPWJEFE GPS WFOUJMBUJPO UP FOTVSF SFMJBCMF PQFSBUJPO PG UIF QSPEVDU BOE UP QSPUFDU JU GSPN PWFS IFBUJOH 5IF PQFOJO...

Страница 4: ...4FUVQ 4FUUJOHT PUJPO FUFDUJPO 4FUUJOHT 04 4FUUJOHT 7JEFP 1SPGJMF 4FUUJOHT VEJP 1SPGJMF 4FUUJOHT 4USFBNJOH 4FUUJOH 4FUUJOHT WFOUT 4FUUJOHT PDBM 4UPSBHF 4FUUJOHT 4FSWJDFT BUF 5JNF 4FUUJOHT 4FSWJDFT 61O1 4FUUJOHT 4FSWJDFT POKPVS 4FUUJOHT 4FSWJDFT 4 1 4FUUJOHT 4FSWJDFT 1PSU 4FUUJOHT 4FSWJDFT 4FDVSJUZ 4FUUJOHT 4FSWJDFT 4 4FUUJOHT DDPVOUT 4FUUJOHT BJOUFOBODF JSNXBSF 6QEBUF 4FUUJOHT BJOUFOBODF BDUPSZ FGB...

Страница 5: ...ct Accessories Introduction Cables Camera Please check if all the camera and accessories are included in the package Screw Plastic Anchor 4pcs Quick Manual Template Sheet Sunshield Sunshield Screws T Wrench ...

Страница 6: ...Introduction PartT BOE FTDSJQUJPO Ball Neck Bracket Con Cap Pan Tilt Stoper Screw Lens Sunshield Cables ...

Страница 7: ...up to the factory default Warning If you press the Reset button you will lose all setting data If needed please make a note for further installation 1 2 3 4 1ass cables through UIF NPVOUJOH TVSGBDF BT OFFEFE Connect the network cable power cable respectively See the section Installation Cabling for details 0ODF BMM DBCMFT BSF DPOOFDUFE TFDVSF UIF DBNFSB UP UIF NPVOUJOH TVSGBDF VTJOH UIF JODMVEFE T...

Страница 8: ...m to eject the memory card from the slot Pressing too hard on the SD memory card can cause the card to shoot out uncontrollably from the slot when released If you have saved data in the SD memory card removing the SD memory card prior to setting record to OFF will cause damage to the data stored in the card Recommended SD Card Specification Not Included Type Micro SD SDHC Manufacturer Transcend Ki...

Страница 9: ...witch is not used use a power adaptor for power transmission and non PoE switch for data transmission Follow the illustrations below to connect the camera without a PoE enabled Switch 1 Using a PoE Enabled Switch The Camera is PoE compliant allowing transmission of power and data via a single Ethernet cable PoE eliminates the need for the different cables used to power record or control the camera...

Страница 10: ...efully Network Connection Connect the crossover cable into the RJ 45 Rate Power Current Consumption DC 12V 18W PoE IEEE 802 3af Class 4 Alarm Output It connects to the alarm lights siren or lamps and it is activated according to the Setup menu setting Cable of the relay output device should connect to red and black line of the Alarm Cable Alarm Input Sensor Cable of the sensor alarm input device s...

Страница 11: ...UIF UBCMF MMPX VQ UP TFDPOET GPS UIF 1 OTUBMMFS UP GJOE UIF DBNFSB PO UIF OFUXPSL ZPV DBO QSFTT UIF h3FGSFTI JTUh UP TFBSDI UIF OFUXPSL BHBJO PS GJMUFS UIF TFBSDI SFTVMUT CZ FOUFSJOH B WBMVF JO UIF GJMUFS CPY BU UIF CPUUPN PG UIF QBHF IFDL UIF CPY OFYU UP h JTQMBZ BNFSB 5IVNCOBJMh UP WJFX B 1 JNBHF PG UIF DBNFSBhT WJFX OFYU UP UIF DBNFSB OBNF PO TVQQPSUFE NPEFMT 4FMFDU B DBNFSB GSPN UIF MJTU CZ EP...

Страница 12: ...owered down until con tions ar nalized with the IP Camera and the IP Camera has been correctly connected to the modem If the IP Camera is connected to a network which utilizes a router you must have Port Forwarding co ured on your personal router to forward all ports to the IP address you have assigned the IP Camera if necessary you may access your IP Camera on your local network by opening Intern...

Страница 13: ...ddressing If so register your IP Video Server on our DDNS website before you c re setup or install the IP Camera Even though your IP is not dynamic you will just remember hostname dyndns com gate1 instead of complicated series of numbers like http 201 23 4 76 8078 For more details contact our Support Center To use a public DDNS called dyndns or no ip refer to the detail information on how to use t...

Страница 14: ...formation and settings received from your Internet Service Provider ISP You may need to refer to these IP addresses at a later time during the configuration 1 You must determine whether the IP address is STATIC or DYNAMIC At this moment you are only concerned about the ISP Did they provide you with a STATIC or DYNAMIC address If you are unsure contact your ISP Configure your IP Camera s TCP IP set...

Страница 15: ...k read the FAQ The IP address you assign must be a private IP For information on how to choose a private IP please read the FAQ 255 255 255 0 Example 192 168 0 1 Example Subnet Mask 3 You must use the same subnet mask as the one you noted under Current TCP IP Settings Default Gateway 4 This IP address must be the IP address of your router private or LAN side Use the same Default Gateway you noted ...

Страница 16: ...le Subnet Mask 3 Default Gateway 4 Use the assigned default gateway from your ISP Use the 1st DNS Server from Assigned IP Address from My ISP Preferred DNS Server 5 Use the DDNS server DDNS Server 6 This is the same site you will register later to utilize our DDNS service 80 Web Port 7 You may select any number between 1025 60000 If you have not received any IP addresses from your ISP contact them...

Страница 17: ... the ACTIVE light the IP Camera has rebooted After the system reboots completely remove the power supply from the unit and close Internet Explorer Return your PC Laptop TCP IP properties to their original settings Before installing the IP Camera you must use Port Forwarding on your personal router Cases A B You will need to forward 1 ports t Web Port All the ports will be forwarded to the IP addre...

Страница 18: ...the IP address and Web Port assigned to the IP Camera 1 2 3 4 5 Access your IP Camera via the Internet 6 Examples http 192 168 0 200 8888 or http 24 106 88 123 If you left your Web Port set to 80 do not need to specify the port in the Address Bar to access the IP Camera If you use Case B C 1 Open Internet Explorer 2 Type the IP of the IP Camera If you use Case A D 1 Open Internet Explorer 2 Visit ...

Страница 19: ... Login the web monitoring page shows up 4 You can also type the ID and password and click Login after checking the box Setting to go directly to the camera s settings page 2 Guest connection on the initial page 1 Guest Login click the test Guest Login below the button Login without an ID and a password 2 Under the guest connection only restrictive functions will be available Settings page cannout ...

Страница 20: ...ited 5 Snapshot Capture a still image from the camera s live view The image is saved as a jpeg file to your local downloads directory 6 View the camera in full screen you can hide all the settings and menu options and display the camera s view across your entire monitor Press Esc to exit the full screen mode 7 Local Recording Record short videos from the camera s streaming and save them locally 1 ...

Страница 21: ...tures or the connection status of the installed equipment 8 Audio On Off enables you to monitor the audio signal of the microphone connected to the NVT Audio IN connector Before use check the availability of the product features or the connection status of the installed equipment 9 Snapshot captures a JPEG Image of the current video stream JPEG file path C 13 About displays the ActiveX information...

Страница 22: ...us for Link Speed Duplex Mode 2 Model Information Displays the camera s hardware information including Firmware and Boot Loader versions camera s Model Serial Number System Mode and local storage information 3 NVT Time Displays the camera s time information including the camera s current time settings and the running time how long the camera has been running since the last time it booted up 4 CPU ...

Страница 23: ...e data request to the appropriate port associated with the camera 4 Default DNS Enter a Domain Name Server DNS address This translates a web addresses to an IP addresses 5 IPv4 Link Local Network Setting Enabled by default 1 IP Address Subnet Mask These are set automatically based on you settings in the Network Setting section 6 IPv6 Network Setting Disabled by default 1 Manually set the camera s ...

Страница 24: ...e according to the center 8 Shutter mode If Shutter is set to Auto shutter speed is adjusted automa tically accroding to the surrounding illumination 9 Shutter speed The faster the shutter speed is moving objects will appear without ghosting effect However this will also cause the picture to appear darker if there is no sufficient lighting This menu is activated when Shutter is set to Manual 4 Sha...

Страница 25: ...ear on the upper bar of the video image on the web monitoring page The camera supports four different motion detection masks QFS FBDI TFOTPS Each one can be setup individually be selecting the appropriate tab If enabled the entire camera s FoV will be set to motion detection 2 Clear All Deselects the selected area 3 Invert Inverts the selected area 4 Enable Check the box for the activation 5 Sensi...

Страница 26: ...r Select a color for the text s font 7 Transparency Adjust the transparency of the OSD text 1 Enable OSD Text Check for the activation 2 X Axis Adjust the X axis positionof the OSD Logo 3 Y Axis Adjust the Y axis position of the OSD Logo 4 Click OK to apply any changes to the settings Before using the OSD Logo feature refer to the firmware update OSD Logo Update entries and upload a logo file 5IJT...

Страница 27: ...red in a second default 20 6 Group Size This sets the number of I frames and P frames per second If GOP is set to 30 the camera will record 1 I frame and 29 P frames To improve the recording quality lower the GOP number However the lower the number the larger the streaming file size will be default 40 5IJT TFUVQ NFOV JT VOJRVF UP FBDI PG UIF DBNFSBhT TFOTPS 1MFBTF OPUF UIBU ZPV XJMM IBWF UP TFUVQ ...

Страница 28: ... less by 20 than that of baseline 4 4 Entropy Coding The camera runs as CAVLC compression ratio CAVLC CABAC system load CAVLC CABAC 4 5 Jumbo Frame Discards or processes the I frames or P frames in excess of a specific value I Thr I frame threshold P Thr P frame threshold 6 Enable Capture the camera s view as JPEG 7 Resolution Adjust the resolution 8 Quality Set 1 Best 6 4 9 Click OK to apply any ...

Страница 29: ...Codec G 711 u G 711 a G 726 quality G 711 G 726 playing compatibility G 711 G 726 3 Sampling Rate 8kHz or 8kHz fixed on MR904 4 4 Volume 1 100 5 Audio Codec G 711 u G 711 a G 726 quality G 711 G 726 playing compatibility G 711 G 726 6 Sampling Rate 8kHz or 8kHz fixed on MR904 7 Volume 1 100 4 8 Click OK to apply any changes to the settings ...

Страница 30: ...ings See next page for more information 4 6 Connection Lists The IP address and port information of the monitoring de vices that are connected to the camera 4 5 RTSP URI Uniform Resource Identifier This is the path that is used on the monitoring program for playing RTSP stream from the camera The default paths are 1 1st Stream rtsp 192 168 1 2 554 AVStream1_1 2 2nd Stream rtsp 192 168 1 2 554 AVSt...

Страница 31: ... video data 4 4 Audio Address The IP address for audio data transmission 7 User RTSP Authentication Check the box if an authentication process is required 8 Use RTCP Check the box if RTCP function is required 9 Use RTCP Keep Alive Check the box if the stream times out 10 The other protocols Displays the supported protocols 11 Click OK to apply any changes to the settings 5 Audio Port The port numb...

Страница 32: ...the detected state of the DI maintains the event maintains 4 inactive level when the non detected state of the DI maintains the event maintains 4 Motion When the motion is detected an event occurs 5 Timer The events occurs periodically unit second Action Types 6 Preset Move When the PTZ Camera is connected to the command Preset Move is sent to the PTZ camera 7 Digital Output This means relay outpu...

Страница 33: ...n Off 1 4 Timer Interval Select one out of 1 86400 2 Action Type Select one out of Preset Move Digital Output TDN 2 1 Preset Move No Select one out of 1 255 Set the preset on the item Video Source 2 2 Digital Output Relay No Select considering the connection Digital Output 2 3 Digital Output Status Select one out of close to open open to close 2 4 Digital Output dwtime Duration 1 60 seconds 2 5 TD...

Страница 34: ...ngs 3 Network Link Fail Unplugged When the camera s net work connection with the monitoring PC is lost 4 I Frame Only I Frame shows at every 60 frames 2sec the camera will record only the main frames of the video The contents of the black are the values that are set on the Video Profile settings 7 Select Stream Select which stream to record 8 Click OK to apply any changes to the settings 9 Model n...

Страница 35: ...e Set button to apply the changes 4 Specify OSD Date TIme Format Set the date and time format Click the Set button to apply the changes 5 Time Zone Select the time zone from the available options 6 Click OK to apply any changes to the settings 7 Enable Check the box to enable 8 Interval Set the request time intervals in minutes 9 Time Server Enter the IP address or hostname of a time server 10 Cli...

Страница 36: ...etection with Windows explorer 1 Enable Check to enable UPnP Friendly name This is the name identifying the camera when using the UPnP search It is created by the camera s MAC address You can modify it as needed 2 3 Click OK to apply any changes to the settings ...

Страница 37: ...o detection with Windows explorer 1 Enable Check to enable UPnP 2 Friendly name This is the name identifying the camera when using the UPnP search It is created by the camera s MAC address You can modify it as needed 3 Click OK to apply any changes to the settings ...

Страница 38: ...ngs Use this menu to set the camera s SNMP settings 1 Enable Check to enable Read community Shows the running mode as public fixed UDP Port Enter the port number for use 2 3 4 Click OK to apply any changes to the settings ...

Страница 39: ...number for the data communication 1 Web HTTP The camera s web port is set by default to 80 You can modify it as needed 2 Serial Port 1 RS485 Currently not supported 3 Serial Port 2 RS232 Currently not supported 4 Click OK to apply any changes to the settings ...

Страница 40: ...enable Basic Policy Select allow deny IP Addresses Lisk Create the IP address list for filtering Press the Add button to add new IP addresses to the list or delete to remove them from the list 2 3 My IP Address Displays the IP address of the PC currently connected to the camera 4 5 Click OK to apply any changes to the settings ...

Страница 41: ...hese are third part DDNS services and some may require subscription or payment 1 Enable Check to enable 2 Select Service Select a service to use 3 Type the information that is used on the registration pro cess of the DDNS server homepage 4 Click OK to apply any changes to the settings ...

Страница 42: ...word for the ID to be added 3 Apply Cancel button Click Apply to save the changes or Cancel to cancel 4 Guest Login Enable check box Check this box to enable guest login services Click Set to apply the changes 5 Max Number of Clients The maximnum allowd connections are 20 fixed 6 To add a new user press the Add User button To modify an existing user press the Modify button next to that user s name...

Страница 43: ...ot be interrupted Updates can take up to 10 minutes 1 Click Browse and select the file to upload 2 Click Upload to start updating 2 Network setting will remain the same however video settings may be reset during the update 3 Logo Upload 4 1 Click Browse and select the file to upload 2 Click Upload to start updating OSD Logo Upload 5 PTZ Protocol Update not supported 6 If anew protocol is uploaded ...

Страница 44: ...f the selected values Please note to click the reset button only afterselecting the values to be initialized Show only changed values check box Check to display only the changed values default 2 Select All check box You can manually check the box next to each settings you want to reset or use the Select All button to selects all groups to be initialized 3 ...

Страница 45: ...Report Webviewer Settings 1 Use the Print button to export the report for you records This page displays the camera s current setting and can be printed or saved as a PDF file for reference ...

Страница 46: ...Open Source Info Webviewer Settings This page documents the camera s firmware and web client information for open source integrations ...

Страница 47: ...Reboot Webviewer Settings You can select to reboot the camera as needed A confirmation window will appear to confirm the reboot ...

Страница 48: ...tion Start Right click Local Area Connection Properties Select the TCP IP in General Tab Click Properties Control Panel Network and Dial up Connection or Network Connection Under the General tab of the TCP IP Properties you will see your IP address information Start Network and sharing center Manage network connections Properties Select either Internet Protocol Ver 4 TCP IPv4 or Internet Protocol ...

Страница 49: ...k Local Area Connection Properties Select the TCP IP in General Tab Click Properties Control Panel Network and Dial up Connection or Network Connection 2 Windows Vista or 7 Users Start Network and sharing center Manage network connections Properties Select either Internet Protocol Ver 4 TCP IPv4 or Internet Protocol Ver 6 TCP IPv4 Click Properties Control Panel ...

Страница 50: ... the router 2 You will have to supply your User Name and Password to log onto the router Default from factory User Name leave blank Password admin 3 Select Applications Gaming from the menu bar 4 Input port numbers in Port Range as below and click Save Setting button Both ofWeb Server Port andVideo Server Port should be added The example is as below 2 Enabled Disabled Name Protocol Type Private Po...

Страница 51: ...Advanced 4 Click Add Custom Service button in Port Forwarding page 5 Input proper values in Ports Custom Services page as below 6 Click Add button 7 With the same method as above add Video Server Port 8 Click Apply button to finish Port Forwarding 3 Enable Service Name Starting Ending Port Server IP Address Check it Input IP Camera name Input IP Camera Web Server port Starting Port should be same ...

Страница 52: ... an IP address 1 Open an MS DOS or Command prompt 2 At the prompt type ping xxx xxx xxx xxx without the quotes and replace the x s with an IP address 3 Press Enter I m accessing my video server remotely over the Internet and the video stream is choppy is this normal Yes The frames per second received remotely are determined by your bandwidth capabilities both at your site where the IP Camera is in...

Страница 53: ...Unit mm Dimension Specifications 116 96 5 250 270 144 5 101 ...

Страница 54: ...SFDFJQU PS PUIFS QSPPG PG UIF EBUF PG UIF PSJHJOBM QVSDIBTF JT SFRVJSFE CFGPSF XBSSBOUZ TFSWJDF JT SFOEFSFE 5IJT XBSSBOUZ POMZ DPWFST GBJMVSFT EVF UP EFGFDUT JO NBUFSJBMT BOE XPSLNBOTIJQ XIJDI BSJTF EVSJOH OPSNBM VTF 5IJT XBSSBOUZ EPFT OPU DPWFS EBNBHFT XIJDI PDDVST JO TIJQNFOU PS GBJMVSFT XIJDI BSF DBVTFE CZ QSPEVDUT OPU TVQQMJFE CZ UIF 8BSSBOUPS PS GBJMVSFT XIJDI SFTVMU GSPN BDDJEFOU NJTVTF BCVT...

Страница 55: ... 4PNF TUBUFT EP OPU BMMPX UIF FYDMVTJPO PS MJNJUBUJPO PG JODJEFOUBM PS DPOTFRVFOUJBM EBNBHFT PS MJNJUBUJPOT PO IPX MPOH BO JNQMJFE XBSSBOUZ MBTUT TP UIF BCPWF FYDMVTJPOT PS MJNJUBUJPOT NBZ OPU BQQMZ UP ZPV 5IJT XBSSBOUZ HJWFT ZPV TQFDJGJD MFHBM SJHIUT BOE ZPV NBZ BMTP IBWF PUIFS SJHIUT GSPN WBSZ GSPN TUBUF UP TUBUF G UIF QSPCMFN JT OPU IBOEMFE UP ZPVS TBUJTGBDUJPO UIFO XSJUF UP UIF GPMMPXJOH BEESF...

Страница 56: ...TU FBERVBSUFST 0GGJDF 8 SFOTIBX 4U 5BNQB 8FTU PBTU FBERVBSUFST 0GGJDF MPPNGJFME WF FSSJUPT 1 9 XXX JHJUBM 8BUDIEPH DPN 5FDIOJDBM 4VQQPSU 64 BOBEB OUFSOBUJPOBM SFODI BOBEJBO 4VQQPSU PVST POEBZ SJEBZ BN UP QN 45 ...

Отзывы: