background image

Graphic Touchscreen Keypad User Guide 

Introduction

Common Keys for Keypad Screen

COMMAND (CMD)

The 

CMD

 key allows you 

to advance through the 

keypad displays, User Menu, 

or complete a data entry 

function.

Back Arrow

 (<—

)

The 

Back Arrow (<—)

 is used 

to go back through the keypad 

displays while operating your 

system. You may press the 

Back Arrow

 to back up through the list 

of functions in the User Menu or to erase the last character entered.

Data Entry Digit keys

These keys allow you to enter your user code when arming or 

disarming or enter other information into the system.

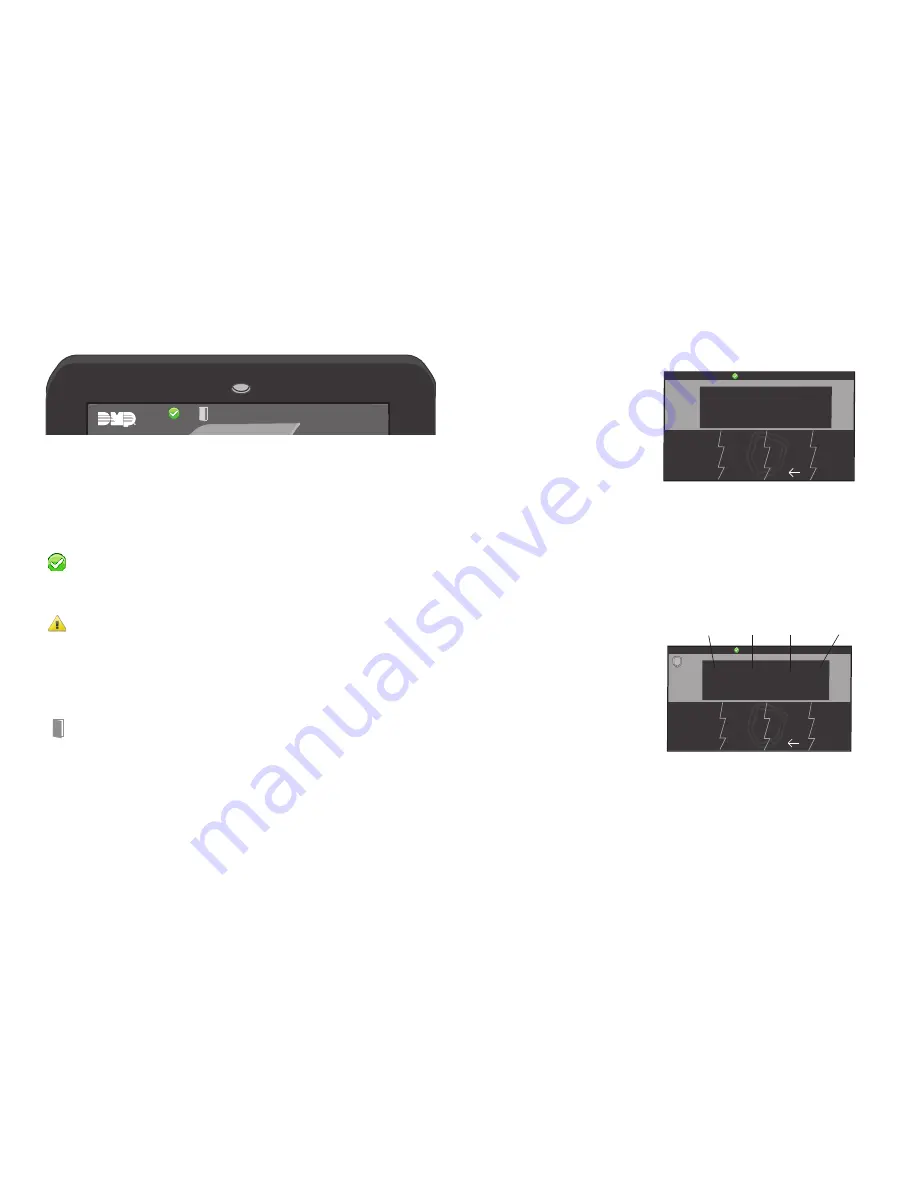
Keypad  Select Areas

There are four touch-sensitive 

areas in the keypad message 

display that allow you to make 

selections by pressing the 

choice shown in the display.

Note: 

For the purposes of this 

guide, when instructed to press 

the first Select Area, press the 

far left area in the message 

display; the second Select Area 

is the second from the left; 

third Select Area is second from the right; and the fourth Select 

Area is the far right.

System Status Display

System Status display shown across the top of the Main Screen, 

displays the armed status, System Ready or System Not Ready, 

alarm or trouble con ditions on a zone or a system monitor such as 

AC or battery trouble. The right corner scrolls to display the day of 

the week and time. The following icons display informing you of the 

status of your system:

Green Check Mark - System Ready to arm:

No 

Green Check Mark -  System Not Ready: (door or window 

is open)

Yellow Triangle -  Attention List: After disarming, if an 

alarm on any zone or communication 

problem has occurred while armed, 

System Status at the top of the Main 

Screen displays a yellow triangle Attention 

List icon. When pressed, the attention 

list displays listing the zone and event.

Blue Door - Chime (Monitor) On

1

ABC 

5

MNO

9

YZ


2

DEF


6

PQR

0


3

GHI


7

STU


4

JKL 

8

VWX

CMD

Select Area 1  Select Area 2  Select Area 3  Select Area 4

Keypad Select Areas

SYSTEM READY

1

ABC 

5

MNO

9

YZ


2

DEF


6

PQR

0


3

GHI


7

STU


4

JKL 

8

VWX

CMD

CMD and Back Arrow Display

DISARMED

NOW

TUE

Panic

Chime

Check-in

Fire Reset

MON   5:35 AM

System Status Display

Содержание 7800 series

Страница 1: ......

Страница 2: ...burglar alarm is valid press NO or VERIFY to send a verification message to the Central Station If a valid alarm has not occurred press YES or CANCEL to cancel the alarm and send an Abort or Cancel m...

Страница 3: ...Status List 9 Zone Status 9 Armed Status 9 Exit Error 9 Arming and Disarming 10 How Your System Operates 10 Arming Functions 10 Key Fob Arming 11 Key Fob Disarming 11 System Arming 12 Home Sleep Away...

Страница 4: ...Graphic Touchscreen Keypad User Guide...

Страница 5: ...ystem Graphic Touchscreen Keypad Main Screen Your system has an easy to use Graphic Touchscreen Keypad that allows you to operate the system When accessing any other screens you may return to the Main...

Страница 6: ...s an easy to understand arming options screen When leaving in a hurry press the shield until it glows the system quick arms the Away system and starts the exit timer giving you ample time to leave Onc...

Страница 7: ...d AC Power OK Battery OK Blue Blinking Panel Disarmed AC Power OK Battery Fault No Light Panel Disarmed AC Power Fault Battery OK Red Steady Panel Armed AC Power OK Battery OK Red Blue Alternate Panel...

Страница 8: ...llable options Scroll through the available options by pressing within the Carousel Menu area and moving your finger up or down You may select any options within the Carousel Menu by pressing the desi...

Страница 9: ...ECKIN Check in SENSORS OFF 1ABC 5MNO 9YZ 2DEF 6PQR 0 3GHI 7STU 4JKL 8VWX CMD SENSORS OFF Reset EXIT TIMER EXIT TIMER MON 5 35 PM 3 5 ARM INSTANT Easy Exit SYSTEM READY 1ABC 5MNO 9YZ 2DEF 6PQR 0 3GHI 7...

Страница 10: ...ond from the right and the fourth Select Area is the far right System Status Display System Status display shown across the top of the Main Screen displays the armed status System Ready or System Not...

Страница 11: ...Chime A tone that sounds each time a door or window is opened while you are using the Zone Monitor Chime option from the User Menu See Zone Monitor in the panel user guide Trouble A steady tone indic...

Страница 12: ...ns and if monitored send alarm reports to a Central Station when a burglary zone is faulted Fire panic and other 24 hour devices are always turned on and do not need to be armed Disarming This means t...

Страница 13: ...or battery power If your system contains any Panic zones these do not display on the screen for security reasons If an alarm occurs on a non fire 24 hour zone or a system monitor it remains in the Sta...

Страница 14: ...selected areas are arming For Home Away or Home Sleep Away systems the Keypad screen displays ALL SYSTEM ON if all areas in the system are arming HOME SYSTEM ON or SLEEP SYSTEM ON if only selected are...

Страница 15: ...ms but the interior area s remain disarmed because you have not exited Instant During the exit delay time you can cancel the exit and entry delays and cause all zones to be instant zones Press ARM INS...

Страница 16: ...east one area in the system is armed and ALL SYSTEM ON if all areas in the system are armed 6 The screen then displays the exit time in seconds and counts down the remaining time EXIT seconds remainin...

Страница 17: ...thin 5 seconds or an invalid user code is entered the prewarn tone begins sounding again 2 ALL SYSTEM OFF is displayed in the upper right corner after the system disarms the Main Screen Shield indicat...

Страница 18: ...end an alarm verify message to the Central Station The system will remain armed System Arming Area Systems Your security system is programmed into separate areas Youmayarmanddisarmallareasatonetimeore...

Страница 19: ...re arming 7d Select STOP to stop the system from arming Correct the zone problem s and return to step 1 Note 24 hourzonescannotbebypassed 8 The screen displays SYSTEM ON if at least one area in the sy...

Страница 20: ...emove an area number from the display press the corresponding number on the screen Press CMD when done 4 After all areas have displayed any alarms that occurred during the armed period are shown If al...

Страница 21: ...arming sequence is the same as Area Disarming steps 2 through 4 in the previous section 2 The screen may display ALARM CANCELLED if your system was disarmed after alarm message had been sent to the ce...

Страница 22: ...ks their status and battery status You may also LOCK or UNLOCK Z Wave equipped doors Z Wave Thermostat Screen The Z Wave Thermostat screen displays all programmed Thermostats and their status You may...

Страница 23: ...User Menu See Z Wave Setup Note The icon is only available if enabled at installation Z Wave Setup Z Wave Setup is used for managing Z Wave devices and Favorites With Z Wave Setup you can Add devices...

Страница 24: ...hose functions to which you have access are displayed Please refer to the user guide provided with your control panel for complete list and operation of the user menu Accessing the User Menu 1 Press K...

Страница 25: ...on System Trouble Yes There is a problem with one or more components in the system Contact your service person System Busy No The system is performing another task with a higher priority Wait a few mo...

Страница 26: ...Sleep Away 2 10 12 14 I Instant Zone 9 Interactive Shield 1 2 12 13 14 Interior 10 11 Invalid Code 8 K Keypad 1 3 4 6 7 8 9 11 12 13 15 20 L LED 1 3 M Main Screen 1 2 3 4 5 6 12 13 14 16 17 20 Mini Sh...

Страница 27: ...Graphic Touchscreen Keypad User Guide...

Страница 28: ...LT 1191 1 02 14315...

Отзывы: