


Before Use
6
Disclaimer
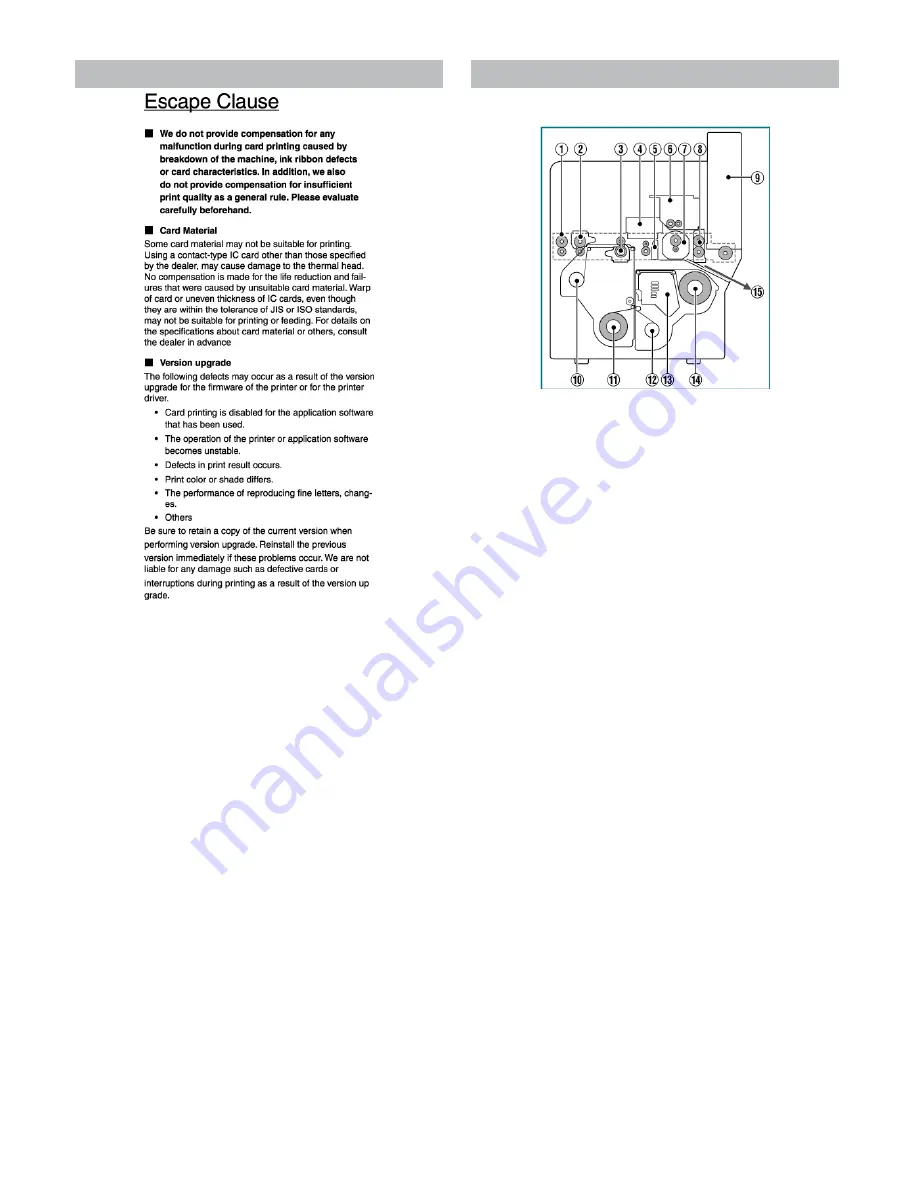
Name and functions of parts
Internal mechanism diagram
①
Card feeder unit
●
This is the roller for feeding cards. Each of the feed rollers needs to
be cleaned daily.
②
Warpage correction heating roller
●
Some types of cards may warp. Adjust accordingly until warpage is
eliminated. Set using the host computer.
③
Retransfer heating roller
●
You can adjust the temperature and retransfer time for some retrans-
fer films and cards. Set using the host computer.
④
Non-contact IC encoder
●
You can adjust the position to stop the card when a non-contact IC
card is used. Set using the host computer.
⑤
Contact IC
●
You can adjust the position to stop the card when a contact IC card
is used. Set using the host computer.
⑥
Magnetic encoder
●
You can select the coercivity when writing data to the magnetic stripe
card. Set using the host computer.
⑦
Card turnover unit
●
Inverts the card.
⑧
Cleaning roller
●
Removes any dust or dirt attached to the card. The cleaning roller
needs to be cleaned daily.
⑨
Card hopper
●
For loading cards.
⑩
Retransfer film (take-up side)
●
For attaching the take-up side of the retransfer film.
⑪
Retransfer film (supply side)
●
For attaching the unused side of the retransfer film.
⑫
Ink ribbon (take-up side)
●
For attaching the take-up side of the ink ribbon.
⑬
Thermal head
●
The thermal head is a consumable part. For details on its replace-
ment, please consult our authorized dealers.
⑭
Ink ribbon (supply side)
●
For attaching the unused side of the ink ribbon.
⑮
NG card outlet
●
Discharges NG cards, such as during card jams.
Содержание EDIsecure X ID 8300
Страница 14: ...14 Operation ...
Страница 15: ...15 Operation ...


