Digital Alert Systems MultiPlayer DASMP Скачать руководство пользователя страница 3


Digital Alert Systems 

MultiPlayer Quick Start Guide 


Revision 4.0 


Page 3 of 13 

7. 

Power up the MultiPlayer by inserting the AC cord and attaching to 100 – 240 VAC power source 

8. 

While the MultiPlayer is booting (approximately 10 sec) open a web browser on the PC 

9. 

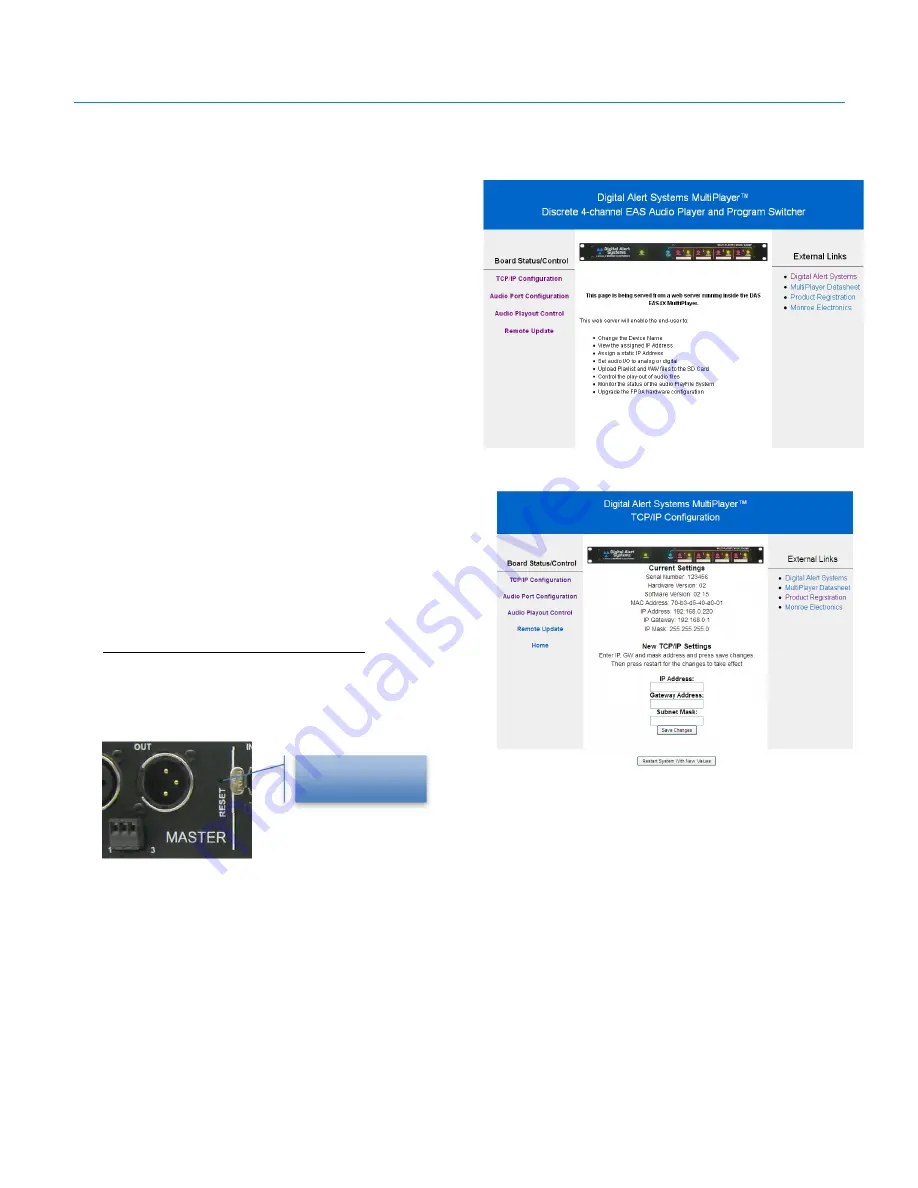
In the address line type 192.168.0.220 and 
press Enter. You should be greeted with 
the MultiPlayer Home page as shown in 
Figure 3. 

10. 

Click the link TCP/IP Configuration on the 
left side of the page. The screen will 
change to the TCP/IP configuration page 
shown in Figure 4 

11. 

 Enter the previously obtained information 
for IP Address, Gateway Address and 
Subnet Mask in the associated fields.  

12. 

Click Save Changes   to store the values 

13. 

Click Restart System with New Values 
which will restart the MultiPlayer with the 
new values.  

14. 

 Disconnect the network connection and plug 
into the network switch/router 

15. 

 Restore the computer’s previous TCP/IP values 
by reversing the steps 

1

 – 

6

 above. 


Resetting to Factory Default IP 

 
Should it be necessary to reset the MultiPlayer to the default IP 

Address (192.168.0.220), press and hold the RESET button, on the 

back panel, for 10 seconds. 


Figure 4 MultiPlayer TCP/IP Configuration screen


Figure 3 MultiPlayer Home page 

Reset button 
(recessed) 

Содержание MultiPlayer DASMP

Страница 1: ...and program switching either simultaneously sequentially or with staggered start times the DASDEC handles EAS playout and switching for the 5th channel This means a DASDEC and DASMP combination can ai...

Страница 2: ...EC the MultiPlayer should be configured with a static IP address Consult your IT department to determine the following information Static IP Address _ _ _ _ _ _ _ _ _ _ _ _ Gateway _ _ _ _ _ _ _ _ _ _...

Страница 3: ...wn in Figure 4 11 Enter the previously obtained information for IP Address Gateway Address and Subnet Mask in the associated fields 12 Click Save Changes to store the values 13 Click Restart System wi...

Страница 4: ...AES3 2 AES digital without input stereo pair ORIG 3 Analog mono ANALOG 4 Analog stereo ANALOG SLAVE combination The different channels created by the MultiPlayer are linked to the different MultiStati...

Страница 5: ...nel 2 would be seen as station 2 channel 3 would be seen as station 3 and channel 4 would be seen as station 4 Therefore 4 stations can be configured in the MultiStation interface of the DASDEC The sc...

Страница 6: ...in the DASDEC Multistation Interface Port 3 is Station 3 in the DASDEC Multistation Interface and Port 4 is Station 4 in the DASDEC Multistation Interface Ports 3 and 4 can be set to AES Analog or ORI...

Страница 7: ...rogram wiring configuration The MultiPlayer features automatic program bypass in the event of power fail In this way the program input will automatically be routed to the program output should power b...

Страница 8: ...4 MP Port 1 Input 4 Port 2 Connection DASDEC Label Setup GPIO MultiPlayer GPIO Pin 1 GPO 1 MP Port 2 Relay 1 Pin 1 Pin 2 GPO 2 MP Port 2 Relay 2 Pin 1 Pin 3 GPI 1 MP Port 2 Input 1 Pin 4 GPI 2 MP Port...

Страница 9: ...ne of the expansion Ethernet ports you need to be sure it is enabled and configured properly Configuring a Network Interface 1 Log In to the DASDEC 2 Go to Setup Network Configuration 3 Enable the pro...

Страница 10: ...ns in BOTH the MultiPlayer FTP User Name and MultiPlayer FTP Password fields 6 Once the network information is entered the DASDEC will attempt to verify connection to the MultiPlayer If there is a con...

Страница 11: ...ext for more information 10 Once selected the change is immediately applied 11 If you are using Analog Audio for the MultiPlayer you must set the EAS Header Tone EOM Amplitude percent to 40 Once you h...

Страница 12: ...ltiPlayer is not connected to the DASDEC you will see the warning message as shown in Figure 13 If necessary follow the steps in STEP 2 6 above to verify connectivity Figure 13 Warning message if Mult...

Страница 13: ...Repeat Steps 3 4 thru 3 9 for each station Step 4 Configuring the MultiPlayer GPI s and GPO s 1 Log in to the DASDEC 2 Go to Setup GPIO MultiPlayer GPIO 3 Using the pull down selections to define the...

Отзывы: