Digital Alert Systems MultiPlayer DASMP Скачать руководство пользователя страница 2


Digital Alert Systems 

MultiPlayer Quick Start Guide 


Revision 4.0 


Page 2 of 13 

Configuring MultiPlayer Network settings 

 
The MultiPlayer’s factory default IP Address is 192.168.0.220. If connecting the MultiPlayer directly to the DASDEC via one of 

the network expansion ports no change is necessary by configuring the DASDEC network port to use a similar address. If using 

a network switch/router to connect the MultiPlayer and DASDEC the IP address will most likely need to be changed. 

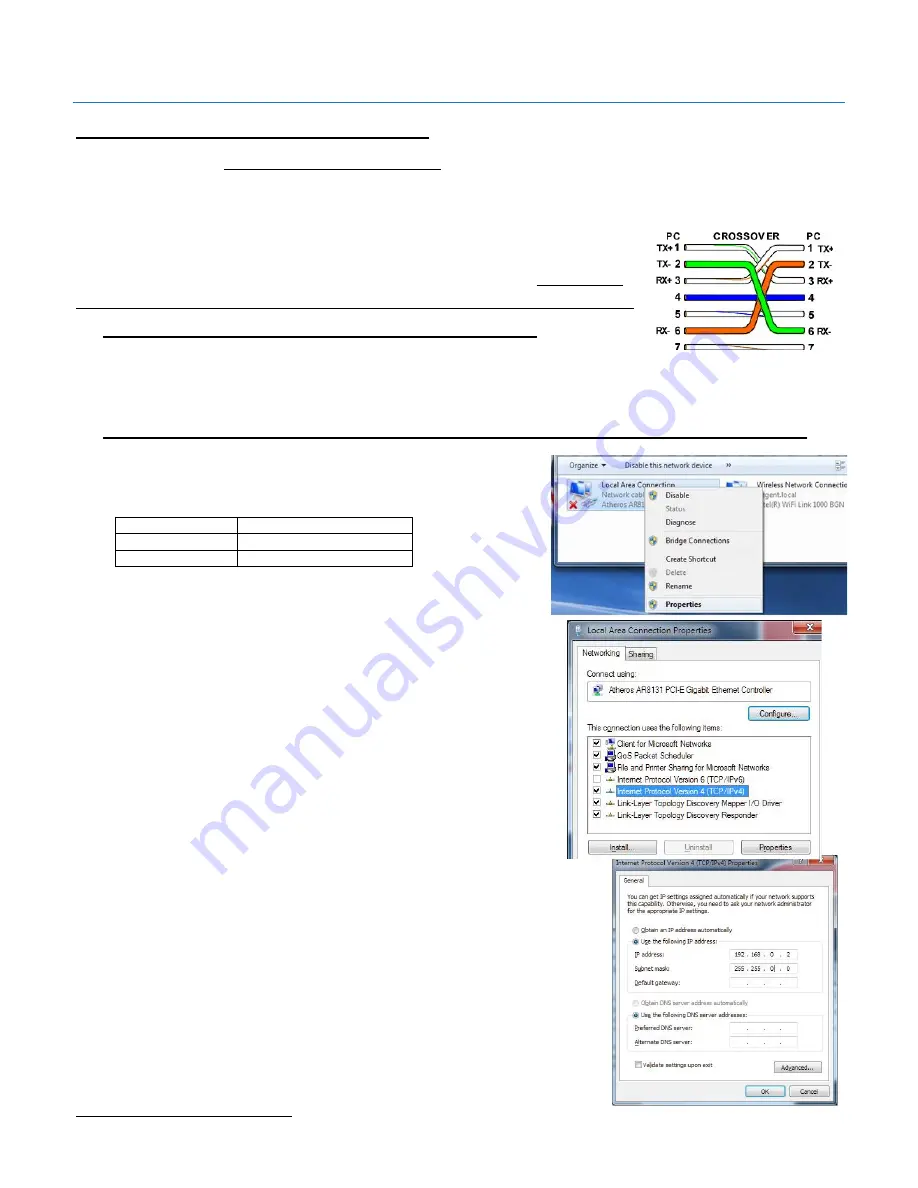
The MultiPlayer ships with a CAT-5 network crossover cable; this cable allows you to connect 

directly to the network port on the MultiPlayer.  Before directly connecting the MultiPlayer 

verify you are using a crossover cable by referencing the picture in Figure 2.  

By not using a 

crossover cable the connection will not work and one or both network ports may be damaged. 

MultiPlayer Direct Network Connection to DASDEC 

1. 

Connect the Ethernet crossover cable from the network connection 
on the MultiPlayer into an open DASDEC Ethernet port, then skip to 

Wiring the MultiPlayer


Setting/Modifying MultiPlayer IP address for Switch/router Connection to DASDEC 

 
To assure connection with the DASDEC, the MultiPlayer should be 
configured with a static IP address. Consult your IT department to determine 
the following information: 
 

Static IP Address 

_ _ _ . _ _ _ . _ _ _ . _ _ _ 

Gateway 

_ _ _ . _ _ _ . _ _ _ . _ _ _ 

Subnet Mask 

_ _ _ . _ _ _ . _ _ _ . _ _ _ 

 
To change the MultiPlayer’s IP address you will need a computer whose IP 
settings can be modified. The following instructions are for a PC with 
Windows 7

1


1. 

On the computer open “Control Panel”, then open 
“Network Connections”.  Right-click on the network 
connection you will be using to complete the setup and 
select properties.  

2. 

From the Network Connection Properties screen click on 
“Internet Protocol Version 4 (TCP/IP), then click on the 
“Properties” button. 
Make a note of the current settings in the “Internet 
Protocol Version 4 (TCP/IP)” properties page that opens 
so you can reset the computer to these settings after 
setting the IP Address of the MultiPlayer.  

3. 

Next click the Radio Button for “Use the Following IP Address”. 

4. 

In the “IP Address” field enter 192.168.0.200.   

5. 

In the “Subnet Mask Field” enter 255.255.0.0.  Leave the 
“Default Gateway”, “Preferred DNS Server” and “Alternate DNS 
Server” fields blank.   
Click OK.  

6. 

Connect the crossover cable from the MultiPlayer to the 
computer 


1

 A Macintosh computer may also be used by modifying similar settings in 

Network Preferences

 under 

System Preferences


Figure 2 Ethernet crossover cable wiring


Содержание MultiPlayer DASMP

Страница 1: ...and program switching either simultaneously sequentially or with staggered start times the DASDEC handles EAS playout and switching for the 5th channel This means a DASDEC and DASMP combination can ai...

Страница 2: ...EC the MultiPlayer should be configured with a static IP address Consult your IT department to determine the following information Static IP Address _ _ _ _ _ _ _ _ _ _ _ _ Gateway _ _ _ _ _ _ _ _ _ _...

Страница 3: ...wn in Figure 4 11 Enter the previously obtained information for IP Address Gateway Address and Subnet Mask in the associated fields 12 Click Save Changes to store the values 13 Click Restart System wi...

Страница 4: ...AES3 2 AES digital without input stereo pair ORIG 3 Analog mono ANALOG 4 Analog stereo ANALOG SLAVE combination The different channels created by the MultiPlayer are linked to the different MultiStati...

Страница 5: ...nel 2 would be seen as station 2 channel 3 would be seen as station 3 and channel 4 would be seen as station 4 Therefore 4 stations can be configured in the MultiStation interface of the DASDEC The sc...

Страница 6: ...in the DASDEC Multistation Interface Port 3 is Station 3 in the DASDEC Multistation Interface and Port 4 is Station 4 in the DASDEC Multistation Interface Ports 3 and 4 can be set to AES Analog or ORI...

Страница 7: ...rogram wiring configuration The MultiPlayer features automatic program bypass in the event of power fail In this way the program input will automatically be routed to the program output should power b...

Страница 8: ...4 MP Port 1 Input 4 Port 2 Connection DASDEC Label Setup GPIO MultiPlayer GPIO Pin 1 GPO 1 MP Port 2 Relay 1 Pin 1 Pin 2 GPO 2 MP Port 2 Relay 2 Pin 1 Pin 3 GPI 1 MP Port 2 Input 1 Pin 4 GPI 2 MP Port...

Страница 9: ...ne of the expansion Ethernet ports you need to be sure it is enabled and configured properly Configuring a Network Interface 1 Log In to the DASDEC 2 Go to Setup Network Configuration 3 Enable the pro...

Страница 10: ...ns in BOTH the MultiPlayer FTP User Name and MultiPlayer FTP Password fields 6 Once the network information is entered the DASDEC will attempt to verify connection to the MultiPlayer If there is a con...

Страница 11: ...ext for more information 10 Once selected the change is immediately applied 11 If you are using Analog Audio for the MultiPlayer you must set the EAS Header Tone EOM Amplitude percent to 40 Once you h...

Страница 12: ...ltiPlayer is not connected to the DASDEC you will see the warning message as shown in Figure 13 If necessary follow the steps in STEP 2 6 above to verify connectivity Figure 13 Warning message if Mult...

Страница 13: ...Repeat Steps 3 4 thru 3 9 for each station Step 4 Configuring the MultiPlayer GPI s and GPO s 1 Log in to the DASDEC 2 Go to Setup GPIO MultiPlayer GPIO 3 Using the pull down selections to define the...

Отзывы: