7
Front Panel Controls
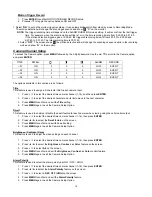
1. Removable Cartridge Casing
The DGN216 comes with 2 removable hard disk drive cartridges.
2. MENU
Press
MENU
to enter the Main Menu. You will be prompted for a password upon pressing the
MENU
button.
3. ENTER
Press
ENTER
for confirmation when making selections in the Menu mode.
4. ZOOM
The
ZOOM
feature is used to enlarge a single camera image on the main monitor.
5.
This button has two functions: PIP & Motion Detection
(a) Press the PIP button to change to Picture in Picture mode.
(b) When you are in the Camera Channel Set-up Menu and Motion Detection is activated it turns all targets on the screen
ON or OFF.
6. SLOW
Press
SLOW
to slow down the speed during Play mode. It can also be used to slow down the speed of FAST Forward
and Rewind.
7. SELECT
When in a multi-camera viewing mode, this feature is used to select the position of cameras in the multi camera display
mode. (for more information, see
view select
option in the operation section)
8.
Press
to view the 4 channel screen display mode.
9.
Press
to toggle between the 7, 9, 10, 13 channel screen display mode.
10.
Press
to view the 16 channel screen display mode.
11.
Explanation of LEDs
HDD
LED
: ON when the HDD is active.
HDD
Full
: ON when the HDD is full.
ALARM
:
ON when the alarm feature is enabled, flashing when an alarm event occurs.
TIMER
:
ON when Timer feature is “Enabled”.
PLAY
:
ON during Playback.
REC:
ON during Recording.
12. Cameral Select (1-16)
Press
Camera
Select button
(1-16) to select a camera channel.


