background image

• Do not apply pressure on the open

door.

• Do not use the appliance as a work

surface or as a storage surface.

• Open the appliance door carefully. The

use of ingredients with alcohol can

cause a mixture of alcohol and air.

• Do not let sparks or open flames to

come in contact with the appliance

when you open the door.

• Do not put flammable products or items

that are wet with flammable products

in, near or on the appliance.

WARNING! Risk of damage to

the appliance.

• To prevent damage or discoloration to

the enamel:

– do not put ovenware or other

objects in the appliance directly on

the bottom.

– do not put aluminium foil directly on

the bottom of cavity of the

appliance.

– do not put water directly into the hot

appliance.

– do not keep moist dishes and food

in the appliance after you finish the

cooking.

– be careful when you remove or

install the accessories.

• Discoloration of the enamel or stainless

steel has no effect on the performance

of the appliance.

• Use a deep pan for moist cakes. Fruit

juices cause stains that can be

permanent.

• This appliance is for cooking purposes

only. It must not be used for other

purposes, for example room heating.

• Always cook with the oven door closed.

Care and cleaning

WARNING! Risk of injury, fire,

or damage to the appliance.

• Before maintenance, deactivate the

appliance and disconnect the mains

plug from the mains socket.

• Make sure the appliance is cold. There

is the risk that the glass panels can

break.

• Replace immediately the door glass

panels when they are damaged.

Contact the Authorised Service Centre.

• Clean regularly the appliance to

prevent the deterioration of the surface

material.

• Clean the appliance with a moist soft

cloth. Only use neutral detergents. Do

not use any abrasive products,

abrasive cleaning pads, solvents or

metal objects.

• If you use an oven spray, follow the

safety instruction on it's packaging.

• Do not clean the catalytic enamel (if

applicable) with any kind of detergent.

Internal lighting

WARNING! Risk of electric

shock.

• The type of light bulb or halogen lamp

used for this appliance is for household

appliances only. Do not use it for house

lighting.

• Before replacing the lamp, disconnect

the appliance from the power supply.

• Only use lamps with the same

specifications.

Service

• To repair the appliance contact the

Authorised Service Centre.

• Use original spare parts only.

Disposal

WARNING! Risk of injury or

suffocation.

• Disconnect the appliance from the

mains supply.

• Cut off the mains electrical cable close

to the appliance and dispose of it.

• Remove the door catch to prevent

children or pets from becoming trapped

in the appliance.

6

Содержание DKU35907XK

Страница 1: ...DKU35907XK User Manual Oven Benutzerin formation Backofen ...

Страница 2: ...ance can be used by children aged from 8 years and above and persons with reduced physical sensory or mental capabilities or lack of experience and knowledge if they have been given supervision or instruction concerning the use of the appliance in a safe way and understand the hazards involved Children between 3 and 8 years of age and persons with very extensive and complex disabilities shall be k...

Страница 3: ...is switched off before replacing the lamp to avoid the possibility of electric shock Do not use the appliance before installing it in the built in structure Do not use a steam cleaner to clean the appliance Do not use harsh abrasive cleaners or sharp metal scrapers to clean the glass door since they can scratch the surface which may result in shattering of the glass If the mains power supply cable...

Страница 4: ...of the front of the appliance 595 mm Width of the back of the appliance 559 mm Depth of the appli ance 569 mm Built in depth of the appliance 548 mm Depth with open door 1022 mm Ventilation opening minimum size Open ing placed on the bottom rear side 560x20 mm Mounting screws 4x25 mm Before you install the appliance fit it with the applicable hob from the table Type Maximum power DKEV6046XB 7350 W...

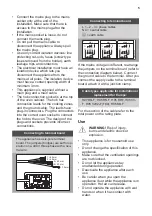
Страница 5: ...iance has a six pole terminal board The jumpers bridges are set for op eration on a 400 V three phase with a neu tral wire 1 45 mm 2 45 mm 3 60 mm 4 60 mm 70 mm 1 2 3 4 Connecting to terminal board L 1 2 3 phase cables N 4 neutral cable earth cable 356618739 230V 230V 1 2 3 5 4 2N 230V 1 2 3 5 4 3N 230V 1 2 3 5 4 If the mains voltage is different rearrange the jumpers on the terminal board refer t...

Страница 6: ...ng WARNING Risk of injury fire or damage to the appliance Before maintenance deactivate the appliance and disconnect the mains plug from the mains socket Make sure the appliance is cold There is the risk that the glass panels can break Replace immediately the door glass panels when they are damaged Contact the Authorised Service Centre Clean regularly the appliance to prevent the deterioration of ...

Страница 7: ...INSTALLATION WARNING Refer to Safety chapters Building In 18 594 589 114 21 548 595 1 min 550 20 600 min 560 3 5 60 20 198 523 80 520 60 Securing the oven to the cabinet 7 ...

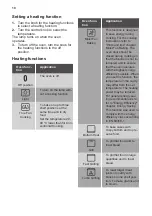
Страница 8: ...bs for the cooking zones You can operate the hob with the knobs for the cooking zones You must read the Safety chapters in the hob user manual Heat settings Knob indication Function 0 Off position 1 9 Heat settings Double zone switch 1 Turn the knob to a necessary heat setting 2 To complete the cooking process turn the knob to the off position Using the double zone if applicable To activate the do...

Страница 9: ... accessories and the removable shelf supports back to their initial position Preheating Preheat the empty oven before first use 1 Set the function Set the maximum temperature 2 Let the oven operate for 1 hour 3 Set the function Set the maximum temperature 4 Let the oven operate for 15 minutes 5 Set the function Set the maximum temperature 6 Let the oven operate for 15 minutes 7 Turn off the oven a...

Страница 10: ...or the cooking instructions refer to Hints and tips chapter Moist Fan Baking The oven door should be closed during cooking so that the function is not in terrupted and to ensure that the oven operates with the highest energy efficiency possible When you use this function the temperature in the cavity may differ from the set temperature The heating power may be reduced For general energy sav ing re...

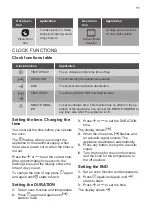
Страница 11: ... operate the oven The flashes when you connect the appliance to the electrical supply when there was a power cut or when the timer is not set Press the or to set the correct time After approximately five seconds the flashing stops and the display shows the time of day you set To change the time of day press again and again until starts to flash Setting the DURATION 1 Set an oven function and tempe...

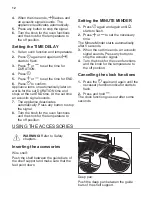
Страница 12: ... knob for the oven functions and the knob for the temperature to the off position Setting the MINUTE MINDER 1 Press again and again until starts to flash 2 Press or to set the necessary time The Minute Minder starts automatically after 5 seconds 3 When the set time ends an acoustic signal sounds Press any button to stop the acoustic signal 4 Turn the knob for the oven functions and the knob for th...

Страница 13: ...pts the power supply The oven turns on again automatically when the temperature drops HINTS AND TIPS WARNING Refer to Safety chapters The temperature and baking times in the tables are guidelines only They depend on the recipes and the quality and quantity of the ingredients used Cooking recommendations The oven has five shelf positions Count the shelf positions from the bottom of the oven floor Y...

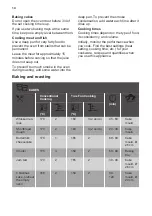
Страница 14: ...d water each time after it dries up Cooking times Cooking times depend on the type of food its consistency and volume Initially monitor the performance when you cook Find the best settings heat setting cooking time etc for your cookware recipes and quantities when you use this appliance Baking and roasting CAKES Conventional Cooking True Fan Cooking min C C Whisked rec ipes 170 2 160 3 2 and 4 45 ...

Страница 15: ...iscuits 140 3 140 150 3 30 35 Baking tray Biscuits two levels 140 150 2 and 4 35 40 Baking tray Biscuits three levels 140 150 1 3 and 5 35 45 Baking tray Meringues 120 3 120 3 80 100 Baking tray Meringues two levels preheat the empty oven 120 2 and 4 80 100 Baking tray Buns pre heat the empty oven 190 3 190 3 12 20 Baking tray Eclairs 190 3 170 3 25 35 Baking tray Eclairs two levels 170 2 and 4 35...

Страница 16: ...ventional Cook ing True Fan Cooking min C C White bread 1 2 pieces 0 5 kg each 190 1 190 1 60 70 Rye bread pre heating is not needed 190 1 180 1 30 45 Bread tin Bread rolls 6 8 rolls 190 2 180 2 2 and 4 25 40 Baking tray Pizza 230 250 1 230 250 1 10 20 Enamel led tray Scones 200 3 190 3 10 20 Baking tray Preheat the empty oven Use the cake mould 16 ...

Страница 17: ...s 180 1 180 1 50 60 Lasagne 180 190 2 180 190 2 25 40 Cannelloni 180 190 2 180 190 2 25 40 Use the second shelf position Use the wire shelf MEAT Conventional Cooking True Fan Cooking min C C Beef 200 190 50 70 Pork 180 180 90 120 Veal 190 175 90 120 English roast beef rare 210 200 50 60 English roast beef medium 210 200 60 70 English roast beef well done 210 200 70 75 17 ...

Страница 18: ...le duck 175 2 220 2 120 150 Whole goose 175 2 160 1 150 200 Rabbit cut in pieces 190 2 175 2 60 80 Hare cut in pieces 190 2 175 2 150 200 Whole pheasant 190 2 175 2 90 120 Use the second shelf position FISH Conventional Cooking True Fan Cook ing min C C Trout Sea bream 3 4 fish 190 175 40 55 Tuna Salmon 4 6 fillets 190 175 35 60 Grill Preheat the empty oven Use the fourth shelf position Grill with...

Страница 19: ... 7 Toast 4 6 2 4 2 3 Turbo Grilling Preheat the empty oven Use the first or the second shelf position To calculate the roasting time multiple the time given in the table below by the centimetres of thickness of the fillet BEEF C min Roast beef or fil let rare 190 200 5 6 Roast beef or fil let medium 180 190 6 8 Roast beef or fil let well done 170 180 8 10 PORK C min Shoulder Neck Ham joint 1 1 5 k...

Страница 20: ...5 3 5 kg 160 180 120 150 POULTRY C min Turkey 4 6 kg 140 160 150 240 FISH STEAMED C min Whole fish 1 1 5 kg 210 220 40 60 Dehydrating True Fan Cooking Cover trays with grease proof paper or baking parchment For a better result stop the oven halfway through the drying time open the door and let it cool down for one night to complete the drying For 1 tray use the third shelf position For 2 trays use...

Страница 21: ...mekins Flan base tin Dark non reflective 28 cm diameter Dark non reflective 26 cm diameter Ceramic 8 cm diame ter 5 cm height Dark non reflective 28 cm diameter Moist Fan Baking For the best results follow suggestions listed in the table below C min Sweet rolls 12 pieces baking tray or dripping pan 175 3 40 50 Rolls 9 pieces baking tray or dripping pan 180 2 35 45 Pizza frozen 0 35 kg wire shelf 1...

Страница 22: ...ping pan 180 3 35 45 Shashlik 0 5 kg baking tray or dripping pan 180 3 40 50 Cookies 16 pieces baking tray or dripping pan 150 2 30 45 Macaroons 20 pieces baking tray or dripping pan 180 2 45 55 Muffins 12 pieces baking tray or dripping pan 170 2 30 40 Savory pastry 16 pieces baking tray or dripping pan 170 2 35 45 Short crust bis cuits 20 pieces baking tray or dripping pan 150 2 40 50 Tartlets 8 ...

Страница 23: ...tins Ø20 cm Conven tional Cooking Wire shelf 2 180 70 90 Apple pie 2 tins Ø20 cm True Fan Cooking Wire shelf 2 160 70 90 Sponge cake cake mould Ø26 cm Conven tional Cooking Wire shelf 2 170 40 50 Preheat the oven for 10 minutes Sponge cake cake mould Ø26 cm True Fan Cooking Wire shelf 2 160 40 50 Preheat the oven for 10 minutes Sponge cake cake mould Ø26 cm True Fan Cooking Wire shelf 2 and 4 160 ...

Страница 24: ... cooking time Preheat the oven for 3 minutes CARE AND CLEANING WARNING Refer to Safety chapters Notes on cleaning Cleaning Agents Clean the front of the oven with a soft cloth with warm water and a mild cleaning agent To clean metal surfaces use a dedicated cleaning agent Clean stubborn stains with a special oven cleaner Everyday Use Clean the oven cavity after each use Fat accumulation or other f...

Страница 25: ...o clean the door gasket refer to the general information about cleaning Removing the shelf supports To clean the oven remove the shelf supports CAUTION Be careful when you remove the shelf supports 1 Pull the front of the shelf support away from the side wall 2 Pull the rear end of the shelf support away from the side wall and remove it 2 1 Install the removed accessories in the opposite sequence ...

Страница 26: ...cloth on a stable surface 7 Hold the door trim B on the top edge of the door at the two sides and push inwards to release the clip seal 1 2 B 8 Pull the door trim to the front to remove it 9 Hold the door glass panel by its top edge and carefully pull it out Make sure the glass slides out of the supports completely 10 Clean the glass panels with water and soap Dry the glass panels carefully Do not...

Страница 27: ...burning on the lamp The back lamp 1 Turn the lamp glass cover to remove it 2 Clean the glass cover 3 Replace the lamp with a suitable 300 C heat resistant lamp 4 Install the glass cover TROUBLESHOOTING WARNING Refer to Safety chapters What to do if Problem Possible cause Remedy The cooking zones do not operate Refer to the operating instructions for the built in cooking sur face You cannot activat...

Страница 28: ...ock Service data If you cannot find a solution to the problem yourself contact your dealer or an Authorised Service Centre The necessary data for the service centre is on the rating plate The rating plate is on the front frame of the oven cavity Do not remove the rating plate from the oven cavity We recommend that you write the data here Model MOD Product number PNC Serial number S N ENERGY EFFICI...

Страница 29: ... one time Cooking with fan When possible use the cooking functions with fan to save energy Residual heat When the cooking duration is longer than 30 minutes reduce the oven temperature to minimum 3 10 minutes before the end of cooking The residual heat inside the oven will continue to cook Use the residual heat to warm up other dishes Keep food warm Choose the lowest possible temperature setting t...

Страница 30: ... von Kindern und schutzbedürftigen Personen Das Gerät kann von Kindern ab 8 Jahren und Personen mit eingeschränkten physischen sensorischen oder geistigen Fähigkeiten oder mit mangelnder Erfahrung und oder mangelndem Wissen nur dann verwendet werden wenn sie durch eine für ihre Sicherheit zuständige Person beaufsichtigt werden oder in die sichere Verwendung des Geräts eingewiesen wurden und die mi...

Страница 31: ...ß Seien Sie vorsichtig und berühren Sie niemals die Heizelemente Verwenden Sie zum Anfassen des Zubehörs und der Töpfe wärmeisolierende Handschuhe Ziehen Sie bitte vor jeder Wartungsmaßnahme den Netzstecker aus der Steckdose WARNUNG Vergewissern Sie sich dass das Gerät ausgeschaltet ist bevor Sie die Lampe austauschen um einen Stromschlag zu vermeiden Verwenden Sie ds Gerät nicht bevor es in den E...

Страница 32: ...ische müssen die passenden Abmessungen aufweisen Die Mindestabstände zu anderen Geräten und Küchenmöbeln sind einzuhalten Montieren Sie das Gerät an einem sicheren und geeigneten Ort der den Montageanforderungen entspricht Einige Teile des Geräts sind stromführend Das Küchenmöbel muss auf allen Seiten mit dem Gerät abschließen um einen Kontakt mit stromführenden Teilen zu vermeiden Das Gerät ist m...

Страница 33: ...änglich ist Falls die Steckdose lose ist schließen Sie den Netzstecker nicht an Ziehen Sie nicht am Netzkabel wenn Sie das Gerät von der Stromversorgung trennen möchten Ziehen Sie stets am Netzstecker Verwenden Sie nur geeignete Trenneinrichtungen Überlastschalter Sicherungen Schraubsicherungen müssen aus dem Halter entfernt werden können Fehlerstromschutzschalter und Schütze Die elektrische Insta...

Страница 34: ...öffnete Gerätetür aus Benutzen Sie das Gerät nicht als Arbeits oder Abstellfläche Öffnen Sie die Gerätetür vorsichtig Bei der Verwendung von Zutaten die Alkohol enthalten kann ein Alkohol Luftgemisch entstehen Achten Sie beim Öffnen der Tür darauf dass keine Funken oder offenen Flammen in das Gerät gelangen Laden Sie keine entflammbaren Produkte oder Gegenstände die mit entflammbaren Produkten ben...

Страница 35: ...e ein Backofenspray verwenden befolgen Sie die Anweisungen auf der Verpackung Reinigen Sie die katalytische Emailbeschichtung falls vorhanden nicht mit Reinigungsmitteln Innenbeleuchtung WARNUNG Stromschlaggefahr Die Leuchtmittel oder die Halogenlampe in diesem Gerät sind nur für Haushaltsgeräte geeignet Benutzen Sie diese nicht für die Raumbeleuchtung Trennen Sie das Gerät von der Stromversorgung...

Страница 36: ...Einbau 18 594 589 114 21 548 595 1 min 550 20 600 min 560 3 5 60 20 198 523 80 520 60 Befestigung des Ofens am Möbel 36 ...

Страница 37: ... Einstellknöpfen bedient werden Lesen Sie bitte die Sicherheitshinweise in der Gebrauchsanleitung für das Kochfeld sorgfältig durch Kochstufen Knopfstellung Funktion 0 Stellung Aus 1 9 Kochstufen Zweikreiszonen schalter 1 Drehen Sie den Einstellknopf auf die gewünschte Kochstufe 2 Zum Beenden des Kochvorgangs muss der Einstellknopf in die Stellung Aus gedreht werden Verwenden der Zweikreis Kochzon...

Страница 38: ...behör und die herausnehmbaren Einhängegitter wieder in ihrer ursprünglichen Position ein Vorheizen Heizen Sie den leeren Backofen vor der ersten Inbetriebnahme vor 1 Stellen Sie die Funktion ein Stellen Sie die Höchsttemperatur ein 2 Lassen Sie den Backofen 1 Stunde lang eingeschaltet 3 Stellen Sie die Funktion Stellen Sie die Höchsttemperatur ein 4 Lassen Sie den Backofen 15 Minuten lang eingesch...

Страница 39: ...nfunkti on Anwendung Feuchte Um luft Diese Funktion ist entwi ckelt worden um wäh rend des Garvorgangs Energie zu sparen Die Kochanleitungen finden Sie im Kapitel Hinweise und Tipps Feuchte Um luft Die Backofentür soll te während des Garvor gangs geschlossen blei ben damit die Funktion nicht unterbrochen wird So wird gewährleistet dass der Backofen mit der höchsten Energieeffi zienz arbeitet Wenn ...

Страница 40: ...Zum Einstellen einer Countdown Zeit Diese Funktion hat kei ne Auswirkung auf den Gerätebetrieb Sie können den KURZZEIT WECKER jederzeit einstellen auch wenn das Gerät ausgeschaltet ist Einstellen der Uhrzeit Ändern der Uhrzeit Die Uhrzeit muss vor der Inbetriebnahme des Backofens eingestellt werden Die Anzeige blinkt wenn Sie das Gerät an die Stromversorgung anschließen nach einem Stromausfall und...

Страница 41: ... später automatisch ein gart für die eingestellte DAUER und stoppt um die eingestellte ENDE Zeit Nach Ablauf der eingestellten Zeit ertönt ein Signalton 7 Das Gerät wird automatisch ausgeschaltet Drücken Sie eine beliebige Taste um das Signal abzustellen 8 Drehen Sie den Backofen Einstellknopf und den Temperaturwahlknopf auf die Aus Position Einstellen des KURZZEIT WECKERS 1 Drücken Sie wiederholt...

Страница 42: ...en Abrutschen vom Rost gesichert ZUSATZFUNKTIONEN Kühlgebläse Wenn der Backofen in Betrieb ist wird das Kühlgebläse automatisch eingeschaltet um die Ofenoberflächen zu kühlen Nach dem Abschalten des Backofens kann das Kühlgebläse weiterlaufen bis der Ofen abgekühlt ist Sicherheitsthermostat Ein unsachgemäßer Gebrauch des Ofens oder defekte Bestandteile können zu einer gefährlichen Überhitzung führ...

Страница 43: ...öffnen bevor 3 4 der Backzeit abgelaufen ist Wenn Sie zwei Backbleche gleichzeitig nutzen lassen Sie eine Ebene dazwischen frei Garen von Fleisch und Fisch Setzen Sie bei Speisen mit hohem Fettgehalt eine Brat und Fettpfanne ein damit keine hartnäckigen Flecken im Backofen verbleiben Lassen Sie das Fleisch vor dem Anschneiden etwa 15 Minuten ruhen damit der Fleischsaft nicht ausläuft Um die Rauchb...

Страница 44: ...r 160 2 150 2 90 120 Kuchen form Ø 20 cm Rosinenku chen Heizen Sie den lee ren Backofen vor 175 1 160 2 50 60 Brotform Muffins 170 3 140 150 3 20 30 Back blech Muffins zwei Ebenen 140 150 2 und 4 25 35 Back blech Muffins drei Ebenen 140 150 1 3 und 5 30 45 Back blech Kekse 140 3 140 150 3 30 35 Back blech Kekse zwei Ebenen 140 150 2 und 4 35 40 Back blech Kekse drei Ebenen 140 150 1 3 und 5 35 45 ...

Страница 45: ... blech Eclairs 190 3 170 3 25 35 Back blech Eclairs zwei Ebenen 170 2 und 4 35 45 Back blech Törtchen 180 2 170 2 45 70 Kuchen form Ø 20 cm Üppiger Obstkuchen 160 1 150 2 110 120 Kuchen form Ø 24 cm Leeren Backofen vorheizen BROT UND PIZZA Ober Unterhitze Heißluft Min C C Weißbrot 1 2 Stück je 0 5 kg 190 1 190 1 60 70 Roggenbrot Vorheizen ist nicht erforderlich 190 1 180 1 30 45 Brotform 45 ...

Страница 46: ...ech Leeren Backofen vorheizen Verwenden Sie eine Kuchenform FLANS Ober Unterhitze Heißluft Min C C Nudelauflauf Vorheizen ist nicht erforderlich 200 2 180 2 40 50 Gemüseauflauf Vorhei zen ist nicht erforderlich 200 2 175 2 45 60 Quiche 180 1 180 1 50 60 Lasagne frisch 180 190 2 180 190 2 25 40 Cannelloni 180 190 2 180 190 2 25 40 Nutzen Sie die zweite Einschubebene Verwenden Sie den Kombirost 46 ...

Страница 47: ...Unterhitze Heißluft Min C C Schweineschulter mit Schwarte 180 2 170 2 120 150 Schweinshaxe 2 Stück 180 2 160 2 100 120 Lammkeule 190 2 175 2 110 130 Hähnchen ganz 220 2 200 2 70 85 Pute ganz 180 2 160 2 210 240 Ente ganz 175 2 220 2 120 150 Gans ganz 175 2 160 1 150 200 Kaninchen in Stücke ge schnitten 190 2 175 2 60 80 Kaninchen in Stücke ge schnitten 190 2 175 2 150 200 Fasan ganz 190 2 175 2 90...

Страница 48: ...ndersteak 4 Stück 0 6 10 12 6 8 Würstchen 8 12 15 10 12 Schweinekoteletts 4 Stück 0 6 12 16 12 14 Hähnchen halbiert 2 1 30 35 25 30 Spieße 4 10 15 10 12 Hähnchenbrust 4 Stück 0 4 12 15 12 14 Frikadellen 6 0 6 20 30 Fischfilet 4 Stück 0 4 12 14 10 12 Belegte Toastbrote 4 6 5 7 Toast 4 6 2 4 2 3 Heißluftgrillen Leeren Backofen vorheizen Nutzen Sie die erste oder zweite Einschubebene Multiplizieren S...

Страница 49: ...1 kg 150 170 90 120 KALB C Min Kalbsbraten 1 kg 160 180 90 120 Kalbshaxe 1 5 2 kg 160 180 120 150 LAMM C Min Lammkeule Lammbraten 1 1 5 kg 150 170 100 120 Lammrücken 1 1 5 kg 160 180 40 60 GEFLÜGEL C Min Geflügelteile je 0 2 0 25 kg 200 220 30 50 Hähnchen hal biert je 0 4 0 5 kg 190 210 35 50 Hähnchen Pou larde 1 1 5 kg 190 210 50 70 Ente 1 5 2 kg 180 200 80 100 Gans 3 5 5 kg 160 180 120 180 Pute ...

Страница 50: ...3 Stellen Sie die Temperatur auf 60 70 C ein OBST Std Pflaumen 8 10 Aprikosen 8 10 Apfelscheiben 6 8 Birnen 6 9 Feuchte Umluft Empfohlenes Zubehör Verwenden Sie die dunklen und nicht reflektierenden Formen und Behälter Sie haben eine bessere Wärmeabsorption als helle Farbe und reflektierende Schüsseln Pizzapfanne Backform Förmchen Tortenbodenform Dunkel nicht reflek tierend 28 cm Durchmesser Dunke...

Страница 51: ...hku chen à la Victo ria Backform auf Kombi rost 170 2 35 50 Fisch pochiert 0 3 kg Backblech oder tiefes Blech 180 2 35 45 Fisch 0 2 kg Backblech oder tiefes Blech 180 3 25 35 Fischfilet 0 3 kg Pizzapfanne auf Kom birost 170 3 30 40 Fleisch po chiert 0 25 kg Backblech oder tiefes Blech 180 3 35 45 Schaschlik 0 5 kg Backblech oder tiefes Blech 180 3 40 50 Plätzchen 16 Stück Backblech oder tiefes Ble...

Страница 52: ...zapfanne auf Kom birost 180 3 35 45 Mediterranes Gemüse 0 7 kg Backblech oder tiefes Blech 180 4 35 45 Informationen für Prüfinstitute Tests gemäß IEC 60350 1 C Min Tört chen 20 pro Blech Ober Unterhitze Back blech 3 170 20 30 Tört chen 20 pro Blech Heißluft Back blech 3 150 160 20 35 Tört chen 20 pro Blech Heißluft Back blech 2 und 4 150 160 20 35 Apfelku chen 2 Formen à Ø 20 cm Ober Unterhitze K...

Страница 53: ...Backofen 10 Min vorheizen Biskuit Ku chen form Ø 26 cm Heißluft Kombi rost 2 und 4 160 40 60 Backofen 10 Min vorheizen Mürbe teigge bäck Heißluft Back blech 3 140 150 20 40 Mürbe teigge bäck Heißluft Back blech 2 und 4 140 150 25 45 Mürbe teigge bäck Ober Unterhitze Back blech 3 140 150 25 45 Toast 4 6 Stück Grill Kombi rost 4 Max 2 3 Minuten auf der ers ten Seite 2 3 Minuten auf der zweiten Seite...

Страница 54: ...m speziellen Backofen reiniger Täglicher Gebrauch Reinigen Sie den Innenraum des Backofens nach jedem Gebrauch Fettan sammlungen und Speisereste könnten einen Brand verursachen Für die Grillpfanne ist das Risiko besonders hoch Es kann sich Feuchtigkeit im Ofen oder an den Glasscheiben der Tür nieder schlagen Um die Kondensation zu reduzieren heizen Sie den Backofen im mer 10 Minuten vor dem Garen ...

Страница 55: ...im Herausnehmen der Einhängegitter 1 Ziehen Sie das Einhängegitter vorne von der Seitenwand weg 2 Ziehen Sie das Einhängegitter hinten von der Seitenwand weg und nehmen Sie es heraus 2 1 Führen Sie zum Einsetzen der entfernten Zubehörteile die oben beschriebenen Schritte in umgekehrter Reihenfolge durch Aus und Einbauen der Tür Die Backofentür ist mit zwei Glasscheiben ausgestattet Die Backofentür...

Страница 56: ...f einer stabilen Fläche 7 Fassen Sie die Türabdeckung B an der Oberkante der Tür an beiden Seiten an Drücken Sie sie nach innen um den Klippverschluss zu lösen 1 2 B 8 Ziehen Sie die Türabdeckung nach vorne um sie abzunehmen 9 Halten Sie die Oberkante der Türglasscheibe fest und ziehen Sie sie vorsichtig heraus Achten Sie darauf dass die Glasscheiben vollständig aus den Halterungen gezogen werden ...

Страница 57: ...alogenlampen immer mit einem Tuch anfassen um ein Einbrennen von Fett Fingerabdrücke zu vermeiden Rückwandlampe 1 Drehen Sie die Glasabdeckung der Lampe und nehmen Sie sie ab 2 Reinigen Sie die Glasabdeckung 3 Ersetzen Sie die Lampe durch eine geeignete bis 300 C hitzebeständige Lampe 4 Bringen Sie die Glasabdeckung wieder an FEHLERSUCHE WARNUNG Siehe Kapitel Sicherheitshinweise Was tun wenn Störu...

Страница 58: ... auf den Spei sen und im Garraum nieder Die Speisen standen zu lan ge im Backofen Lassen Sie die Speisen nach Beendigung des Gar oder Backvorgangs nicht länger als 15 20 Minuten im Backofen stehen Das Display zeigt 12 00 an Es gab einen Stromausfall Stellen Sie die Uhrzeit neu ein Servicedaten Wenn Sie das Problem nicht selbst lösen können wenden Sie sich an Ihren Händler oder einen autorisierten ...

Страница 59: ...nicht zu oft geöffnet werden Halten Sie die Türdichtung sauber und stellen Sie sicher dass sie sich fest in der richtigen Position befindet Verwenden Sie Kochgeschirr aus Metall um mehr Energie zu sparen Heizen Sie wenn möglich den Backofen nicht vor Halten Sie die Unterbrechungen beim Backen so kurz wie möglich wenn Sie mehrere Speisen gleichzeitig zubereiten Garen mit Heißluft Nutzen Sie wenn mö...

Страница 60: ...in den entsprechenden Recyclingbehältern Recyceln Sie zum Umwelt und Gesundheitsschutz elektrische und elektronische Geräte Entsorgen Sie Geräte mit diesem Symbol nicht mit dem Hausmüll Bringen Sie das Gerät zu Ihrer örtlichen Sammelstelle oder wenden Sie sich an Ihr Gemeindeamt 60 ...

Страница 61: ...61 ...

Страница 62: ...62 ...

Страница 63: ...63 ...

Страница 64: ...867355784 A 292019 ...

Отзывы: