E
E
N
N
• should any trace of water appear, check the drain hole of the container to ensure that it is not clogged, that the water fill and
drain pipes are correctly connected and are not throttled or damaged
• make sure that the temperature of the air or water does not exceed the installation limit values (see paragraph 5.2)
• make sure that the water inlet filter is not clogged (see paragraph 9.1)
If the fault still persists after the above inspections have been made, turn off the electric power source by means of the switch
fitted during the installation phase, pull out the plug (if any) from its socket, turn off the tap connecting the appliance to the water
mains, and contact the nearest Authorized Technical Service Centre.
To obtain a faster and more efficient reply when you call the Centre, state the model of the appliance precisely, together with its
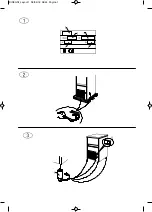
serial number or manufacturing number. This information is given on the serial N° plate (Fig. 1) affixed to the rear of the appliance
and on the cover of this instruction manual.
8 OPERATION
The appliance is equipped with a thermostat in the ice bin which stops production when the ice accumulated in the bin reaches the
probe to which the thermostat is connected. When the ice is removed from the bin, the thermostat will reactivate production, thus
creating a new stock of ice.
9 MAINTENANCE
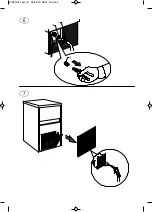
9.1 CLEANING THE FILTER OF WATER SUPPLY SOLENOID VALVE (Fig. 6)
All the operations described in this paragraph must be carried out only after the electric power and water supplies have been
disconnected, as described previously, by professionally qualified and authorized personnel.
At least every two months, clean the filter (14) located on the water inlet solenoid valve, proceeding as follows:
•
switch off the electric power supply
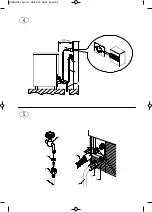
by means of the switch (7 in Fig. 4), fitted during installation, and disconnect the plug (if
any) of the appliance from its socket
•
shut off the water supply
by turning the tap (8 in Fig. 4) fitted during installation
• unscrew the threaded ring nut (11) of the water feed hose, located at the outlet of the solenoid valve at the rear of the appliance
• using a pair of pliers, remove the filter (14) from its seat without damaging the water feed pipe connector
• place the filter under a strong jet of water to remove residue, but replace the filter if it is excessively dirty
After having carried out the cleaning operations, refit the filter and hose pipe taking the necessary precautions described earlier in
the Instruction Manual.
When the operations have terminated, turn on both the electricity supply and water supply.
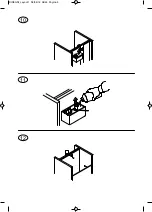
9.2 AIR-COOLED MODELS (Fig. 7)
For air-cooled models, it is very important to keep the finned condenser and its external filter (if any) clean.
Have the finned condenser cleaned at least once every two months by an Authorized Technical Service Centre, which can include
this operation in the scheduled maintenance programme.
The external filter (if any) must be cleaned at least once a month, as follows:
• switch off appliance and
cut off power supply
with the switch (7 in Fig. 4) fitted at the installation stage
• open plastic grille
• remove filter and keep it at a distance form the appliance
• remove dust from filter by blowing with compressed air
• replace filter in its seat and close plastic grille
9.3CLEANING AND SANITIZING OPERATIONS
A cleaning and sanitizing kit specifically designed for this appliance is available from your dealer.
Do not use corrosive substances to remove limestone from the appliance, because this will invalidate the warranty,
and may cause serious damage to the materials and components of the appliance.
Do not use jets of water to clean the appliance.
All cleaning operations must be carried out only after the electric power and water supplies have been
disconnected, as described previously, by professionally qualified and authorized personnel.
Follow the instructions given in the cleaning and sanitizing manual supplied with the appliance.
IMPORTANT:
All the ice produced during the first 30 minutes after cleaning and sanitising operations, together with any ice present in
the bin, must be discarded.
Содержание ICE115AS-R2
Страница 1: ...Mod ICE115AS R2 Production code GB903A HC 08 2018 ...
Страница 15: ...DISEGNI_Layout 1 06 04 18 08 44 Pagina 1 ...
Страница 16: ...DISEGNI_Layout 1 06 04 18 08 44 Pagina 2 ...
Страница 17: ...DISEGNI_Layout 1 06 04 18 08 44 Pagina 3 ...
Страница 18: ...8 9 DISEGNI_Layout 1 06 04 18 08 44 Pagina 4 ...
Страница 19: ...10 11 12 DISEGNI_Layout 1 06 04 18 08 44 Pagina 5 ...


