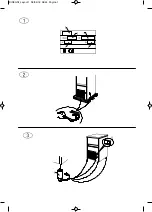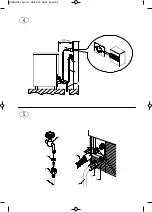
Complete sanitizing can only be carried out only by the Authorized Technical Service Centres, and must be done regularly
depending on the conditions of use of the appliance, the chemical and physical features of the water, and after every period in
which the appliance has remained at a standstill for any length of time.
You are advised to ask your dealer to draw up a scheduled maintenance contract that will cover the following:
• cleaning the condenser
• cleaning the filter located on the water supply solenoid valve
• cleaning the ice-tray
• checking the charge of coolant gas
• checking the operating cycle
• sanitizing the appliance
The frequency of cleaning and sanitizing operations can vary, depending on:
• temperature and environmental conditions
• temperature and quality of water (hardness, presence of grit, etc.)
• quantity of ice produced, or time of use of ice flaker
• periods of non-use of ice flaker
TO ENSURE CORRECT CLEANING AND SANITIZING OF THE ICE FLAKER, PERFORM THE OPERATIONS DESCRIBED IN
THIS MANUAL AT LEAST ONCE A MONTH.
IMPORTANT:
• the operations described in this manual must only be performed by skilled, authorised personnel
• the ice flaker must be installed in a hygienically clean location; avoid premises such as cellars and storerooms, because poor
hygiene promotes the formation and proliferation of bacteria in the ice flaker
• a cleaning and sanitizing kit specifically designed for this appliance is available from your dealer
• do not use corrosive substances to remove limescale from the appliance, because this will invalidate the guarantee, and may
cause serious damage to the materials and components of the appliance
• gloves suitable to protect against cuts must be worn when performing all operations involving handling of sheet metal parts in
particular
• gloves suitable to protect the skin against the substances used must be worn when performing all cleaning and sanitizing
operations
• wear suitable goggles during cleaning and sanitizing operations to protect the eyes against splashes of the substances used
• take care not to spill water or solutions on the wiring or the power cable
10 CLEANING
1.
switch off appliance
2.
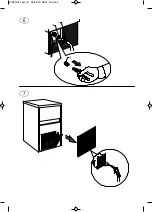
remove top of appliance by lifting rear part and releasing it from front hooks (Fig. 8). The top is secured to the rear panel of the
appliance with a screw, which must be removed before lifting the top and repositioned when cleaning and sanitizing
operations are finished
3.
remove rear panel by loosening fixing screws and raising it (Fig. 9)
4.
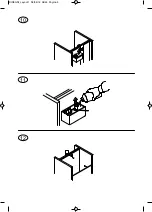
open lid of water supply basin (Fig. 10)
5.
empty water basin
6.
fill water basin with a with a 25% solution of water and white vinegar. Raise without forcing the floating valve with a non-
metallic stick
7.
switch on the appliance and let it run, topping up the level of the solution in the basin until at least 2 litres of solution has been
used
8.
switch off appliance and
disconnect from power supply mains
9.
remove all ice from bin
10.
clean ice outlet (1 in Fig. 11), bin and door with water and white vinegar solution. Remove any sediments from evaporator with
a soft brush and non-abrasive sponge
11.
rinse components previously cleaned
12.
remove the stick that holds the floating valve
13.
connect appliance to mains electricity supply, and switch on
14.
rinse evaporator leaving appliance running for at least 5 minutes
15.
prepare to perform the sanitizing operations described in the next chapter
11 SANITIZING
Use a 200 mg/l solution of sodium hypochlorite and water (or a solution of ½ ounce of normal bleach to 1 gallon of water), or one
of the solutions commonly used to disinfect babies’ feeding bottles; in this case, check that the sanitizing product is:
• authorized by your Country’s Ministry of Health
Содержание ICE115AS-R2
Страница 1: ...Mod ICE115AS R2 Production code GB903A HC 08 2018 ...
Страница 15: ...DISEGNI_Layout 1 06 04 18 08 44 Pagina 1 ...
Страница 16: ...DISEGNI_Layout 1 06 04 18 08 44 Pagina 2 ...
Страница 17: ...DISEGNI_Layout 1 06 04 18 08 44 Pagina 3 ...
Страница 18: ...8 9 DISEGNI_Layout 1 06 04 18 08 44 Pagina 4 ...
Страница 19: ...10 11 12 DISEGNI_Layout 1 06 04 18 08 44 Pagina 5 ...


