background image

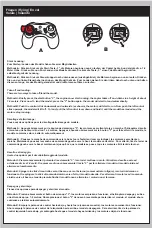
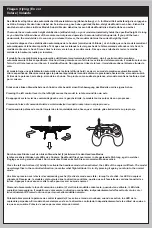
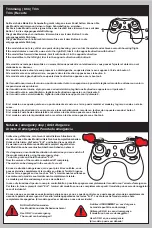
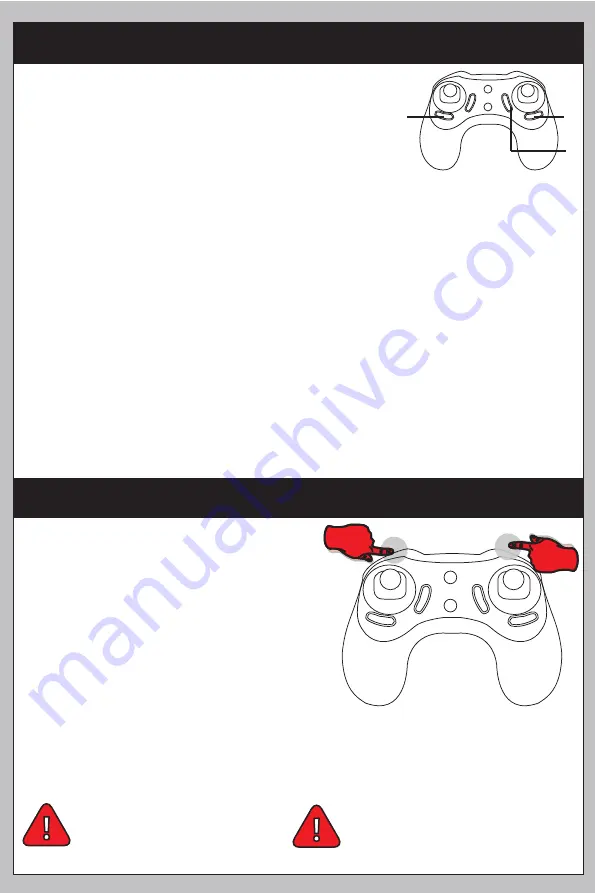
Sollte sich das Modell im Schwebeflug nicht ruhig an einem Punkt halten, können Sie 

das Modell austrimmen und einen ruhigen Schwebeflug zu erreichen.

Dreht sich das Modell um die eigene Achse nach rechts/ links trimmen Sie es mit dem 

Button 1 in die entgegengesetzte Richtung.

Fliegt das Modell nach vorne/hinten trimmen Sie es mit dem Button 5 in die 

entgegengesetzte Richtung.

Fliegt das Modell nach links/rechts trimmen Sie es mit dem Button 6 in die 

entgegengesetzte Richtung.

If the model does not stay still at one point during hovering, you can trim the model and achieve a smooth hovering flight.

If the model rotates around its own axis to the right/left, trim it in the opposite direction with button 1.

If the model flies forwards/backwards, trim it with button 5 in the opposite direction.

If the model flies to the left/right, trim it in the opposite direction with button 6.

Si le modèle ne reste pas immobile à un moment donné pendant le vol stationnaire, vous pouvez l'ajuster et obtenir un vol 

stationnaire en douceur.

Si le modèle tourne autour de son propre axe à droite/gauche, coupez-le dans le sens opposé à l'aide du bouton 1.

Si le modèle vole en avant/en arrière, coupez-le dans la direction opposée avec le bouton 5.

Si le modèle vole à gauche/droite, coupez-le dans la direction opposée avec le bouton 6.

Se il modello non rimane fermo in un punto durante il volo in sospensione, è possibile tagliare il modello e ottenere un volo in 

sospensione senza problemi.

Se il modello ruota intorno al proprio asse a destra/sinistra, tagliarlo nella direzione opposta con il pulsante 1.

Se il modello vola in avanti/indietro, tagliarlo nella direzione opposta con il pulsante 5.

Se il modello vola a sinistra/destra, tagliarlo nella direzione opposta con il pulsante 6.

Si el modelo no se queda quieto en un punto durante el vuelo en el aire, puede recortar el modelo y lograr un vuelo en el aire 

suave.

Si el modelo gira alrededor de su propio eje a la derecha/izquierda, recortar en la dirección opuesta usando el botón 1.

Si el modelo vuela hacia adelante/atrás, recortar en la dirección opuesta con el botón 5.

Si el modelo vuela a la izquierda/derecha, recortar en la dirección opuesta con el botón 6.

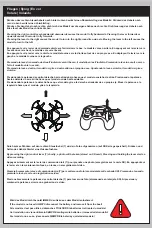
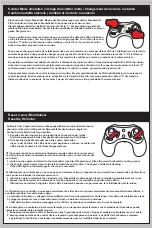
Not-Aus | 

emergency stop 

| Arrêt d'urgence

Arresto di emergenza | 

Parada de emergencia

NUR im Notfall anwenden.

Das Modell kann dabei Schaden nehmen!

Sollte eine gefährliche, nicht mehr kontrollierbare Situation ent-

stehen, können Sie das Modell mittels Not-Aus komplett abschalten.

Drücken Sie hierzu die Tasten “8+9” und halten diese gedrückt.

Es werden nun die Motoren des Modell komplett abgeschalten.

Das Modell kann bei eventuellen Abstürzen Schaden nehmen!

If a dangerous, uncontrollable situation should arise you can switch off

the model completely using the emergency stop.

To do this, press and hold the button "8+9".

Now the motors of the model are switched off completely.

The model can be damaged in the event of a crash!

En cas de situation dangereuse qui ne peut plus être contrôlée, vous

pouvez éteindre complètement le modèle en utilisant l'arrêt d'urgence.

Pour ce faire, appuyez sur les touches "8+9" et maintenez-les enfoncées.

Les moteurs du modèle sont maintenant complètement éteints.

Le modèle peut être endommagé en cas de collision !

In caso di situazione di pericolo non più controllabile, è possibile spegnere completamente il modello con l'arresto d'emergenza.

Per fare ciò, tenere premuti i tasti "8+9". I motori del modello sono ora completamente spenti. Il modello può essere danneggiato in

caso di incidente!

En caso de que se produzca una situación peligrosa que ya no se pueda controlar, se puede apagar el modelo completamente

usando la parada de emergencia. Para ello, mantenga pulsadas las teclas "8+9". Los motores del modelo están ahora

completamente apagados. ¡El modelo puede ser dañado en caso de accidente!

Use ONLY in an emergency.

The model can be damaged!

A utiliser UNIQUEMENT en cas d'urgence.

Le modèle peut être endommagé !

Utilizzare SOLO in caso di emergenza.

Il modello può essere danneggiato!

Usar SOLO en una emergencia.

¡El modelo puede ser dañado!

Trimmung | 

trim 

| Trim

Trim | Recorte

8

9

1

5

6

Содержание 9360

Страница 1: ......

Страница 2: ...re e al design senza preavviso Pertanto non possibile avanzare alcuna pretesa sulla base di lievi scostamenti del prodotto in vostro possesso rispetto ai dati e alle illustrazioni contenute in queste...

Страница 3: ...stress extraordinaire ou influence ext rieure des modifications ou des r parations non autoris es effectu es par des personnes non autoris es les dommages caus s par la perte de contr le du mod le Cou...

Страница 4: ...se of the packaging material properly as it could be dangerous for children Utilisez ce produit de mani re responsable En tant que fabricant et distributeur du produit nous n avons aucune influence di...

Страница 5: ...en wie z B Kontrollverlust ber das Modell Kurzschluss Brand elektrischer Schlag etc f hren Beachten Sie die Sicherheitsanweisungen in dieser Bedienungsanleitung Diese enthalten wichtige Informationen...

Страница 6: ...ions importantes pour la manipulation du produit Le produit ne convient aux enfants de moins de 14 ans que sous la surveillance d un adulte Prima dell inizio Chiarite con la vostra compagnia di assicu...

Страница 7: ...werden Entsorgen Sie leere Batterien bzw defekte Akkus umweltgerecht ber die autorisierten Sammelstellen Die Entsorgung ber den Hausm ll ist untersagt Akkus d rfen nicht feucht oder nass werden Verme...

Страница 8: ...sive heavy metal Cd Cadmi um Hg Mercury Pb Lead the name appears on the battery rechargeable battery e g under the garbage can symbols shown on the left You can return your used batteries rechargeable...

Страница 9: ...oni ambientali avverse ad es umidit temperatura ambiente troppo alta o bassa fonti di accensione o fuoco aperto polvere vapori solventi Evitare lo sporco pesante e le sollecitazioni meccaniche eccessi...

Страница 10: ...an der Motorwelle Demontieren Sie gegebenenfalls den vorsichtig mit handels blichem Bremsenreiniger Schmieren Sie die Lager wieder e seiner Lebensdauer gem den geltenden gesetzlichen Vorschriften ich...

Страница 11: ...t vollst ndig geladen Trennen Sie den Akku vom USB Ladekabel Trennen Sie das USB Ladekabel von der Stromversorgung Maximale Ladezeit ca 2 4 Stunden Laden Sie NIE unbeaufsichtigt z B ber Nacht Laden Si...

Страница 12: ...itar el sobrecalentamiento durante la carga utilice siempre una base ign fuga Nunca desconecte la conexi n del enchufe tirando de los cables siempre tire del enchufe Conecte el cargador USB a una fuen...

Страница 13: ...he proper functioning of the model When changing the rotor blades make sure that exactly the same labelled blades are attached again Incorrectly fitted rotor blades will result in loss of control and...

Страница 14: ...l h licopt re horizontalement 5 d placez le levier de commande gauche vers le haut puis vers le bas les LED s allument alors en permanence Effectuez un contr le de fonctionnement et de port e avant c...

Страница 15: ...le commence alors atterrir automatiquement M thode B Poussez le manche de commande vers le bas et vers l ext rieur comme indiqu les moteurs se mettent en marche Maintenant poussez le manche de command...

Страница 16: ...el modelo mantiene la altura actual por s mismo Dr cken des linken Steuerhebels nach links rechts bewirkt einen Drehbewegung des Modells um die eigene Achse Pressing the left control lever to the lef...

Страница 17: ...a hacia atr s abajo hace que el modelo vuele hacia atr s Presionando la palanca hacia adelante o hacia arriba hace que el modelo vuele hacia adelante Presionando la palanca a la derecha hace que el mo...

Страница 18: ...la derecha izquierda recortar en la direcci n opuesta usando el bot n 1 Si el modelo vuela hacia adelante atr s recortar en la direcci n opuesta con el bot n 5 Si el modelo vuela a la izquierda derech...

Страница 19: ...le horizontalement sur le sol 2 pousser les deux leviers de commande vers le bas gauche et les maintenir en position Les LED de l h licopt re se mettent clignoter Si les LEDs s allument nouveau en pe...

Страница 20: ...L elicottero non risponde El helic ptero no responde Antriebsakku leer defekt Drive battery empty defective Batterie d entra nement vide d fectueuse Batteria di azionamento vuota difettosa Bater a de...

Страница 21: ...il aplicaci n Descargue la aplicaci n escanee el c digo QR e inst lela en su smartphone Android o IOS Wir empfehlen immer die Verwendung des Controllers zur Steuerung des Modells Steuerung via App ist...

Страница 22: ...la izquierda 16 Palanca de control derecha 17 Recorte 18 Despegue y aterrizaje autom tico 19 Calibraci n 20 Seguir ME a trav s de la imagen de la c mara 5 Agilit t Hier k nnen Sie die Agilit t Geschw...

Страница 23: ...e se encuentre el modelo 13 Dibujar Ruta Haga clic en el s mbolo despu s de dibujar la ruta de vuelo en el helic ptero seguir la ruta correspondien te 14 Si su imagen en vivo se muestra al rev s puede...

Страница 24: ...tial requirements and the other relevant provisions of the Directive RED 2014 53 EU when used for it intended purpose Est conforme aux exigences des directives et ordonnances suivantes RED 2014 53 EU...

Отзывы: