11
A
FIG. 16
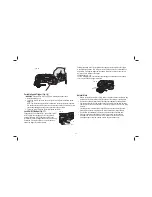
Variable Speed Trigger (Fig. 16)
WARNING:
Ensure switch is fully OFF before installing the battery pack.
1. Install the battery pack.
2. To turn the tool ON, hold it as shown in Figure 16 and press the variable speed
trigger (A).
NOTE: The further the trigger switch is depressed, the faster the tool will operate.
If in doubt about the proper speed for your operation, test the performance at low
speed and gradually increase until a comfortable speed is found.
3. To turn the tool OFF, release the variable speed switch (A).
Lock On/Off Button (Fig. 17)
Engage the lock on/off button (D), by pushing it to the
left or right. When the trigger (A) is not depressed,
pushing the button fully to either side until it snaps
into place will lock the trigger and disable it from being
depressed. Placing the button in the center position
allows the trigger to operate normally.
FIG. 17
A
D
Pushing the button to the left or right with the trigger depressed will lock the trigger
in the depressed position. This allows for more comfort and control in extended use
applications. Pressing the trigger switch again will release the lock out and the tool
will turn off upon release of the trigger.
LED Worklight (Fig. 18)
The LED worklight (B) will activate any time the trigger is depressed and will remain
on for 20 seconds after trigger is released.
FIG. 18
B
Helpful Hints
• Always ensure the workpiece is firmly held or clamped to prevent movement. Any
movement of the material may affect the quality of the cutting or sanding finish.
• Do not start sanding without having the sandpaper attached to sanding platen.
• Use coarse grit paper to sand rough surfaces, medium grit for smooth surfaces
and fine grit for the finishing surfaces. If necessary, first make a test run on scrap
material.
• Excessive force will reduce the working efficiency and cause motor overload.
Replacing the accessory regularly will maintain optimum working efficiency.
• Do not allow the sandpaper to wear away, it will damage the sanding pad.
• If the tool overheats, especially when used at low speed, set the speed to
maximum and run it with no load for 2–3 minutes to cool the motor. Avoid
prolonged usage at very low speeds. Always keep the blade sharp.
Содержание XR Li-Ion DCS355-XE
Страница 1: ...DCS355 XE 18V BRUSHLESS CORDLESS MULTI TOOL INSTRUCTION MANUAL ...
Страница 2: ......
Страница 15: ......


