background image

8

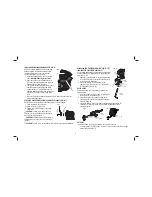
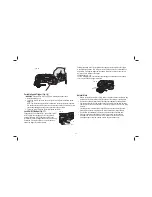
Installing/Removing Accessories (Fig. 3–5)

TOOL-FREE ACCESSORY CLAMP

The DCS355 features a quick change accessory system. This allows for faster 

accessory changes without the need for wrenches or hex keys like other oscillating 

tool systems.
  1.  Grasp the tool and squeeze the accessory 

clamping lever (C) as shown in Figure 3.

  2.  Clean any residual debris from the tool shaft 

and the accessory holder.

  3.  Slide the accessory between the shaft (J) 

and the accessory holder making sure the 

accessory engages all eight pins on the 

holder and is flush with the shaft.

  4.  Release the accessory clamp lever.

NOTE:

 Some accessories, such as scrapers and 

blades, can be mounted at an angle if required as 

shown in Figure 5.

FIG. 4

FIG. 5

FIG. 3

C

J

FIG. 2

A

D

F

C

E

B

G

H

I

INTENDED USE

This oscillating multi-tool is designed for professional detail sanding, plunge cutting, 

flush cutting, removal of excess materials and surface preparation applications. 

DO NOT

 use under wet conditions or in presence of flammable liquids or gases.

This oscillating multi-tool is a professional power tool. 

DO NOT

 let children come into 

contact with the tool. Supervision is required when inexperienced operators use this 

tool.

ASSEMBLY AND ADJUSTMENTS

WARNING: To reduce the risk of serious personal injury, turn the tool off and 

disconnect the battery pack before making any adjustments or removing/installing 

attachments or accessories. 

An accidental start-up can cause injury.

WARNING: Risk of lacerations or burns. Do not touch the sharp edges of 

accessories at any time.

 Do not touch workpiece or blade immediately after 

operating the tool. They can become very hot. Handle carefully. Always allow 

accessories and workpiece to cool before handling.

Содержание XR Li-Ion DCS355-XE

Страница 1: ...DCS355 XE 18V BRUSHLESS CORDLESS MULTI TOOL INSTRUCTION MANUAL ...

Страница 2: ......

Страница 3: ...tandardised test given in EN 60745 and may be used to compare one tool with another It may be used for a preliminary assessment of exposure WARNING The declared vibration emission level represents the main applications of the tool However if the tool is used for different applications with different accessories or poorly maintained the vibration emission may differ This may significantly increase ...

Страница 4: ...wer tool while you are tired or under the influence of drugs alcohol or medication A moment of inattention while operating power tools may result in serious personal injury b Use personal protective equipment Always wear eye protection Protective equipment such as dust mask non skid safety shoes hard hat or hearing protection used for appropriate conditions will reduce personal injuries c Prevent ...

Страница 5: ...ety The electric motor has been designed for one voltage range only Always check that the power supply corresponds to the voltage on the rating plate 220 240 V AC means your tool will operate on alternating current Operation at a voltage outside this range can cause loss of power and can result in overheating All DEWALT tools are factory tested if this tool does not operate check the power supply ...

Страница 6: ... standards Eye protection AS NZS1337 Eye Protectors for Industrial Applications Hearing protection AS NZS1270 Acoustics Hearing Protection Respiratory protection AS NZS1716 Respiratory Protective Devices WARNING Some dust created by power sanding sawing grinding drilling and other construction activities contains chemicals known to cause cancer birth defects or other reproductive harm Some example...

Страница 7: ...ened battery cells may cause respiratory irritation Provide fresh air If symptoms persist seek medical attention WARNING Burn hazard Battery liquid may be flammable if exposed to spark or flame Important Safety Instructions for All Battery Chargers SAVE THESE INSTRUCTIONS This manual contains important safety and operating instructions for battery chargers Before using the charger read all instruc...

Страница 8: ...ating that the charging process has started 3 The completion of charge will be indicated by the red light remaining ON continuously The pack is fully charged and may be used at this time or left in the charger Indicator Light Operation PACK CHARGING PACK CHARGED x HOT COLD DELAY PROBLEM PACK OR CHARGER PROBLEM POWERLINE Charge Indicators This charger is designed to detect certain problems that can...

Страница 9: ...local service center 5 The battery pack should be recharged when it fails to produce sufficient power on jobs which were easily done previously DO NOT CONTINUE to use under these conditions Follow the charging procedure You may also charge a partially used pack whenever you desire with no adverse effect on the battery pack 6 Foreign materials of a conductive nature such as but not limited to grind...

Страница 10: ...NTENDED USE This oscillating multi tool is designed for professional detail sanding plunge cutting flush cutting removal of excess materials and surface preparation applications DO NOT use under wet conditions or in presence of flammable liquids or gases This oscillating multi tool is a professional power tool DO NOT let children come into contact with the tool Supervision is required when inexper...

Страница 11: ...ON Read and follow all manufacturers safety warnings for any accessories used with this tool CAUTION To avoid injury ensure adaptor and accessory are securely tightened FIG 6 L K FIG 7 M N Attaching the Cut Depth Guide Fig 8 12 AVAILABLE IN SELECTED MODEL ONLY The cut depth guide allows you to precisely cut material at a specified depth or height and more accurately track a marked cut line 1 Attac...

Страница 12: ...ery pack out of the tool handle Insert it into the charger as described in the charger section of this manual FUEL GAUGE BATTERY PACKS FIG 15 T FIG 15 Some DEWALT battery packs include a fuel gauge which consists of three green LED lights that indicate the level of charge remaining in the battery pack To actuate the fuel gauge press and hold the fuel gauge button T A combination of the three green...

Страница 13: ...lows for more comfort and control in extended use applications Pressing the trigger switch again will release the lock out and the tool will turn off upon release of the trigger LED Worklight Fig 18 The LED worklight B will activate any time the trigger is depressed and will remain on for 20 seconds after trigger is released FIG 18 B Helpful Hints Always ensure the workpiece is firmly held or clam...

Страница 14: ...ning Dirt and grease may be removed from the exterior of the charger using a cloth or soft non metallic brush Do not use water or any cleaning solutions Repairs This charger and battery pack are not serviceable Servicing at an authorized service centre is required to avoid damage to static sensitive internal components To assure product SAFETY and RELIABILITY repairs maintenance and adjustment inc...

Страница 15: ......
Страница 16: ... X X X X X X X X 55 55 140 140 90 90 X X DCB141 14 4 1 5 X X X X X X X X X X X X X X X X X X X 30 30 70 70 45 40 X X DCB142 14 4 4 0 X X X X X X X X X X X X X X X X X X X 90 90 180 180 120 117 X X DCB143 14 4 2 0 X X X X X X X X X X X X X X X X X X X 40 40 90 90 60 60 X X DCB145 14 4 1 3 X X X X X X X X X X X X X X X X X X X 25 25 X 60 40 35 X X DE9094 14 4 1 3 45 45 45 30 30 15 30 12 60 30 60 30 ...

Отзывы: