English
9
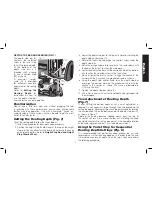
DEPTH STOP BAR AND VERNIER (FIG. 7)
The depth stop bar (K)
FIG. 7
L
N
P
O
K
M
contacts the selected
screw in the turret stop
to limit the routing depth.
At the bottom of the
depth stop bar is a
threaded shaft, a spring
(L) and a knurled knob
(M), as shown.
A precision vernier
scale (N) is provided
for extremely accurate
adjustment of the routing
depth.
Refer to
Setting the
Routing Depth
for
instructions on how to
use the depth stop bar
and vernier in an actual operation.
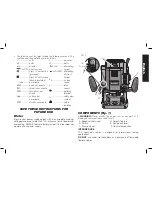
Familiarization
Please take a little time now and, without plugging the tool
in, practice with these adjustments and controls and become
familiar with their operation. Only with a complete, “hands on”
understanding of these systems will you be able to get the most
out of this quality router.
Setting the Routing Depth (Fig. 7)
To set the routing depth follow the steps below:
1. Install the desired router bit as described previously.
2. Position the height stop thumb wheel at the top of the height
stop rod. You can either turn the thumb wheel or use the handy
quick release button. Refer to
Height Stop Rod and Height
Stop Thumb Wheel.
3. Adjust the depth stop bar to the top of its travel by rotating the
depth stop control knob (O).
4. Rotate the turret stop to position the shortest screw under the
depth stop bar.
5. Raise the plunge release lever and push the router down until
the end of the bit just touches the workpiece.
6. Lower the depth stop bar until the knurled knob on the bottom
of it touches the selected screw in the turret stop.
7. Raise or lower the plastic vernier to align the hairline in the
vernier with the 0 mark on the graduated scale, as shown.
8. Using the depth stop control knob, raise the depth stop bar
and align the desired mark on the graduated scale with the
hairline in the vernier, as shown (the scale is graduated in
1/16ths of an inch).
9. Tighten the depth stop bar clamp (P).
10. The router is now set to cut to the set depth when plunged into
the workpiece.
Fine Adjustment of Routing Depth
(Fig. 7)
If, after setting the desired depth of cut, a small adjustment is
needed, it is not necessary to go through the entire procedure for
setting the depth. Minor adjustment can be easily made by rotating
the knurled knob (M) on the bottom end of the depth stop bar (K),
as shown in Figure 7.
Rotating the knob clockwise (looking down from the top of
the router) will result in a more shallow cut. Rotating the knob
counterclockwise will result in a deeper cut. One complete rotation
of the knob represents about 1 mm in depth adjustment.
Using the Turret Stop for Sequential
Routing Depth Settings (Fig. 8)
It is recommended that particularly deep grooves be cut with
several passes rather than one deep pass. In order to do this and
still maintain accuracy of depth when the job is finished, perform
the following procedure.


