


M
AINTENANCE
LBB Series Oven Owner
’s Manual
50
Version
20
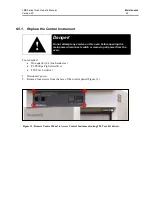
6.5.3. Replace (Optional) Protocol 3 Controller
Refer to the Protocol 3 Owner’s Manual for instructions on replacing the Protocol 3 Controller.
6.5.4. Replace Heater Unit
Danger!
Do not attempt any service on this oven before opening the
main power disconnect switch or removing all power from
the oven.
Tools needed:
•
Thin open end wrench
•
One-quarter (1/4) inch socket set
•
T15 Torx bit driver
1.
Disconnect power.
2.
Remove shelves (Figure 21).
3.
Remove left and right side ducts
a.
Remove screws from each duct.
b.
Remove duct from oven.
4.
Remove heater cover (located on the top or
bottom of the oven, depending on model).
a.
Remove screws from the heater cover.
b.
Remove heater cover from the oven.
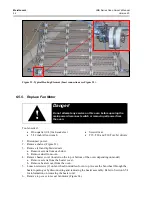
5.
Disconnect heater leads from heater element with
wrench, carefully noting which wires connect to
which terminals (Figure 22).
6.
Remove old heater (Figure 23).
a.
Remove screws holding the heater frame to
the oven body.
b.
Remove heater and discard.
7.
Install new heater
a.
Secure new heater frame with screws.
b.
Attach heater leads to appropriate terminals
with care to not damage insulator. Note the
orientation of terminals to avoid short circuits
(Figure 22)
8.
Reinstall heater cover.
9.
Reinstall side ducts.
10.
Reinstall shelves.
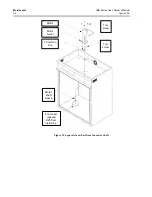
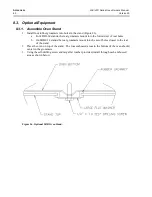
Figure 21. Remove Screws to Remove Each Duct
(using T15 Torx bit driver.
Содержание LBB 1-23
Страница 3: ...LBB Series Oven Owner s Manual PREFACE Version 20...
Страница 4: ...PREFACE LBB Series Oven Owner s Manual 4 Version 20...
Страница 62: ...APPENDICES LAC LFC Series Oven Owner s Manual 62 Version 20 8 3 3 Operating the Timer...
Страница 63: ...LAC LFC Series Oven Owner s Manual APPENDICES Version 20 63...


