background image

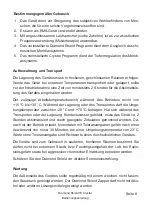
Diamond Shield IE Crystal

Bedienungsanleitung

Seite 19

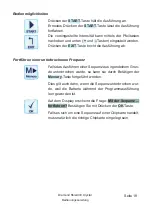
Bedienmöglichkeiten

Drücken der 

START

-Taste hält die Ausführung an.  

Erneutes Drücken der 

START

-Taste lässt die Ausführung 

fortfahren. 
Die voreingestellte Intensität kann mittels der Pfeiltasten 
nach oben und unten (

 + 

 und 

 – 

Tasten) eingestellt werden.

Drücken der 

EXIT

-Taste bricht die Ausführung ab. 

Fortführen einer unterbrochenen Frequenz

Falls das Ausführen einer Sequenz aus irgendeinem Grun-
de unterbrochen wurde, so kann sie durch Betätigen der 

Memory

-Taste fortgeführt werden. 

Dies gilt auch dann, wenn die Sequenz unterbrochen wur-
de, weil die Batterie während der Programmausführung 
leer geworden ist. 
Auf dem Display erscheint die Frage: 

Mit der Sequenz ... 

fortfahren?

 Bestätigen Sie mit Drücken der 

OK

-Taste. 

Falls es sich um eine Sequenz auf einer Chipkarte handelt, 
muss natürlich die richtige Chipkarte eingelegt sein. 

Содержание Diamond Shield IE Crystal

Страница 1: ...Diamond Shield IE Crystal Das Wohlbefinden Gerät Mikroströme EMS Bedienungsanleitung Instruction Manual Firmware Version 2 1 ...

Страница 2: ...Diamond Shield IE Crystal Bedienungsanleitung Seite 2 ...

Страница 3: ...edienungsanleitung Seite 3 Inhaltsverzeichnis Einleitung 5 Wichtige Hinweise 7 Bezeichnung der Bedienungselemente 9 Inbetriebnahme 12 Bedienung 14 Technische Daten 23 Angaben zur Entsorgung 24 Zubehör 26 Konformitätserklärung 28 ...

Страница 4: ...Diamond Shield IE Crystal Bedienungsanleitung Seite 4 ...

Страница 5: ...ine Spannungen 0 1 V bis hin zu hohen Spannungen 16 V Impuls Entladung Wobble Funktion Modulation der Ausgangsfrequenzen Konstantstrom Regelung Abspielen von Frequenzen die auf speziellen Chipkarten optionales Zubehör gespeichert sind Der Betrieb kann über eine 9V Batterie oder einen wiederaufladbaren Akkumula tor erfolgen Das Gerät kann zur Steigerung des subjektiven Wohlbefindens verwendet wer d...

Страница 6: ...ung der Erdung sogenannte negative Ionen tritt nur ein wenn die Steckdose richtig geerdet ist Dies überprüfen Sie bitte unbedingt mit dem Steckdosenprüfer Achtung Die Benutzung des Erdungssteckers oder auch jedes anderen elektrischen Ge rätes an einer fehlerhaften Steckdose kann lebensgefährlich sein Verwenden Sie das Erdungskabel nicht bei Gewitter ...

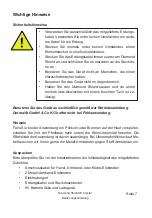
Страница 7: ...chen mit einem feuchten Tuch ist zu lässig Wichtige Hinweise Sicherheitshinweise Auspacken Bitte überprüfen Sie vor der Inbetriebnahme die Vollständigkeit des mitgelieferten Zubehörs Anschlusskabel für Hand Armband oder Klebe Elektroden 2 Metall Armband Elektroden Elektrodengurt Erdungskabel und Steckdosentester 9V Batterie Akku und Ladegerät Benutzen Sie das Gerät ausschließlich gemäß der Betrieb...

Страница 8: ...beitstemperaturbereich während des Betriebes reicht von 15 C bis 30 C Während der Lagerung oder des Transportes darf die Umge bungstemperatur zwischen 20 C und 70 C betragen Hat sich während des Transportes oder der Lagerung Kondenswasser gebildet muss das Gerät ca 2 Stunden akklimatisiert und durch geeignete Zirkulation getrocknet werden Da nach ist der Betrieb erlaubt Nenndaten mit Toleranzangab...

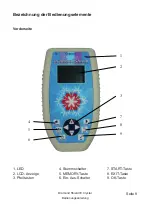
Страница 9: ...rystal Bedienungsanleitung Seite 9 Bezeichnung der Bedienungselemente Vorderseite 1 LED 2 LCD Anzeige 3 Pfeiltasten 4 Stummschalter 5 MEMORY Taste 6 Ein Aus Schalter 7 START Taste 8 EXIT Taste 9 OK Taste 1 2 3 7 8 9 4 5 6 ...

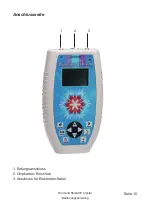
Страница 10: ...Diamond Shield IE Crystal Bedienungsanleitung Seite 10 Anschlussseite 1 2 3 1 Erdungsanschluss 2 Chipkarten Einschub 3 Anschluss für Elektroden Kabel ...

Страница 11: ...Diamond Shield IE Crystal Bedienungsanleitung Seite 11 Rückseite 1 Batteriefach 1 ...

Страница 12: ...nur für einige Sekunden ge halten Deshalb sollte der Batteriewechsel schnell erfolgen Gehen Sie wie folgt vor 1 Schalten Sie das Gerät aus 2 Entfernen Sie die neue Batterie aus ihrer Verpackung um sie griffbereit zu haben 3 Öffnen Sie den Batteriefachdeckel auf der Rückseite des Gerätes 4 Anhand der alten Batterie sehen Sie die korrekte Einlegerichtung Die Polung ist außerdem im Batteriefach angez...

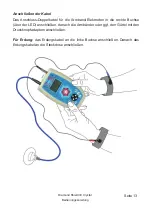
Страница 13: ...schluss Doppelkabel für die Armband Elektroden in die rechte Buchse über der LED anschließen danach die Armbänder oder ggf den Gürtel mit den Druckknopfadaptern anschließen Für Erdung das Erdungskabel an die linke Buchse anschließen Danach das Erdungskabel an die Steckdose anschließen ...

Страница 14: ...chwächerer Batterie schneller Das Gerät ist auch bei fast leerer Batterie voll funktionsfähig Bei vollständig entleerter Batte rie erscheint eine entsprechende Meldung und das Gerät kann nicht länger verwendet werden Lautsprecher aktivieren deaktivieren Drücken Sie die SOUND Taste um den Lautsprecher an bzw auszuschalten Der aktuelle Zustand wird daraufhin kurz angezeigt Tastensperre Das Gerät ver...

Страница 15: ...e des Menüs mit der Pfeiltaste nach unten wieder zum An fang springen oder entsprechend vom Anfang mit der Pfeiltaste nach oben zum Ende Mit der OK Taste bestätigen Sie die Auswahl Je nach ausgewähltem Element erscheint dann eine neue Anzeige Untermenü die dem ausgewählten Element entspricht Mit der EXIT Taste kommen Sie wieder eine Ebene zurück nach oben falls Sie sich nicht bereits im Hauptmenü ...

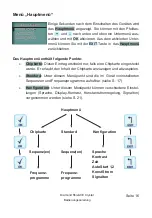
Страница 16: ... Chipkarte Dieser Eintrag erscheint nur falls eine Chipkarte eingesteckt wurde Er erlaubt den Inhalt der Chipkarte anzuzeigen und abzuspielen Standard Unter diesem Menüpunkt sind die im Gerät vorinstallierten Sequenzen und Frequenzprogramme aufrufbar siehe S 17 Konfiguration Unter diesem Menüpunkt können verschiedene Einstel lungen Sprache Display Kontrast Konstantstromregelung Signalton vorgenomm...

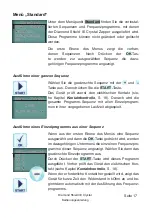
Страница 17: ...uerst den elektrischen Kontakt sie he Kapitel Kontaktkontrolle S 18 Danach wird die gesamte Programm Sequenz mit allen Einzelprogram men in ihrer vorgegebenen Laufzeit abgespielt Ausführen eines Einzelprogramms aus einer Sequenz Wenn aus der ersten Ebene des Menüs eine Sequenz ausgewählt und dann die OK Taste gedrückt wird werden im dazugehörigen Untermenü die einzelnen Frequenzpro gramme dieser S...

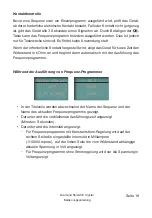
Страница 18: ...gt das Gerät für kurze Zeit den Widerstand in kOhm an und beginnt dann automatisch mit der Ausführung des Frequenzprogramms Während der Ausführung von Frequenz Programmen In der Titelzeile werden abwechselnd der Name der Sequenz und der Name des aktuellen Frequenzprogramms gezeigt Darunter wird die verbleibende Ausführungszeit angezeigt Minuten Sekunden Darunter wird die Intensität angezeigt Für F...

Страница 19: ...Ausführung ab Fortführen einer unterbrochenen Frequenz Falls das Ausführen einer Sequenz aus irgendeinem Grun de unterbrochen wurde so kann sie durch Betätigen der Memory Taste fortgeführt werden Dies gilt auch dann wenn die Sequenz unterbrochen wur de weil die Batterie während der Programmausführung leer geworden ist Auf dem Display erscheint die Frage Mit der Sequenz fortfahren Bestätigen Sie mi...

Страница 20: ...kt Chipkarte aus und drücken Sie die OK Taste Es erscheint ein Untermenü das die Sequenz en der Chipkarte anzeigt Durch Drücken der START Taste spielen Sie die gesamte Sequenz ab Wenn mehrere Sequenzen enthalten sind können Sie vorher mit den Pfeiltasten und zur ge wünschten Sequenz navigieren Falls Sie nur ein einzelnes Frequenzprogramm aus der Sequenz abspielen möchten so drücken Sie nach Aus wa...

Страница 21: ...aste wechselt auf die Sekunden Wenn Sie mit den Pfeiltasten nach oben oder unten auf einen anderen Konfigurationseintrag springen wird die eingestellte Zeit übernommen AutoStart1 und AutoStart2 Hier wird angezeigt ob das automatische Starten eines Programms zu einem konfigurierten Zeitpunkt aktiv ist Durch Betätigen der OK Taste wechseln Sie in das Untermenü das die entspre chende Konfiguration be...

Страница 22: ...Eingabe erfolgt mit den Pfeiltas ten Links und Rechts Zeit Uhrzeit der Auto Start Funktion Die Pfeiltasten Links und Rechts ver ändern die Stunden bzw Minuten Mit der OK Taste wird zwischen Stunden und Minuten hin und hergeschaltet Jeden Die Auto Start Funktion kann so konfiguriert werden dass sie nicht jeden Tag erfolgt sondern z B jeden zweiten jeden dritten Tag bis zu jeden 7 Tag Die Eingabe er...

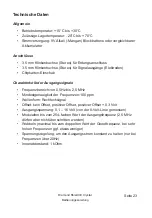
Страница 23: ...harakteristik der Ausgangssignale Frequenzbereich von 0 5Hz bis 2 5 MHz Mindestgenauigkeit der Frequenzen 100 ppm Wellenform Rechtecksignal Offset kein Offset positiver Offset positiver Offset 0 3 Volt Ausgangsspannung 0 1 16 Volt von der 0 Volt Linie gemessen Modulation bis zum 254 fachen Wert der Ausgangsfrequenz 2 5 MHz dürfen aber nicht überschritten werden Wobbeln maximal bis zum doppelten We...

Страница 24: ...senden unfreie Sendungen werden nicht angenommen Bitte beachten Sie auch dass die Entsorgung von Batterien oder Akkus über den normalen Hausmüll aus Umweltschutzgründen verboten ist Sie können diese un entgeltlich bei den öffentlichen Sammelstellen der Gemeinden oder überall dort wo Batterien verkauft werden zurückgeben Gerne können Sie die von uns gelieferten Batterien auch an folgende Adresse zu...

Страница 25: ...Diamond Shield IE Crystal Bedienungsanleitung Seite 25 ...

Страница 26: ...tall Armband Elektroden sind in der Weite verstellbar Dazu lässt sich das blaue Element an der bezeichneten Seite aufklappen Elektrodengürtel Dieser Gürtel ist für die Anwendung des Crystal Programms konzipiert Seine Elektroden wer den auf dem Energiezentrum unter dem Nabel platziert Ladegerät Mit dem abgebildeten Ladegerät können Sie ausschließlich NiMH Nickel Metallhydrid Ak kus aufladen Erdungs...

Страница 27: ...Sie können am Kör per für lokale Anwendung platziert werden Platte Die Platte wird zum Plate Zapping mit Hilfe ei nes Zusatzkabels in die stromführende Leitung das Kabel mit dem roten Stecker zwischenge schaltet Zappikator Der Zappikator wird mit dem stromführenden Kabel mit dem roten Stecker an den Zapper angeschlossen Dann können Sie Nahrungs mittel auf die Platte legen Im Standard Menü finden S...

Страница 28: ...Richtlinien EMC Directives 2004 108 EG Elektromagnetische Verträglichkeit Electromagnetic compatibility DIN EN 61000 6 1 VDE 0839 6 1 2007 10 Elektromagnetische Verträglichkeit EMV Teil 6 1 Fachgrundnormen Störfestigkeit für Wohnbereich Geschäfts und Gewerbebereiche sowie Kleinbetriebe IEC 61000 6 1 2005 EN 61000 6 1 2007 DIN EN 61000 6 3 VDE 0839 6 3 2011 09 Elektromagnetische Verträglichkeit EMV...

Страница 29: ...GmbH Co KG Alle Rechte vorbehalten Jede Art der Vervielfältigung nur mit Genehmigung der DermaVit GmbH Co KG DermaVit GmbH Co KG Unterer Anger 15 Rgb 80331 München Deutschland Tel 49 0 89 18 90 84 6 0 Fax 49 0 89 18 90 84 6 15 E Mail info derma vit com Web http www derma vit com ...

Страница 30: ......

Страница 31: ...Diamond Shield IE Crystal Wellness Device Microcurrents EMS Instruction Manual Firmware Version 2 1 ...

Страница 32: ...Diamond Shield IE Crystal Instruction Manual page 32 ...

Страница 33: ...Crystal Instruction Manual page 33 Index Introduction 35 Important Notices 37 Feature Identification 39 Bringing into service 42 Operation 44 Technical Data 53 For disposal 54 Accessories 56 Declaration of Conformity 58 ...

Страница 34: ...Diamond Shield IE Crystal Instruction Manual page 34 ...

Страница 35: ...f 0 5 Hz to 2 5 MHz intensity range from small voltages 0 1 V to high voltages 16 V Impulse discharge Wobble functionality Modulation of the output frequencies Constant current control Running frequencies from special chip cards optional accessory The operation can be done via a 9V battery or a rechargeable battery The device can be used to enhance the well being ...

Страница 36: ...f supply The good effect of the earthing so called negative ions occurs only if the power socket is properly earthed Be sure to check this with the power socket tester Warning The use of the earthing plug or any other electrical appliances to an incorrect power socket can be perilous Do not use the earthing cable during a thunderstorm ...

Страница 37: ...on Unpacking Before using this device please check the completeness of the supplied acces sories Connection cable for bracelets or other electrodes incl two pairs of connector adapters 2 metal bracelet electrodes Electrode belt Grounding cable and power socket tester 9V rechargeable battery and battery charger Using of the device according to the operating instructions is essential DermaVit GmbH C...

Страница 38: ... before handling The permissible operating temperature ranges from 15 C to 30 C During storage or transportation the ambient temperature can be between 20 C and 70 C If condensation has been formed during transportation or storage the device must acclimate for about 2 hours and dried by appropriate circulation Thereafter the operation of the device is permitted Nominal data with tolerances are val...

Страница 39: ...eld IE Crystal Instruction Manual page 39 Feature Identification Front Side 1 LED 2 LCD Display 3 Arrow keys 4 Mute switch 5 MEMORY button 6 On Off switch 7 START button 8 EXIT button 9 OK button 1 2 3 7 8 9 4 5 6 ...

Страница 40: ...Diamond Shield IE Crystal Instruction Manual page 40 Connection Side 1 2 3 1 Grounding connection 2 Chipcard slot 3 Connection for electrodes ie bracelets ...

Страница 41: ...Diamond Shield IE Crystal Instruction Manual page 41 Back Side 1 Battery compartment 1 ...

Страница 42: ...eries or rechargeable batteries Changing the battery The time setting is maintained for only a few seconds without battery Therefore the battery should be changed quickly Proceed as follows 1 Turn off the device 2 Remove the new battery from its package 3 Open the battery cover on the rear panel 4 On the basis of the old battery you will see the correct polarity It is indi cated in the compartment...

Страница 43: ...l page 43 Connecting the cables Connect the electrode cable for the bracelet electrodes in the right socket above LED Then connect the bracelets If you want to work with grounding Connect the grounding cable to the left socket then to the outlet ...

Страница 44: ... battery is full the flashing frequency is slow When the battery is almost empty the flashing frequency is faster The device is fully functional even if the battery is almost empty If the battery is completely empty a message appears and the device can no longer be used Activate deactivate the loudspeaker Press the SOUND button to switch the audio signal on or off The current state is then display...

Страница 45: ...to the first item with the down arrow key and accordingly from the first to the last item with the up arrow key Confirm your selection with the OK button Then a subme nu appears that corresponds to the selected item Press the EXIT key to return one level up if you are not already in the main menu Important Terms The structure of the application programs from the standard menu or from chip cards is...

Страница 46: ...he Main menu shows the following items Chipcard This item is displayed only if a chip card is inserted It can be used to display and run the contained programs Standard Under this menu item you can find preinstalled sequences and frequency programs see page 47 Settings In this menu various settings language display contrast con stant amps speaker can be undertaken see page 51 Main menu Chipcard St...

Страница 47: ...quence are shown Executing an entire sequence Select the desired sequence with the and button To run the entire sequence press the START button First the device will test the electrical contact see the chapter Contact control Then all the sub programs of the selected sequence are successively executed Running a single program of a sequence Select the desired sequence with the and button Press the ...

Страница 48: ...r a short time the resistance in k Ohms and then the device automatically begins executing the frequency pro gram During execution of frequency programs In the headline the sequence name and the name of the current single program are shown in turns Below the remaining execution time is displayed minutes seconds Below the intensity is displayed For frequency programs with constant current control t...

Страница 49: ...n will quit the current application Continuing an interrupted sequence If the execution of a sequence has been interrupted for some reason you can continue it by pressing the Memory button This applies even if the sequence was interrupted because the battery has become empty during program execution The display will show the question Continue with se quence Press the OK button to confirm Obviously...

Страница 50: ...m Chip card and press the OK button A submenu appears which displays the contents of the chipcard The entire sequence s and or sub programs of Chip card can be applied similarly as it is described in the chapter Standard menu page 47 For running the entire sequence of the selected program press the START button For running single sub programs of the sequence enter the submenu of the sequence by pr...

Страница 51: ...s In order to take over the adjusted time move to a different configuration entry by means of the arrow keys up or down Please also note the instructions in section Changing the battery page 42 AutoStart1 and AutoStart2 These menu items show whether the auto start of a program is active at a configured time By pressing the OK but ton you switch to the screen which provides the appropriate configur...

Страница 52: ...larm signal The input is done with the arrow keys left and right Time Time of the auto start feature The left and right arrow keys change the hours or minutes The OK button switches back and forth between hours and minutes Run every The auto start function can be configured so that it is not carried out every day but e g every other day or every third day up to every 7th day The input is done with...

Страница 53: ...s Chip card slot Characteristic of the output signals Frequency range 0 5 Hz 2 5 MHz Waveform square wave signal Minimum accuracy of the frequencies 100 ppm Output Voltage 0 1 16 Volts measured from the 0 Volt line Offset No offset positive offset positive offset 0 3 Volts Modulation up to 254 times the output frequency but 2 5 MHz must not be exceeded Wobble maximum up to twice the fundamental fr...

Страница 54: ...lectrical appliances or return it to the address below unfree postage will not be accepted Please also note that the disposal of batteries is prohibited on the normal household waste for environmental reasons You can bring them to the public collection places or wherever batteries are sold You are welcome to return the battery to the following address unfree postage will not be accepted DermaVit G...

Страница 55: ...Diamond Shield IE Crystal Instruction Manual page 55 ...

Страница 56: ...et electrodes can be adjusted For this purpose the blue element can be opened at the indicated edge Electrode Belt This belt is designed for the application of the Crystal program It s electrode buttons are placed to the energy center below the navel Battery Charger With the enclosed battery charger you can charge exclusively NiMH nickel metal hydride batteries Earthing cable The insert pins of th...

Страница 57: ... x 45 mm and 35 x 45 mm They can be placed on the body for specific local application Plate stainless steel For plate zapping the plate is interconnected within the current carrying line the cable with the red plug by means of an additional cable Zappicator The zappicator is connected to the zapper with the current carrying cable Then you can place food onto the plate In the Standard menu you will...

Страница 58: ... Richtlinien EMC Directives 2004 108 EG Elektromagnetische Verträglichkeit Electromagnetic compatibility DIN EN 61000 6 1 VDE 0839 6 1 2007 10 Elektromagnetische Verträglichkeit EMV Teil 6 1 Fachgrundnormen Störfestigkeit für Wohnbereich Geschäfts und Gewerbebereiche sowie Kleinbetriebe IEC 61000 6 1 2005 EN 61000 6 1 2007 DIN EN 61000 6 3 VDE 0839 6 3 2011 09 Elektromagnetische Verträglich keit E...

Страница 59: ...rmaVit GmbH Co KG All rights reserved Any kind of reproduction only with approval of DermaVit GmbH Co KG DermaVit GmbH Co KG Unterer Anger 15 Rgb 80331 München Germany Tel 49 0 89 18 90 84 6 0 Fax 49 0 89 18 90 84 6 15 E Mail info derma vit com Web http www derma vit com ...

Страница 60: ......
Отзывы: