background image


50 

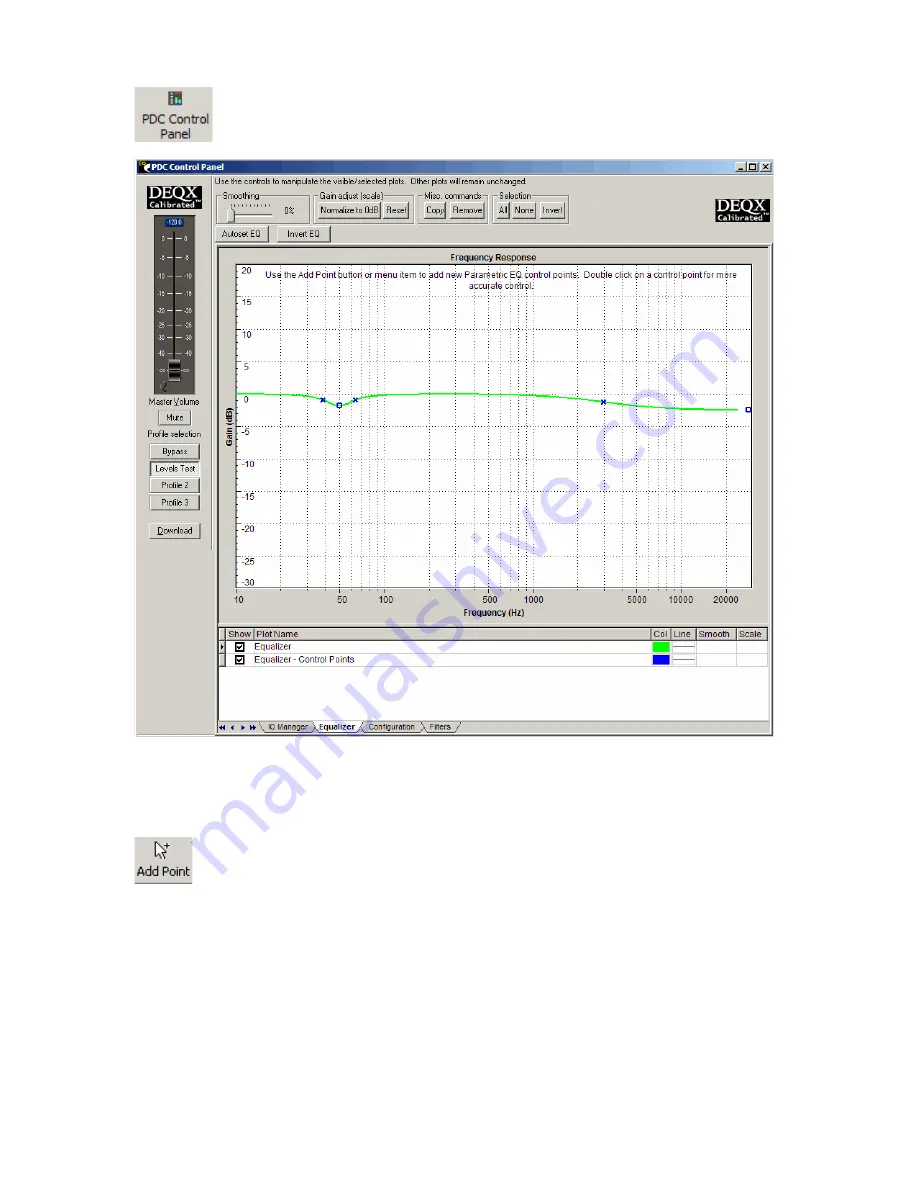
Equalizer tab at the bottom of the DEQX Control Panel. 


Changes made to the Parametric Equalizer take effect in real-time. To add an EQ band to the 
equalizer, click on the Add Point button on the tool bar at the top of the screen, then click on the 
EQ curve at the desired frequency of the EQ band. The cursor changes to cross hairs, where the 
center frequency and bandwidth may be adjusted by clicking and dragging the relevant point.  


Up to 10 bands of equalization may be applied (or up to 7 bands, if you're using the EQ controls 
on the remote control supplied with the DEQX). The center frequency, gain (or cut) and width (Q) 
of each band may be set. These values can be set visually using the mouse: 

• 

To adjust the center frequency of an EQ band, drag the center-point of the band left or 
right  

• 

To adjust the amount of gain of an EQ band, drag the center-point of the band up or 
down  

• 

To adjust the width of an EQ band, drag either end point of the band left or right  


Содержание DEQX-Cal

Страница 1: ...Installer s Manual DEQX Cal Version 2 90...

Страница 2: ...ings 51 Measuring and Equalizing a Room 51 Manual Room Equalization 60 Incorporating a Subwoofer 67 Reusing Existing Measurements Corrections and Configurations 69 How to Use Modify an Existing Config...

Страница 3: ...Selection 110 Output Selection 110 The PDC Control Panel vs the PDC Configuration Window 112 PDC Configuration Types 112 PDC Configuration Parameters 114 Main Filter 114 Limit Filters 115 Time Alignm...

Страница 4: ...er manufacturer s specifications to ensure correct connection If you are in doubt as to the connection of your audio equipment please seek assistance from a professional audio installer or contact DEQ...

Страница 5: ...ot obligated to provide maintenance or updates to Recipient for Product licensed under this Agreement DISCLAIMER OF WARRANTY DEQX Cal software Product is deemed accepted by Recipient upon first use Th...

Страница 6: ...hiles often avoid using EQ DEQX uses linear phase EQ that not only does not introduce more timing phase errors when correcting frequency response but it compensates for existing measured timing phase...

Страница 7: ...ming coherence Three band tone control including a fully parametric EQ band with 99 memory remote control Additional features if using DEQX Active crossover option available on some models Stereo 3 wa...

Страница 8: ...n means click the File menu then click the Open menu option Choose is also used for clicking a tab in a tabbed dialog Menu options can also be chosen with the selected with the navigation keys and act...

Страница 9: ...nt panel buttons the remote control or the PC running DEQX Cal software Installing and setting up a DEQX unit involves Connecting the DEQX unit to your system see DEQX unit User Manual Installing and...

Страница 10: ...driving each loudspeaker with optional mono or stereo subwoofers or 2 An active 2 way speaker configuration 2 amplifiers per speaker plus optional mono or stereo subwoofers or 3 Stereo 3 way active 3...

Страница 11: ...and on again The PC should recognize the new device 4 Windows should start up a Found New Hardware or similar Wizard This wizard may ask if Windows can connect to Windows Update to search for softwar...

Страница 12: ...capable of active 3 way set up or is limited to single amplifier for full range usually passive speakers with optional subwoofer s e g DEQX MATE In the case of 3 way active capable DEQX units Profile...

Страница 13: ...ed DEQX folder and select Project1 file and select Open Click on the Configure icon This starts the DEQX Configuration Wizard On the first window of the DEQX Configuration Wizard click the Next button...

Страница 14: ...urement and calibration on the groups of speakers in your system Installing a Microphone Calibration file To install a microphone calibration choose File Install Microphone Behringer microphones are a...

Страница 15: ...ker s Impulse response is derived to achieve a high resolution Impulse response measurement The Impulse response describes a speaker s time and frequency domain behavior showing which frequencies are...

Страница 16: ...isting one Select the Create a new speaker measurement radio button if it is not already selected and click Next t If for some reason the connection to the DEQX is not established at this point becaus...

Страница 17: ...Manufacturer Model and Configuration for which you are performing the measurement You can also specify a name for the measurement or accept the default In the Distance Angle and Height fields enter de...

Страница 18: ...maging the tweeter However unless there is any DC voltage e g loud clicks from the power amplifier this is usually not necessary because the DEQX Cal software provides a High Pass filter for the swept...

Страница 19: ...dentifier for the speaker then click Next to continue The speaker s serial number is an appropriate choice as a unique identifier In the DEQX configuration diagram click on the speaker you are measuri...

Страница 20: ...easurement wizard then downloads to the DEQX the test signals determined by your selection see the figure above and plays them see the figure below The IO Manager will be automatically displayed when...

Страница 21: ...need to measure one driver of a speaker at a different volume than another driver of the same speaker or if the drivers of a speaker has appreciably different efficiencies then the Master Volume shou...

Страница 22: ...volume has been set to an appropriate level and the correct microphone has been selected click Run to start the measurement process Note you will need to ensure that ambient noise is minimized before...

Страница 23: ...or the first driver is too low less than 20 dB you can halt the measurement adjust the Master Volume reduce ambient noise and or increase the number of sweeps then repeat the measurement When measurem...

Страница 24: ...r Correction or Measuring a Room Once you accept the measurement and you do not wish to run more measurements immediately the final Measurement wizard dialog gives you the following options when you c...

Страница 25: ...information refer to Correcting a Loudspeaker below The speaker correction can be verified after it has been generated See Verifying a Speaker Correction on page 36 In order to simplify this process d...

Страница 26: ...known as phase response or Group delay Note if a pair of speakers is corrected together the correction set created will match the phase response of the speakers ensuring that the speakers are in phas...

Страница 27: ...The second window gives you the option creating a new speaker calibration or loading an existing one Select the Create a new speaker calibration radio button if it is not already selected and click Ne...

Страница 28: ...n this dialog Select the speaker measurements to be used for the speaker calibration Note non matching speakers should not be corrected together For example you should not attempt to correct a main sp...

Страница 29: ...29 Select Next to continue Provide a name for the calibration template or accept the default name Click Next to continue...

Страница 30: ...In the figure below the signal received directly from the speaker was received at about 5 milliseconds and the first reflection was received at about 9 8 milliseconds or about 4 8 milliseconds after...

Страница 31: ...to maximize the time between the speaker s own signal and the time of the first reflection If your configuration is bi amp or tri amp there will be a Crossovers tab available In this tab you can adju...

Страница 32: ...if you attempt to correct below 200Hz phase distortion will be introduced to the filter which will make the resulting sound dull and flat worse than the uncorrected speaker Methods to maximise the eff...

Страница 33: ...example 200Hz has a wavelength of 1 7 metres 5 7 ft if practical it is desirable to correct down to about 200Hz or below implying a truncation target approaching about 6ms or more As a general rule D...

Страница 34: ...the frequency response is affected If there are anomalies in the response this is a good place to experiment You can also disregard aspects of the measured response using the limits You will soon get...

Страница 35: ...35 The above window displays the calibration information Click Finish to create a calibration and Next to exit the Calibration wizard...

Страница 36: ...e displayed in a new tab at the bottom of the calibration wizard Verifying a Speaker Correction Once a pair of speakers has been corrected See Correcting a Loudspeaker one or both of the measurements...

Страница 37: ...o move the speaker or the microphone The Verification Measurement Wizard will start The Verification Measurement Wizard defaults to the settings that were used when the measurement was originally carr...

Страница 38: ...38 The first dialog lists the correction sets and within those the correction filters that have been generated with the current calibration template...

Страница 39: ...39 Select the speaker that you wish to verify then click Next...

Страница 40: ...n the speaker was originally measured using the Master Volume control on the IO Manager You may find that the Master Volume has to be set to a different level than was used when the speaker was origin...

Страница 41: ...41 Once the measurement is completed click Next...

Страница 42: ...of Accepting the measurement or Retrying If the confidence see Confidence in the Glossary of Terms is too low less than 20 dB you can adjust the Master Volume reduce ambient noise and or increase the...

Страница 43: ...you clicked Accept in the previous dialog this final dialog will appear with the verification measurement displayed behind it on the Data Viewer Click Finish to close the dialog and the Verification W...

Страница 44: ...file menu Click Sum to see the summed measurement Configuring the DEQX unit Once a correction set has been created for a speaker or pair of speakers the DEQX must be configured To carry out a configu...

Страница 45: ...45 The first window of the Configuration Wizard provides a brief introduction to the use of the wizard Click Next to continue...

Страница 46: ...he type of configuration or mode that best matches your speaker set up and the method you used to measure the speakers For example if you have a pair of two way speakers that you measured with a bi am...

Страница 47: ...each profile can be different For example you may have corrections of the same speakers with differing correction filters and or varying amounts of para EQ cut boost in different profiles and even ti...

Страница 48: ...box 2 On the Main Filter tab select Use a correction filter for this loudspeaker 3 Select Calibration Templates then the speaker name the Correction Set you generated then the speaker that you have s...

Страница 49: ...ick on the Save button once you have set up the DEQX Configuration This also saves the measurement s and correction s you have created Finding Out What is Configured on the DEQX The DEQX Configuration...

Страница 50: ...e adjusted by clicking and dragging the relevant point Up to 10 bands of equalization may be applied or up to 7 bands if you re using the EQ controls on the remote control supplied with the DEQX The c...

Страница 51: ...s may be loaded into a PDC configuration from the PDC by clicking on the Read EQ from PDC button on the tool bar at the top of the configuration screen Once the EQ settings have been loaded into a PDC...

Страница 52: ...lternatively if you have more than one project loaded Refer to Projects in the Reference section the first window will prompt you to supply the name of the project in which the measurement will be sto...

Страница 53: ...53 You can accept the default project or select another project from the drop down box then click Next to continue...

Страница 54: ...a new room measurement radio button if it is not already selected and click Next Enter the required measurement parameters All drivers in a speaker may be measured concurrently Measuring drivers sepa...

Страница 55: ...55 Select the speakers you wish to measure Each speaker will be measured in turn Click Next to continue Each room may be measured in several locations Click Run to continue...

Страница 56: ...y so that you can set the Master Volume to an appropriate level We suggest that it be set so that input level as measured by the microphone peaks at about 90 dB Some experimentation may be required fo...

Страница 57: ...r s and any crossover between a speaker filter and a subwoofer filter All settings in the IO Manager including individual channel gain and any channel soloing muting or polarity settings The parametri...

Страница 58: ...58 If the measurement was successful click the Next button Otherwise click Retry repeating the measurement with more sweeps lower ambient noise or adjusted volume level...

Страница 59: ...in the legend at the bottom of the Equalizer See Using the Parametric EQ for more details on its use Tip when applying manual or automatic EQ The Sum button can sum the individual components of a roo...

Страница 60: ...e Parametric EQ One way to add EQ that counteracts the room effects shown by a room measurement is to firstly add EQ bands up to 10 or 7 if you re using the EQ controls on the optional remote control...

Страница 61: ...61 Part of the room measurements for left and right speakers prior to the addition of any parametric EQ...

Страница 62: ...62 One band of parametric EQ applied to the room measurements duplicating the line of the room measurements...

Страница 63: ...tric EQ bands inverted using the Invert Button in order to cancel out the peaks and troughs of the room measurements You can of course also apply the EQ bands without using the Invert EQ button by add...

Страница 64: ...ou plan to do some manual room equalization making use of the Invert EQ feature as well as using the Autoset EQ button for the lower frequencies make sure to do the manual room equalization before usi...

Страница 65: ...ency response chart on the left Default settings for the Autoset EQ options The parameters can be adjusted to suit the nature of the particular room measurement if desired The EQ style can be parametr...

Страница 66: ...tly what you see it doesn t go behind the visible shape of the room measurement plot s to the original room measurements This means for example that the Autoset EQ will provide a different correction...

Страница 67: ...e a consistently exact distance from the drivers When correcting the subwoofer s window at about 20ms or more and use limits of 20 Hz and 300Hz and set smoothing to 100 but experimenting down to zero...

Страница 68: ...ements and smooth the sum to 100 10 Note how the level of the summed response below 150 Hz or your chosen crossover frequency compares to the level above that frequency Move the subwoofer plot s up or...

Страница 69: ...uration wizards can be used to access existing data as well as creating new data Using the Wizards you can View an existing speaker measurement Use an existing speaker measurement in a new speaker cal...

Страница 70: ...he first window of the Speaker Measurement Wizard just click Next or if you have more than one project loaded as per the figure above select the project that contains the existing measurement then cli...

Страница 71: ...e existing measurements for that speaker and measurement format combination Select the desired measurement then click the Next button The measurement can be displayed in either 1 The Viewer the New Vi...

Страница 72: ...72 An existing measurement displayed in the Viewer window Alternatively you can view an existing speaker measurement by going through the Viewer icon Click the Viewer icon This opens the Viewer Wizard...

Страница 73: ...3 At the first window of the Viewer Wizard just click Next or if you have more than one project loaded as per the figure above select the project that contains the existing measurement then click Next...

Страница 74: ...utton Click on the sign next to the Speakers folder then click on the sign next to the desired speaker measurement format combination This will show measurements and correction filters if any for that...

Страница 75: ...e figure above ie one containing another measurement that you loaded into the Viewer previously Select the window you wish to display the measurement and click the Finish button How to Use an Existing...

Страница 76: ...e first window of the Calibration Wizard just click Next or if you have more than one project loaded as per the figure above select the project that contains the existing calibration template then cli...

Страница 77: ...he project that contains the existing configuration then click Next At the second window of the Configuration Wizard select the Load an existing PDC configuration radio button This displays existing P...

Страница 78: ...78 How to View an Existing Room Measurement This is similar to viewing an existing speaker measurement Click on the Room Measurement Icon...

Страница 79: ...the first window of the Room Measurement Wizard just click Next or if you have more than one project loaded as per the figure above select the project that contains the existing measurement then click...

Страница 80: ...oom measurement to show both all the speakers in that room measurement You can then select one or more of the speakers by checking the box es next to it them then clicking Next With the speakers shown...

Страница 81: ...d similar to speaker measurements you can also view an existing room measurement by going through the Viewer icon Upgrading the Firmware To upgrade the firmware on the PDC choose Tools Upgrade PDC fir...

Страница 82: ...82...

Страница 83: ...Refer to Using the Project Explorer in Working with Projects There is always one project which will appear in bold text in the Project Explorer This is the default project the project where measuremen...

Страница 84: ...amped design using the speaker s own crossover and as a bi amped design using the PDC s crossovers Within each Speaker are a Corrections folder and a Measurements folder Within the Measurements folder...

Страница 85: ...eters you have chosen for an explanation of correction parameters refer to Speaker Calibration Parameters These correction parameters are saved when the project is saved but doing so will not change t...

Страница 86: ...on filters These correction filters have been created with the same correction parameters It may be seen that ultimately the Speakers folder and the Calibration Templates folder both provide access to...

Страница 87: ...ystem as per the example in the figure above A new folder is created each time you click on the Measure Room button or choose Tools Measure Room refer to Measuring a Room Within each measurement posit...

Страница 88: ...d measurements and corrections easily in DEQX project files a convention for naming has been adopted The naming convention uses a syntax similar to web based URL where each entity for locating a resou...

Страница 89: ...clicking on the Untitled project and selecting Save and Compress Project As This will open the Save As dialog window and you will be prompted to give the Untitled project a new name Opening an Existin...

Страница 90: ...the speaker measurement format For example SuperSound SS500 L Single amp then the MEASUREMENTS folder Right click on the measurement then choose View from the pop up menu To open a calibration templa...

Страница 91: ...will open Select the destination project click next then Load an existing PDC configuration and select the PDC configuration we previously copied over and click Finish Select a speaker and click Open...

Страница 92: ...nt or filters into a new viewer radio button Alternatively if you are used to using the Project Explorer you can also create a blank viewer then drag and drop measurements from the Project Explorer in...

Страница 93: ...ny for that speaker measurement format combination Check the box next to the desired measurement then click the Next button The measurement can be displayed in either 1 The Viewer the New Viewer optio...

Страница 94: ...ximize the duration of the signal that is received prior to the first reflection This may be best achieved by placing the speaker equi distant from side walls and the rear wall and by using a speaker...

Страница 95: ...s driver axis i e it will be pointing down at the speaker at a 45 degree angle When measured with this method the speaker measurement can be similar to that obtainable in an anechoic chamber Other Se...

Страница 96: ...urer 2 Speaker Model 3 Speaker Serial Number 4 Measurement Name 5 Measurement Distance the horizontal distance from the microphone to the speaker 6 Measurement Angle the angle between i the horizontal...

Страница 97: ...ttings page tick box If you wish to perform bi amp or tri amp speaker measurements and have the measurement process pause between measurements so that you can for example adjust the position of the mi...

Страница 98: ...98 Select the speaker that you wish to verify then click Next...

Страница 99: ...speaker was originally measured using the Master Volume control on the IO Manager You may find that the Master Volume has to be set to a different level than was used when the speaker was originally m...

Страница 100: ...og gives you the option of Accepting the measurement or Retrying If the confidence see Confidence in the Glossary of Terms is too low less than 20 dB you can adjust the Master Volume reduce ambient no...

Страница 101: ...you clicked Accept in the previous dialog this final dialog will appear with the verification measurement displayed behind it on the Data Viewer Click Finish to close the dialog and the Verification...

Страница 102: ...displayed in the Data Viewer DEQX Viewer and Response Charts The Viewer Wizard Data Viewer and Parametric EQ Chart Controls The Data Viewer is used for viewing and manipulating impulse frequency phase...

Страница 103: ...om Out control reverses this process When Zoom In is selected the right mouse button can also be used to zoom out To zoom in on a specific region select the Zoom In control then click and drag over th...

Страница 104: ...104 Smoothing can also be applied to an individual plot by entering a value in the Smooth column for the relevant plot...

Страница 105: ...to 0dB button Again it is applied only to the selected plots This means for example if two plots have been normalised to 0dB then one plot is de selected then Reset applied then the de selected plot...

Страница 106: ...106...

Страница 107: ...he relevant plot and picking from the line styles displayed Data Viewer Parametric EQ and Calibration Chart Controls The following functions are available by right clicking on the plot area or by clic...

Страница 108: ...rt when an EQ point has been added to the EQ It allows you to edit the Frequency Gain Q and Bandwidth of the EQ point IO Manager Once the profiles are loaded into the PDC and the inputs and outputs of...

Страница 109: ...n the Master Volume control makes it active the crescent symbol becomes yellow as shown below When the Master Volume control is active the volume can also be adjusted in 0 1 dB increments by using the...

Страница 110: ...ill not switch from digital RCA to digital XLR When Microphone is selected as the source the lower drop down box lets you select between available microphone calibration files When Analog is selected...

Страница 111: ...l output channels to be adjusted up or down in 0 5 dB increments This can be useful for say manual matching of subwoofers and speakers The gain adjustments for all output channels can be reset to 0 by...

Страница 112: ...DC This data is for display only you cannot edit the configuration directly on the PDC On the other hand the PDC Configuration Window shows what is currently on the PC For example the configuration ta...

Страница 113: ...here can be speaker correction filters to filter the audio signal from input to output The supported PDC Configurations are listed in the table below In this table the L and R are assumed to be the le...

Страница 114: ...ble click on the box of the appropriate speaker in the configuration window The configuration parameter options for a tri amp speaker channel are shown in the following diagram Main Filter Under this...

Страница 115: ...b woofer as frequency increases and the fall off of the speaker as frequency decreases Say for example that they naturally cross over at about 100 Hz and the speaker s magnitude response drops off rap...

Страница 116: ...sub woofer is 14 feet from the listening position To align these three speakers the main speakers have to be delayed by a time period equal to the time that sound takes to travel 4 feet For the left m...

Страница 117: ...confidence The sweeps are added together and averaged to reduce the effect of discontinuous noises during the measurement When drivers of a speaker are measured concurrently they may reinforce or can...

Страница 118: ...118 An anechoic measurement of a speaker with 75 smoothing The same anechoic measurement with 100 smoothing...

Страница 119: ...nt then reduce the effect of those early reflections It is often useful to use smoothing to avoid correcting small variations in the frequency response that are actually measurement artefacts rather t...

Страница 120: ...a lower slope crossover such as 48 dB per octave Woofer and Tweeter correction filters with a 48dB per octave crossover Woofer and Tweeter correction filters with a 300dB per octave crossover The Cros...

Страница 121: ...Hz The purple wiggly line is the Full Range response of the measured speaker and the red line flat for most of the effective frequency range is the Desired Response The Full Range response is the meas...

Страница 122: ...y manual speaker alignment delay The linear phase crossover delay will be present only if you are using linear phase crossovers ie if you have a bi amp or tri amp configuration or if you have used lin...

Страница 123: ...data you wish to import You can browse for the file s by selecting the button Once the file has been selected it s full path and name title sampling frequency and duration in milliseconds will be dis...

Страница 124: ...ard will ask for speaker details a measurement name and measurement details Enter these details then click Next The data will be imported to a speaker measurement with the details you have entered Cli...

Страница 125: ...The DEQX Cal software can use either metric or imperial units for distances Name Library File This specifies the location of The location can be changed by either typing the full path in the dialog bo...

Страница 126: ...f charts that are used by DEQX Cal Chart Name this allows you to specify which type of chart you wish to modify If the All Same tick box is ticked all the charts will be modified If it is not ticked y...

Страница 127: ...id Lines The color and or font of the following chart elements can be changed Chart Element Properties Which Can be Changed Background Color Plot Background Color Title Font and Color X axis Title Fon...

Страница 128: ...ab The PDC tab is shown below The PDC tab allows the appearance of the PDC Configuration template to be changed You can choose whether the following elements of the PDC Configs will be shown Input Out...

Страница 129: ...tent and appearance of toolbars shortcut keys for commands and content of menus can be changed To change these features choose Tools Customize Commands Tab The Commands tab is shown below The Commands...

Страница 130: ...in the mouse pointer changes in appearance to a small button with a mouse pointer next to which is a X to indicate that the command cannot be placed there When a valid location on a toolbar is reache...

Страница 131: ...command can be removed from a toolbar by clicking on it and dragging it off the toolbar Similarly a command can be removed from a menu by clicking on it and dragging it off the menu Toolbars Tab The T...

Страница 132: ...or hidden by clicking on the tickbox next to Show text labels when the toolbar is selected Note the Menu Bar the second toolbar in the list of four toolbars in the figure above does not have the same...

Страница 133: ...Click on the Press New Shortcut Key text entry box 4 Press the Alt key and I key simultaneously Alt I appears in the text box and under the text box the message Assigned to Unassigned appears indicat...

Страница 134: ...134 5 Click on the Assign button to assign Alt I to the PDC Control Panel Alt I is moved into the Current Keys box as shown below 6 Click Close Options Tab The Options tab is shown below...

Страница 135: ...the button If the Show shortcut keys in Screen Tips tickbox is also ticked the explanation will also show a keyboard shortcut if one has been assigned for the button When the Large Icons tickbox is t...

Страница 136: ...le amp with subwoofers bi amp tri amp Does this problem occur with digital input analogue input or both With RCA XLR or both Does this problem occur with digital output analogue output or both With RC...

Страница 137: ...n the PDC off then on again using the power switch at the back of the PDC and try again If this does not restore communications turn the PDC off using the back switch then whilst holding down the P3 b...

Страница 138: ...oo low The changes cannot be applied because this would result in unrealizable limit filters Try reducing the slope or increasing the frequency The PDC has an upper limit for delay This upper limit ma...

Страница 139: ...you click OK the current colors of the PDC Configuration elements will be overwritten with colors from the Windows color scheme When in the Chart tab of the Configuration Options window This is a war...

Страница 140: ...ways a relative measure and for dBFS it is relative to the maximum or clipping level of the input or output The relative measure is always 0dB hence in the dbFS scale all other possible values are neg...

Страница 141: ...near response A term used to define when a systems output is not related to its input by a simple gain factor Off Axis response The response of a loudspeaker when measured to the left or right of the...

Страница 142: ...port or ports may not be functioning properly Does the PC detect other USB devices when they are connected to the same USB port that the PDC was connected to If not then the PC is faulty 5 Sometimes i...

Страница 143: ...log RCA S PDIF AES EBU or Auto Parametric EQ settings Remote Control EQ Settings To reset the EEPROM turn the PDC off at the back then hold down the P3 button whilst turning the PDC back on This will...

Отзывы: