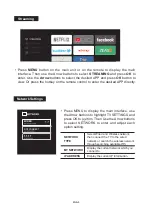
Installation of TV channels
This TV comes with triple tuner.
For digital terrestrial TV: (DVB-T2 – H.265 HEVC)
For digital cable TV: (DVB-C)
For digital satellite TV: (DVB-S2)
+ it has an analogue tuner aswell.
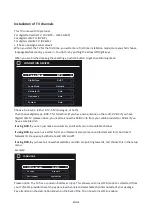
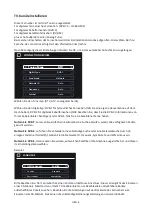
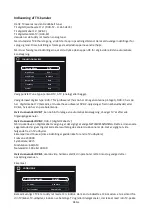
When you start the TV for the first time, you will enter a first time installation mode, Here you shall choose
language& what country you are in. You do this by pushing the arrow left/right keys.
When you are finished making these settings, push OK button to get to autotuning menu.
Choose Tune type. (either DTV, ATV (analogue, or both)
Then choose digital type: DVB-T for terrestrial (if you have own antenna on the roof), DVB-C if you have
digital cable TV (please notice, you need to know the DVB-C info from your cable provider) or DVB-S if you
have a satellite dish.
If using DVB-T
, you can just make an autoscan, and it will scan in all available channel.
If using DVB-C
, you can use either full scan or Network scan (some countries demand this). And insert
Network ID, Frequency, Symbol rate and LCN on/off.
If using DVB-S
, you have to know what satellite your dish are pointing towards, and choose this in the setup
menu.
Example:
Please notice. The TV has a common in input. This allows you to insert CA smartcard from
your TV/cable provider to watch pay per view channels and selectable channels outside of your package.
Pay attention on the description shown on the back of the TV on how to insert CA module.
ENG-4
CONNECTION DEVICES
Tuning Mode
DTV
Digital Type
Scan Mode
Network ID
Frequency
Symbol
DVB-T
Network
Auto
Auto
Auto
LANGUAGE
OSD Language
Country
Environment
Home Mode
Denmark
English
Содержание LDS-4368
Страница 2: ......
Страница 4: ...POWER STANDBY ENG 2...
Страница 8: ...ENG 6 4 x ST4 x 14...
Страница 60: ......
Страница 61: ......
Страница 62: ......
Страница 63: ......
Страница 64: ...2017 43 109 98 67 LDS 4368...


