


25
DENT
Instruments
PowerScout 24
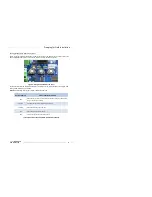
Prepping for Field Installation
An additional option is to set the meter to DHCP and go to the router and assign a specific IP address to
the MAC address that corresponds to the meter. In this way, if the lease does expire, the router will
always assign the same IP number back to the meter. This option may also require a network
administrator.
The
Scan Network
button scans the network for possible meters and displays them in the Logger
Selection dialog box. Look for the serial number on the meter (found on the back of the meter) to
determine which connection point is yours.
Select the correct device from the list of IP Addresses and click
OK
.
The
Setup
button displays the Logger Network Setup dialog box where network address information is
entered.
See your network administrator before making changes.
When you select the
Use DHCP
checkbox the Dynamic Host Configuration Protocol is used to populate
the IP Address, Subnet Mask, and Gateway Address fields automatically.
NOTE:
Each meter connected to the network requires its own unique network IP address. An address is
provided automatically if the network allows DHCP (Dynamic Host Configuration Protocol) and the
meter is configured to request an address.
Click
Update Logger
after making your selections.
ViewPoint displays the following message when the connection is successful: