background image

16

3. Recording from a point 6 seconds back ………………………………… Memory Recording

• Use this function to prevent missing the beginning of the satellite broadcast or other program you want to record using

the “AIR CHECK” function.

1

2

Perform the operations under “Starting recording” on pages 13 and 14.
• To record an analog input, perform steps 1 to 8 under “Analog recording”.
• To record a digital input, perform steps 1 to 7 under “Digital recording”.

Press the CHARACTER/MEMORY REC button.
• Recording starts from a point up to 6 seconds before the button was pressed.
• “

Memory Rec

” is displayed.

• To cancel the memory rec mode, press the 

2

(stop) button.

• Recording stops and the TOC data is written on the MD.
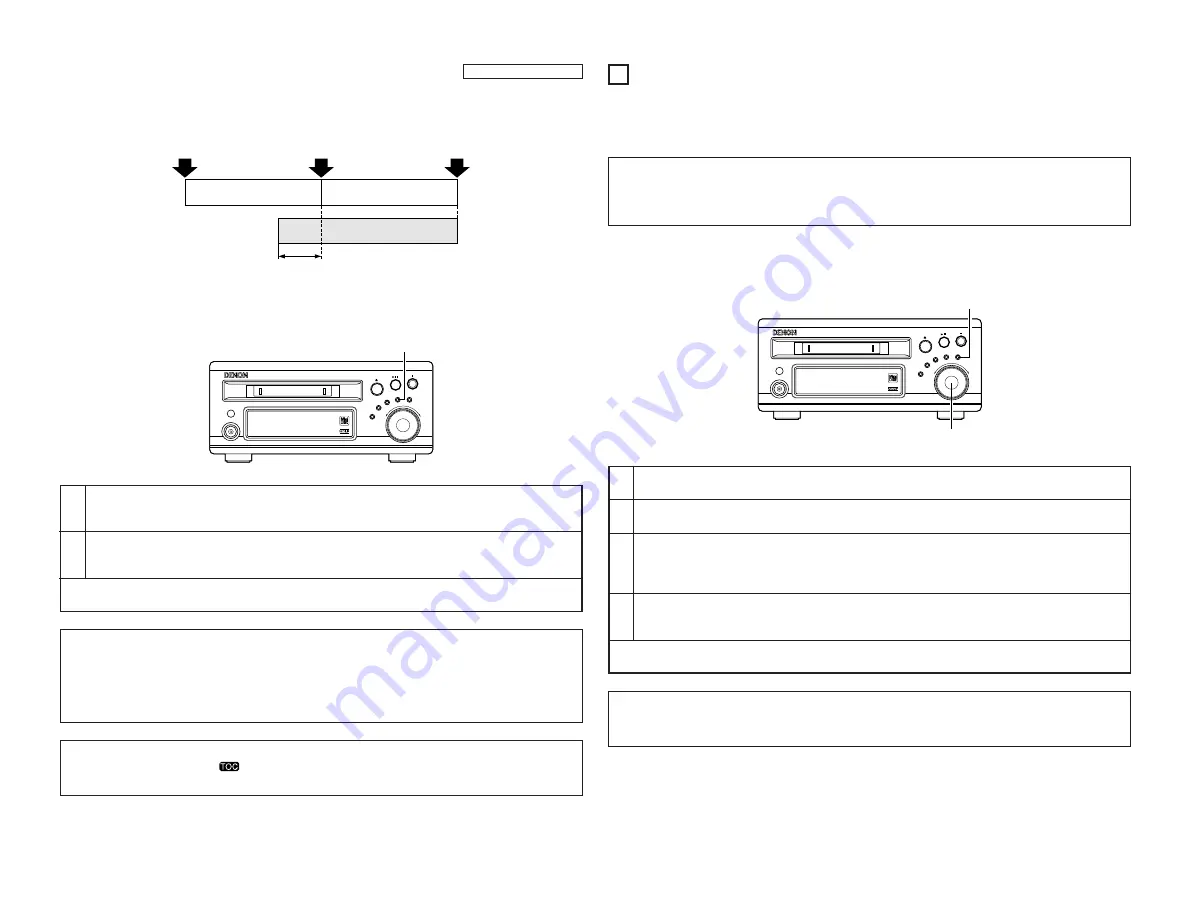
(1) Press the MULTI

REC button.

(2) Press the CHARACTER/

MEMORY REC button.

(Recording stopped)

Set mode

Recorded section

6 seconds

1

18Tr02m 46s

-60     -40     -30      -20     -12       -6        -2         0  

L

dB

R

PUSH

ENTER

MINIDISC RECORDER   DMD-M31

8

9

POWER LOADING MECHANISM

MULTI REC

CD SRS

MEMORY REC

CHARACTER/

TIME/INPUT

EDIT

ON / STANDBY

2

REC PAUSE

REC

NOTE: 

• The set stores in the memory the sound which is being input at the point when the recording pause mode is set.

Thus, the sound from 6 seconds ago cannot be recorded if recording is started more than 6 seconds after the
recording pause mode is set.
In addition, if the input is switched with the TIME/INPUT button in the 6 seconds before memory recording is
started, the sound recorded before the input was switched may be recorded.

NOTE:

• When TOC writing starts, the “

” indicator flashes. Do not shake the main unit, or unplug the power supply

cord while the TOC is being written. If the data is not recorded properly, it will not be possible to play the disc.

• With this function you can start recording from a point up to 6 seconds back in the sound that was being input to the

set when the recording pause mode was set.

11

LONG RECORDING (MDLP RECORDING)

• This unit is compatible with the MDLP (MD-Long Play) format, thereby allowing stereo recording for double or

quadruple the normal recording time (MDLP recording).

• Make the following settings to use the MDLP recording mode:

NOTES: 

• It is not possible to play or edit tracks recorded in the MDLP mode on the other players that are not MDLP compatible.
• It is not possible to combine tracks recorded in the MDLP mode with tracks recorded in the normal mode.
• The recording mode cannot be changed during recording.

1

Press the EDIT button, turn the jog dial of the main unit, and select the MDLP mode.
• “

MDLP?

” is displayed.

2

Press the ENTER button.
• “

MDLP 2/4/Off

” is displayed.

3

Turn the jog dial and select the desired mode.
• “

2

” flashes when the LP 2 recording mode (double the normal recording time) is selected, “

4

” flashes when

the LP 4 recording mode (quadruple the normal recording time) is selected, and “

off

” flashes when the

normal recording mode is selected.

4

Press the ENTER button.
• “

MDLP 2

” (or “

MDLP 4

” or “

off

”) is displayed.

• LP 2 (or LP 4) lights when the MDLP recording mode is selected.

NOTE:

• The MDLP recording mode you have set remains in the memory after recording is completed. Be sure to check

the recording mode before starting to record.

• After setting the MDLP recording mode, record using the same procedure as for normal recording (analog, digital

recording or CD synchronized recording).

1

18Tr02m 46s

-60     -40     -30      -20     -12       -6        -2         0  

L

dB

R

PUSH

ENTER

MINIDISC RECORDER   DMD-M31

8

9

POWER LOADING MECHANISM

MULTI REC

CD SRS

MEMORY REC

CHARACTER/

TIME/INPUT

EDIT

ON / STANDBY

1

1,2~4

1. Setting the MDLP recording mode

Содержание DMD-M31

Страница 1: ...RECORDER DMD M31 1 18Tr02m 46s 60 40 30 20 12 6 2 0 L dB R PUSH ENTER MINIDISC RECORDER DMD M31 8 9 POWER LOADING MECHANISM MULTI REC CD SRS MEMORY REC CHARACTER TIME INPUT EDIT ON STANDBY OPERATING INSTRUCTIONS ...

Страница 2: ... OR BACK NO USER SERVICEABLE PARTS INSIDE REFER SERVICING TO QUALIFIED SERVICE PERSONNEL The lightning flash with arrowhead symbol within an equilateral triangle is intended to alert the user to the presence of uninsulated dangerous voltage within the product s enclosure that may be of sufficient magnitude to constitute a risk of electric shock to persons The exclamation point within an equilatera...

Страница 3: ...12 6 2 0 L dB R PUSH ENTER MINIDISC RECORDER DMD M31 8 9 POWER LOADING MECHANISM MULTI REC CD SRS MEMORY REC CHARACTER TIME INPUT EDIT ON STANDBY q w e rt y u i o 0 1 2 3 8 7 6 9 0 4 5 4 5 FRONT PANEL REAR PANEL DISPLAY q w e r r ...

Страница 4: ...asing this DENON MiniDisc recorder Please read the operating instructions thoroughly in order to acquaint yourself with the MiniDisc recorder and achieve maximum satisfaction from it 1 FEATURES This unit is an audio device using the MiniDisc format Recording is possible for up to 80 minutes Up to 320 minutes can be recorded by using the MDLP mode Operation is the same as with regular compact discs...

Страница 5: ...hen connected to a receiver other than the one in D M31 series In this case none of the system functions auto power on etc will work option Connecting to the D M31 Series 2 When connecting to a receiver other than the one in the D M31 there is no need to make connection 3 Note that in this case none of the system functions auto power on etc will work System operations such as the auto power on fun...

Страница 6: ...ver UD M31 M51 LINE2 When a CD recorder or other equipment is also going to be connected to the D M31 Series connect this to the LINE IN jack of the CD recorder or other equipment Please see SETTING UP THE UNIT in the user s manual of the CD receiver UD M31 M51 for details 5 LINE IN analog input jacks When these jacks connected to the LINE OUT jacks on the tuner amplifier or the CD receiver the so...

Страница 7: ... the CD receiver UD M31 M51 2 If only this unit is purchased also purchase a separately sold remote control unit RC 282 if you wish to control this unit remotely Names and Functions of Remote Control Unit Buttons is included with the UD M31 M51 2 The MD recorder related buttons on the system remote control unit included with the UD M31 M51 are explained below Buttons shared with other models autom...

Страница 8: ...L L REM OTE CO NTR OL UNI T RC 282 M CLE AR GR OU P PRO G DIR ECT REP EAT RAN DO M EDI T ENT ER TIM E TIT LE CHA RAC TER 30 30 Approx 7 meters 1 Inserting the batteries Cautions on batteries Use R6P AA batteries in the remote control unit The batteries should be replaced with new ones after approximately one year though this depends on the frequency with which the remote control unit is used Even ...

Страница 9: ... the power button is pressed setting the unit to the standby mode When the 2 stop button is pressed in the stop mode When TOC writing starts the indicator flashes Do not shake the main unit or unplug the power supply cord while the TOC is being written If the data is not recorded properly it will not be possible to play the disc 2 Handling MiniDiscs MiniDiscs are housed in cartridges so there is n...

Страница 10: ... is started from the play mode and the 3 pause indicator flashes when the manual search operation is started from the pause mode PTY REPEAT RDS RANDOM TITLE CHARACTER TIME EDIT TUNING TUNING ENTER MEMORY TONE SDB TUNER PRESET FUNCTION SLEEP SYSTEM POWER 1 2 1 Searching forward 1 During playback press and hold in the 7 manual search forward button on the remote control unit Normal playback resumes ...

Страница 11: ...MORY TONE SDB TUNER PRESET BAND CD R MD CD VOLUME FUNCTION SLEEP SYSTEM POWER PROG DIRECT 1 PUSH ENTER 8 9 MULTI REC CD SRS 1 Main unit Remote control unit 4 Stopping playback temporarily Pause Use this function to stop playback temporarily then resume from the same point 1 During playback press the 1 3 play pause button The pause mode is set Press the 1 3 play pause button to resume playback from...

Страница 12: ... track repeat mode cannot be set during random playback DISC SKIP GROUP CT PTY REPEAT RDS RANDOM TITLE CHARACTER TIME EDIT TUNING TUNING ENTER MEMORY TONE SDB TUNER PRESET BAND CD R MD CD 1 2 3 VOLUME FUNCTION SLEEP POWER PROG DIRECT 3 1 2 1 18Tr02m 46s 60 40 30 20 12 6 2 0 L dB R PUSH ENTER MINIDISC RECORDER DMD M31 8 9 POWER LOADING MECHANISM MULTI REC CD SRS MEMORY REC CHARACTER TIME INPUT EDIT...

Страница 13: ...ed Set the input mode to LINE1 or LINE2 by using the TIME INPUT button Please see 1 TIME INPUT button under v PART NAMES AND FUNCTIONS on Page 6 for information about how to perform input mode selection The indicator for the selected input source ANA1 or ANA2 lights 1 Analog recording DISC SKIP GROUP CT PTY REPEAT RDS RANDOM TITLE CHARACTER TIME EDIT TUNING TUNING ENTER MEMORY TONE SDB TUNER PRESE...

Страница 14: ...sc that is to be recorded When using a blank disc or a no track disc the Auto Rec Pause function automatically sets this unit to the recording pause mode There is no need to perform step 6 When using an already recorded MiniDisc press the TIME INPUT button on the main unit or the TIME button on the remote control unit to check the recordable time The time display switches between the total recorde...

Страница 15: ...or unplug the power supply cord while the TOC is being written If the data is not recorded properly it will not be possible to play the disc GROUP CT PTY REPEAT RDS RANDOM TITLE CHARACTER TIME EDIT TUNING TUNING ENTER MEMORY TONE SDB TUNER PRESET BAND CD R MD VOLUME FUNCTION SLEEP SYSTEM POWER PROG DIRECT 1 1 18Tr02m 46s 60 40 30 20 12 6 2 0 L dB R PUSH ENTER MINIDISC RECORDER DMD M31 8 9 POWER LO...

Страница 16: ...ot be possible to play the disc With this function you can start recording from a point up to 6 seconds back in the sound that was being input to the set when the recording pause mode was set 11 LONG RECORDING MDLP RECORDING This unit is compatible with the MDLP MD Long Play format thereby allowing stereo recording for double or quadruple the normal recording time MDLP recording Make the following...

Страница 17: ...nto groups so that playback and searches can be performed easily 2 The group functions of this unit provide operations such as those described below 1 Creation of groups Continuous multiple tracks that have been stored on the MD disc are registered as a group and the group is created A maximum of 99 groups can be registered to one MD with this unit Modification of the group registration can be per...

Страница 18: ...Adding disc titles on page 25 Press the EDIT button to enter the input track title Press the 5 eject button on the main unit Group 1 is created The TOC data is written and the disc is ejected When TOC writing starts the indicator flashes Do not shake the main unit or unplug the power supply cord while the TOC is being written If the data is not recorded properly it will not be possible to play the...

Страница 19: ...on first press the GROUP PROG DIRECT button to cancel the programmed play mode NOTES Up to 25 groups can be programmed but the same group cannot be programmed twice To return to the regular play mode press the GROUP PROG DIRECT button and display Direct Mode 2 3 1 2 Playing groups 1 Playing One Group Example Playing group 2 2 Group Program Play 3 Changing the tracks of the group CALL DISC SKIP GRO...

Страница 20: ...9 8 7 CLEAR TAPE DISPLAY VOLUME FUNCTION SLEEP SYSTEM POWER PROG DIRECT 6 3 5 4 2 1 2 3 4 5 6 7 Insert a recorded disc which has registered groups into the disc insertion slot In the stop mode press the GROUP PROG DIRECT button 1Group Mode is displayed The GROUP indicator lights Press the automatic search buttons 8 and 9 and select the group whose title you wish to delete Display 02Gp CC Title Pre...

Страница 21: ...tic search buttons 8 and 9 on the remote control unit Display Track Erase Press the jog dial on the main unit or the ENTER button on the remote control unit Complete is displayed During the pause mode that track is erased When a track is erased during the pause mode the stop mode is set after the track is erased When a track is erased the numbers of the tracks following that track are all decrease...

Страница 22: ...he position where you want to stop erasing point B The section which is to be erased is played and Position OK is displayed The section at which the track is to be combined is played repeatedly for several seconds To fine adjust point A turn the jog dial on the main unit or use the automatic search buttons 8 and 9 on the remote control unit to move point A A Point point number is displayed Fine ad...

Страница 23: ...corresponds to approximately 0 012 seconds Position no points is displayed If it is OK to divide the track press the jog dial on the main unit or the ENTER button on the remote control unit Complete is displayed Press the 5 eject button on the main unit The TOC data is written and the disc is ejected When TOC writing starts the indicator flashes Do not shake the main unit or unplug the power suppl...

Страница 24: ...ecorded tracks cannot be joined Tracks recorded in stereo and tracks recorded monaurally with another MD recorder cannot be joined 4 Moving tracks 1 2 3 4 5 6 7 In the stop mode display the number of the track to be moved Either turn the jog dial on the main unit or use the automatic search buttons 8 and 9 on the remote control unit to display the number of the track to be moved Press the EDIT but...

Страница 25: ... the automatic search buttons 8 and 9 on the remote control unit to display Disc Name In Press the jog dial on the main unit or the ENTER button on the remote control unit The cursor flashes indicating the title input standby mode Input the title Either turn the jog dial on the main unit or use the automatic search buttons 8 and 9 on the remote control unit to select the desired character Some cha...

Страница 26: ...ess the 5 eject button on the main unit The TOC data is written and the disc is ejected When TOC writing starts the indicator flashes Do not shake the main unit or unplug the power supply cord while the TOC is being written If the data is not recorded properly it will not be possible to play the disc The TOC data can also be recorded by performing the following operations Pressing the power button...

Страница 27: ...te control unit 14 PICK REC function PICK REC is a function you can pick only the pieces of audio program you want to store on the disc while listening to audio programs since the PICK REC recording starts If you operate before the TOC writing you can store also all the audio programs during the PICK REC recording The time for which PICK REC recording is possible is the remaining recordable time o...

Страница 28: ...layback can be started simply by pressing the 1 3 play pause button on the system remote control unit When the CD receiver UD M31 M51 is in the standby mode the system power does not turn on even if the 1 3 play pause button on the main unit is pressed 2 Operation is even easier when the components in the D M31 series are connected to the DMD M31 with system connections For instructions on connect...

Страница 29: ...ion Press the MULTI REC button of DMD M31 once to set the record pause mode Press the 1 3 play pause button of the CD receiver or the PLAY button of the Cassette deck Recording starts automatically CD receiver or Cassette deck will stop automatically when playback of the unit has ended and MD is set to record pause mode Stopping the recording Press the 2 stop button of CD receiver or Cassette Deck...

Страница 30: ...n a shaky unstable place Editing has been performed but the UTOC data has not been written indicates a letter or character 17 SYSTEM LIMITATIONS The recording method used on MiniDisc MD systems is different from conventional recording methods Because of this there are several system limitations Note that the following are not malfunctions 1 Track number limitations Up to 255 tracks can be recorded...

Страница 31: ...ecorded on the disc Disc Full is displayed You are attempting to digitally record a digitally recorded source Copy Prohibit is displayed The TIME INPUT button is not set properly The INPUT LEVEL control is turned down Move the disc s accidental erasure protection tab to cover the hole Replace the disc If there are any sections you do not need erase them to increase the recording time Replace the d...

Страница 32: ...32 MEMO ...

Страница 33: ...33 MEMO ...

Страница 34: ...16 11 YUSHIMA 3 CHOME BUNKYOU KU TOKYO 113 0034 JAPAN Telephone 03 3837 5321 Printed in China 511 3984 005 ...

Отзывы: