background image

10

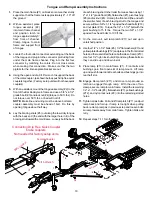
Tongue and Ramp Assembly Instructions

1.

Place the main frame (#1) on blocks or some other sturdy
support so that the frame rests approximately 8" - 10" off
the ground.

2.

With an assistant, place
tongue assembly (#2)
into main frame channel
and position latch on
tongue approximately 3”
from front of channel.
Clamp tongue to main
frame and support front
of tongue.

3.

Locate the four bullet connectors extending out the back
of the tongue and plug into the connector protruding from
under the main frame channel. Plug into the flat four
connector by matching the colors. Do not cross colors
when making this connection.  Make sure that the two
pigtails for the license plate bracket are out.

4.

Using the open end of a 9/16” wrench to support the back
of the male coupler, (as shown below) push drip free quick
couplers together. (Factory setup units will not havequick
couplers)

5.

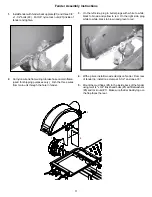
With an assistant, mount the tongue assembly (#2) to the
front of the Kar Kaddy main frame and use a 5/8" x 4-1/2"
grade 5 bolt (#3) and lock nut (#4)(torque to  50 ft. lbs).  Do
not torque over 50 ft. lbs. or bed will not tilt.
NOTE: Brake line and wiring must be above bolt also
coupler assembly must be ahead of bolt.  Do this by
opening tongue about half way.

6.

Lay the bracing struts (#5) out along the tow dolly tongue
with the back end (the end with the larger hole in it) of the
bracing strut toward the main frame.  Loosely bolt the back

of each bracing strut to the trailer frame as shown using 1/
2" x 1-1/2" grade 5 bolt (#6), flatwasher (#7), pivot bushing
(#8) and locknut (#9).  Hold up the front end (the end with
the smaller hole) of each bracing strut to the tongue and
secure with two 5/8" x 1-1/4" epoxied hex head bolts (#10)
and nut plate (#14).  Torque the 1/2" x 1-1/2" bolt with the
pivot bushing to 75 ft. lbs.  Torque the two 5/8" x 1-1/4"
epoxied hex head bolts to 100 ft. lbs.

7.

On the main unit, pull ramp latch (#11) out and up in
unlatched position.

8.

Use four 1/2” x 1-1/2” bolts (#6), 1/2” flat washers (#7) and
yellow plated bushings (#12) and place in the front slotted
hole and the rear slotted hole on both sides of ramp (#13).
Use four 1/2” nylon lock nuts (#9) and snug these bolts so
they can slide up and down in slot.

9.

Place ramp (#13) in main frame (#1).  Front bolts and
bushings go in front open slot of ramp mount.  Lift ramp
up and push forward until rear bolts and bushings go into
rear half slot.

10. Engage Ramp latch (#11) and move ramp around so

latch can engage through ramp.  With the use of two
clamps, secure ramp to main frame.  Install the remaining
1/2” x 1-1/2” bolts (#6), flatwashers (#7), yellow bushings
(#12), and nylon lock nuts (#9) into the remaining slotted
holes.

11. Tighten all six bolts. Pull and lift ramp latch (#11) and pull

ramp back and fold up. If ramp is too tight when pulling
back, reclamp ramp as in previous step and loosen bolts
so ramp lowers away from main frame. Tighten bolts and
retry.

12. Repeat steps 7-11 for other side.

Connector

1

2

3

4

5

5

6

7

8

9

9

6

7

8

10

10

6

6

6

7

7

7

9

11

12

12

13

Female Coupler

Connecting Drip Free Quick Coupler

brake couplers.

Not needed for factory setup units.

Male Coupler

9/16 Wrench

3”

14

Содержание Kar-Kaddy SS KK460SS

Страница 1: ...1 7 06 RD20010 Rev 6...

Страница 2: ...turing Com pany DEMCO If NHTSA receives similar complaints it may open an investigation and if it finds that a safety defect exists in a group of vehicles it may order a recall and remedy campaign How...

Страница 3: ...ates a potentially hazardous situation that if not avoided could result in death or serious injury It may also be used to alert against unsafe practices CAUTION Indicates a potentially hazardous situa...

Страница 4: ...avoid personal injury study the following precautions and insist those working with you or you yourself follow them Replace any caution warning danger or instruction safety decal that is not readable...

Страница 5: ...s towing Replacement parts that displayed a safety sign should also display current sign Safety signs are available from your distributor dealer parts department or factory How to install safety signs...

Страница 6: ...vehicle Beware of bystanders PARTICULARLY CHILDREN Always look around to make sure it is safe to start engine of towing vehicle or move unit This is particularly important with higher noise levels as...

Страница 7: ...owners manual for proper size and grade Refer to bolt torque chart for head identification marking Where replacement parts are necessary for periodic maintenance and servicing genuine factory replacem...

Страница 8: ...ransmission You must disconnect drive shaft at rear axle and remove it With the drive shaft removed it will be necessary to cap the transmission tail shaft to prevent transmission fluid loss Rear engi...

Страница 9: ...30 420 570 650 880 1 225 300 630 850 970 1310 Torque figures indicated are valid for non greased or non oiled threads and heads unless otherwise specified Therefore do not grease or oil bolts or capsc...

Страница 10: ...r frame as shown using 1 2 x1 1 2 grade5bolt 6 flatwasher 7 pivotbushing 8 and locknut 9 Hold up the front end the end with the smaller hole of each bracing strut to the tongue and securewithtwo5 8 x1...

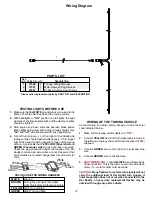
Страница 11: ...Instructions 3 On the left side plug in bullet plugs with white to white black to brown and yellow to red On the right side plug white to white black to brown and green to red 4 With a pliers install...

Страница 12: ...PART NO QTY DESCRIPTION PARTS LIST 1 11590 1 Tongue Wiring Harness 2 11591 1 Main Frame Wiring Harness 3 01863 1 Rubber Grommet not shown Please order replacement parts by PART NO and DESCRIPTION 2 Wi...

Страница 13: ...empty and unhooked to perform any and all of these steps Do not attempt while tow dolly is loaded or hooked up 2 With tongue wheel jack turned to its lowest position push pull tongue to the left 3 Pus...

Страница 14: ...it will go and allow lock to slide in until it stops 4 If lock has been pulled and lifted properly the ramp lock will extend out from it s holder This will mean that the ramp is unlocked and ramp may...

Страница 15: ...go and push forward until you hear or see retainer handles snap into their locked positions Check to make sure they all fully seated Make sure that all pins and locking devices are double checked bef...

Страница 16: ...shaft connected MAINTENANCE Periodically check all bolts and nuts to insure proper tension or torque Grease the king pin and tie rod end grease zerks every 2500 miles An occasional drop of oil may be...

Страница 17: ...t rests against the back of the light bar to hold the license down and tighten wing nut License must be UP with the tow dolly empty Step 2 Remove black locking pin BEFORE loading vehicle onto the Kar...

Страница 18: ...ied securely with front tires in a straight position Rear Wheel Drive Disconnect towed vehicle driveshaft for rear wheel drive vehicles with automatic transmission For manual transmission Consult your...

Страница 19: ...nd at least 1 000 lbs heavier than the towed vehicle and tow dolly combined Do not pack goods in car that is being towed Overloading the Kar Kaddy or exceeding the width limit may result in damage to...

Страница 20: ...rod 7 Reassemble the rest of the Kar Kaddy unit Have the tongue in a hooked up position with the ball coupler 18 off the ground Jack up the axle just enough to allow you to take the wheels off and put...

Страница 21: ...l items w 5650 Master Cyl Replacement Kit drum 5696 Coupler Repair Kit 23 16 22 20 21 19 17 24 13 14 9 10 6 4 3 2 7 5 15 1 8 Please order replacement parts by PART NO and DESCRIPTION 2 8 9 14 15 18 19...

Страница 22: ...for LEFT cluster SB24048 1 Adjusting Screw Assembly L for RIGHT cluster 10 SB10958 2 Spring Shoe 11 SB10961 95 1 Shoe Guide 12 SB23937 1 Cable 13 SB23936 1 Cable Guide 14 SB23724 1 Spring Adjusting S...

Страница 23: ...lic braking is the use of quality brake fluid Use only DOT 3 or DOT 4 brake fluid from a sealed container Only use pressure bleeding equipment and follow the manufacturer s instruction in bleeding the...

Страница 24: ...DOWN 2 4 5 6 7 9 10 11 12 13 19 20 21 22 22 21 20 23 23 24 24 25 26 26 27 28 29 32 32 6 26 36 37 60 38 39 40 41 43 41 45 46 46 47 48 49 50 51 52 52 55 54 53 53 56 56 57 58 60 59 58 19 61 62 63 64 65 7...

Страница 25: ...n 37 00182 1 Hair pin 38 11540 96 1 KK460SS Main Frame 39 5740 1 License Plate Bracket Assembly 40 04771 80 1 Tie Rod 41 5179 1 Right Tie Rod End w Right Hand Threads 42 5178 1 Left Side Tie Rod End w...

Страница 26: ...RIPTION Items included in 5511 kit 2 6 1 3 4 5 7 8 9 10 11 12 13 14 14 15 16 17 18 WINCH ASSEMBLY TILT BED LATCH ASSEMBLY Left Winch 5432 Shown 5432 Left Winch Assembly 5433 Right Winch Assembly 1 002...

Страница 27: ...s 10 11688 3 Red LED Light 11655 1 3 Cluster LED Wiring Harness 11616 1 Gromment 5 8 OD x 3 8 x 1 8 Thick 5765 3 Cluster LED Light Assembly Included REF PART NO NO QTY DESCRIPTION 5763 Ramp Latch Kit...

Страница 28: ...7 11206 1 Tail Light Wire Harness 8 11209 1 4 LED Tail Light 9 11595 1 Left Fender Assembly 11596 1 Right Fender Assembly 10 11604 1 Chrome LED Marker Base Mount 11 11605 1 Yellow LED Marker Light 12...

Страница 29: ...re Tire Cover Please order replacement parts by PART NO DESCRIPTION Drive in stud here for tire with rim 11574 115mm bolt circle 2 3 7 8 6 All options may not mount on tow dolly simultaneously 5 1 4 P...

Страница 30: ...Brake and Signal Light w Lenses 8 02772 10 1 4 20UNC Nylon Insert Locknut 9 00092 6 1 4 20UNC x 1 2 Hex Head Bolt 10 01777 50 2 Light Bar Z Bracket 11 01778 4 3 Suction Cup w Bolt 13 12 02198 1 Light...

Страница 31: ...misuse accident or operated in any way contrary to the operating and maintenance instructions as speci fied in the Demco Owner s Manual for that model tow dolly This warranty does not cover any tow do...

Страница 32: ...32 NOTES...

Страница 33: ...satisfied with the company s resolution of your problem Why did you purchase this product Please list the specific source of information prompting this purchase After purchasing this product do you se...

Страница 34: ...34 Postage Dethmers Manufacturing Company 4010 320th Street Box 189 Boyden Iowa 51234...

Страница 35: ...35 NOTES...

Страница 36: ...36 DETHMERS MFG COMPANY P O BOX 189 4010 320th St BOYDEN IA 51234 PH 712 725 2311 FAX 800 845 6420 TOLL FREE 1 800 54DEMCO 1 800 543 3626 www demco products com...

Отзывы: