background image


NovoDisplay User Manual 

Copyright © 2019 Vivitek. Vivitek is a trademark of Delta Electronics, Inc.


36 

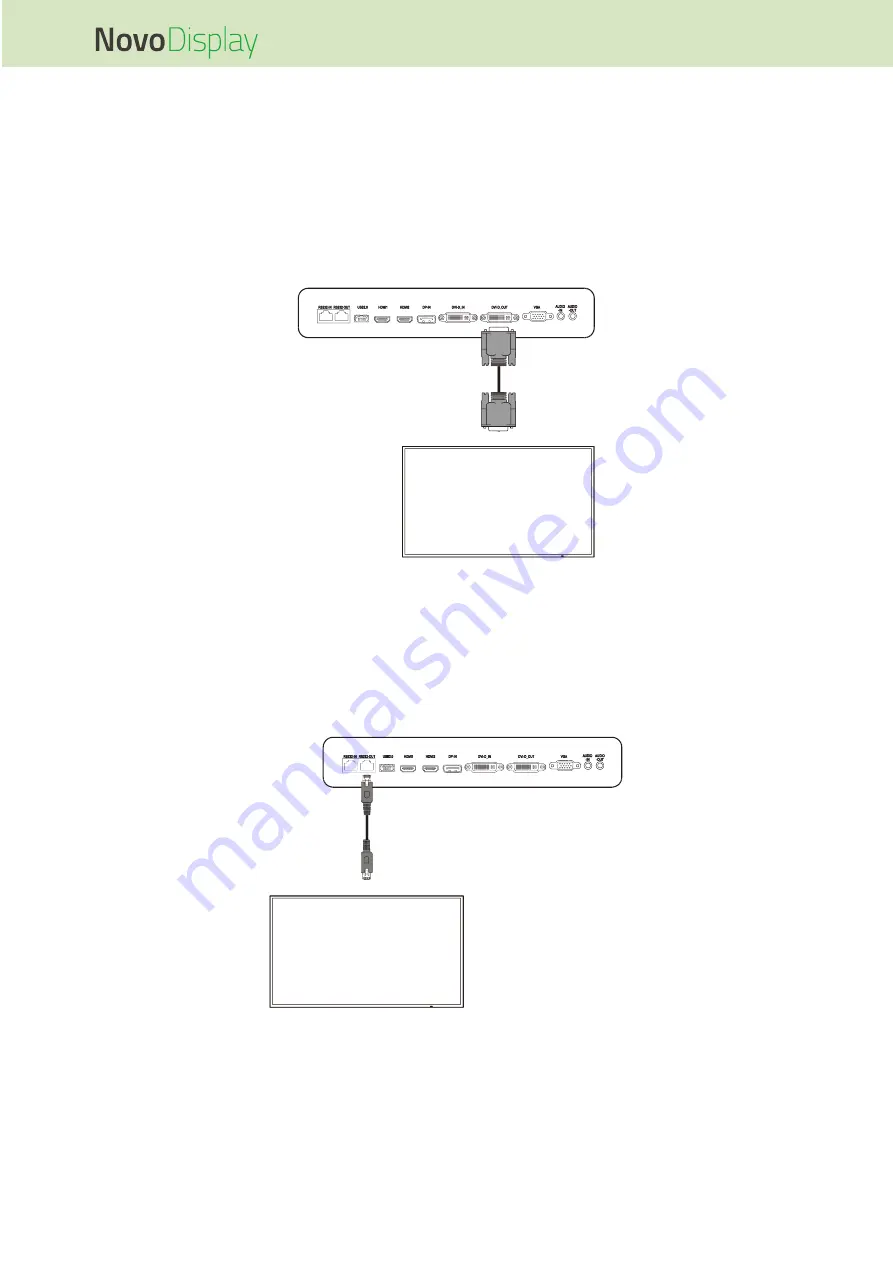
DVI-D Out 

The DVI-D Out port connects to another display in a daisy chain configuration to pass 

along the video signal derived from the DVI-D In port. When connecting another display 

to the DVI-D Out port: 

  Use a standard DVI-D cable. 

  Select the DVI input source on both displays and the video will be duplicated on both 

displays. 


RS-232 Out   

The RS-232 Out port connects to another display in a daisy chain configuration to pass 

along the control commands derived from the RS-232 In port. When connecting another 

display to the RS-232 Out port: 

  Use an Ethernet cable. 


Содержание Vivitek NovoDisplay DK430

Страница 1: ...User Manual For DK430 DK550 DK650 DK750...

Страница 2: ...K650 10 DK750 11 Display Rear View 12 DK430 DK550 12 DK650 12 DK750 13 Display Right View 14 DK430 DK550 14 DK650 14 DK750 15 Display Left View 16 DK650 16 DK750 17 Display Bottom View 18 DK430 DK550...

Страница 3: ...e 34 USB 2 0 34 NovoDisplay 34 OPS Module 34 USB Type C OPS Module only 35 microSD OPS Module only 35 DVI D Out 36 RS 232 Out 36 Audio Out 37 Getting Started 38 Powering the Display 38 Switching Input...

Страница 4: ...he product packaging and don t modify or lengthen it Please check and ensure that the AC source is connected with the ground The power cable that comes with the display is for use exclusively by this...

Страница 5: ...batteries are used and installed in the proper orientation Maintenance This machine should only be maintained serviced by certified technician Inspect the display mount frequently to ensure that it ha...

Страница 6: ...ill be required to correct the interference at his her own expense Changes or modifications not expressly approved by the parties responsible for compliance could void the user s authority to operate...

Страница 7: ...dio frequency energy and if not installed and used in accordance with the instruction manual may cause harmful interference to radio communications Operation of this equipment in a residential area is...

Страница 8: ...sure that all of the proper items are included with the display in the packaging The items that should be included in the packaging are NovoDisplay Remote Control w Battery Power Cable For DK430 DK550...

Страница 9: ...he volume for the display Switches sub menus in the display s settings menu Changes Adjusts the settings for an item in the display s settings sub menus 4 Up Button Selects items in the display s sett...

Страница 10: ...sub menus 4 Volume Up Right Button Increases the volume for the display Switches sub menus in the display s settings menu Changes Adjusts the settings for an item in the display s settings sub menus 5...

Страница 11: ...on Opens Closes the display s settings menu Returns to the previous menu in the display s settings sub menus 4 Volume Down Left Button Decreases the volume for the display Switches sub menus in the di...

Страница 12: ...o 2 Wall Mount Screw Holes Used to install the wall mount included with the display See the Installing the Wall Mount section for more information 3 Control Panel See the Display Front View section fo...

Страница 13: ...rademark of Delta Electronics Inc 13 DK750 No Item Description 1 Handles Allows you to safely carry move the display 2 Wall Mount Screw Holes Used to install the wall mount included with the display S...

Страница 14: ...components DK430 DK550 No Item Description 1 Speaker Broadcasts the display s audio 2 OPS Slot Remove the cover to install an OPS module to the display 3 Control Panel See the Display Front View secti...

Страница 15: ...NovoDisplay User Manual Copyright 2019 Vivitek Vivitek is a trademark of Delta Electronics Inc 15 DK750 No Item Description 1 Power Socket Connects to a power outlet...

Страница 16: ...nics Inc 16 Display Left View The following illustration shows the left side of the display and its various components NOTE The left side of DK430 and DK550 do not feature any major components DK650 N...

Страница 17: ...D In Port Connects to a computer to broadcast video 7 DisplayPort In Port Connects to a computer to broadcast video and audio 8 HDMI In Port 2 2 0 Connects to Blu Ray DVD players set top boxes digital...

Страница 18: ...edia players computers or other video sources to broadcast video and audio 5 HDMI In Port 2 2 0 Connects to Blu Ray DVD players set top boxes digital media players computers or other video sources to...

Страница 19: ...broadcast video and audio 7 HDMI In Port 2 2 0 Connects to Blu Ray DVD players set top boxes digital media players computers or other video sources to broadcast video and audio 8 DisplayPort In Port...

Страница 20: ...module does not support control commands it is only used for debugging To send control commands to the display use the embedded RS232 In port on the display 4 USB 2 0 Ports Connects to a USB flash dri...

Страница 21: ...8 Smart Picture Switches picture mode 9 Screen Freeze Freezes the image on the screen 10 Settings Menu Opens the OSD settings menu 11 Input Source Opens the input source menu 12 Function Buttons INFO...

Страница 22: ...nsuring that the and terminals on the battery match their corresponding terminals in the battery compartment WARNING Failure to install the correct batteries in the correct orientation may result in d...

Страница 23: ...displays When setting the display down to install the wall mount place it face down on a flat and stable surface covered by a protective sheet or cloth and a table cushion as shown in the illustration...

Страница 24: ...the distance Y between the top two POM nuts 3 Place the two C U shaped mount brackets in the correct position on the wall where you want mount the display on ensuring that the distance between the mo...

Страница 25: ...nuts on the display are installed into the mount brackets ensuring that they are properly secured 6 Install two E 4x43mm screws into either top or sides of the mount brackets to secure the POM nuts in...

Страница 26: ...ollow the instructions below 1 Install the two E M5x100mm screws into the B vertical beam brackets on the display with a depth of 2 10mm NOTE DO NOT fully screw the M5x100mm screws into the bracket on...

Страница 27: ...m bracket onto the wall by placing the bracket against a proper wall and securing it using the eight C M8x80mm screws NOTE You can choose the screw clearance depending on the conditions of the wall 5...

Страница 28: ...NovoDisplay User Manual Copyright 2019 Vivitek Vivitek is a trademark of Delta Electronics Inc 28 6 Tighten the E M5x100mm screws until they are fully screwed into the horizontal beam bracket...

Страница 29: ...he OPS Module first If you do not install the OPS module before you begin using the display the display will not have all the functions available for use To install the OPS module follow the instructi...

Страница 30: ...itek Vivitek is a trademark of Delta Electronics Inc 30 3 Tighten the two captive screws on the OPS module until the module is properly secure in the display DK430 DK550 DK650 DK750 4 Install the ante...

Страница 31: ...to broadcast video and audio on the NovoDisplay When connecting a device to the HDMI In port Use an HDMI cable with a standard Type A HDMI connector Select the corresponding HDMI input in the input s...

Страница 32: ...n audio cable from the audio out jack of the source to the audio in jack of the NovoDisplay as described in the Audio In PC Audio section below DVI D In The DVI D In port connects mainly to computers...

Страница 33: ...as a VGA connection by connecting to the audio out jack of the video source to broadcast the audio from that source When connecting a device to the Audio In port Use a standard 3 5mm audio cable Novo...

Страница 34: ...send control commands to the display use the embedded RS232 In port on the display NovoDisplay OPS Module USB 2 0 The USB ports on both the NovoDisplay and OPS module allow you to connect USB devices...

Страница 35: ...E The USB Type C port is only used for USB devices and saving NovoDS playlists It does not support playback of media files or direct video input sources microSD OPS Module only The microSD card slot a...

Страница 36: ...the DVI D In port When connecting another display to the DVI D Out port Use a standard DVI D cable Select the DVI input source on both displays and the video will be duplicated on both displays RS 23...

Страница 37: ...k Vivitek is a trademark of Delta Electronics Inc 37 Audio Out The Audio Out jack connects to external speakers to broadcast the audio from the NovoDisplay When connecting external speakers to the Aud...

Страница 38: ...Powering the Display After mounting installing the NovoDisplay in the desired location you must supply power to the display using the following steps 1 Plug the supplied power cable into the display a...

Страница 39: ...e display on DK430 DK550 DK650 DK750 3 Press the power button on the display or the remote control to power on the display DK430 DK550 DK650 DK750 Switching Input Source After making a video input con...

Страница 40: ...emote control to select the video input you want to show on the display and then press the menu button on the display or the OK button on the remote control to confirm your selection NOTE The OPS sele...

Страница 41: ...J 45 section for more information A Wi Fi connection Setting up a Wi Fi Connection To set up a Wi Fi connection 1 Ensure that the OPS module is installed in the display See the Installing the OPS Modu...

Страница 42: ...y User Manual Copyright 2019 Vivitek Vivitek is a trademark of Delta Electronics Inc 42 4 Select Device Settings in the Settings menu 5 Select Wi Fi in the NT Settings menu 6 Select Advanced in the Ge...

Страница 43: ...itek is a trademark of Delta Electronics Inc 43 7 Select Wi Fi in the Settings menu 8 Turn the Wi Fi switch on in the Wi Fi menu 9 Select the Wi Fi access point router that you want NovoDisplay to con...

Страница 44: ...or right button to select a menu e g the Sound menu Press the up or down button to select the item in the menu that you want to adjust Press the input source button to confirm selection of the item th...

Страница 45: ...color temperature for the display The available settings include Standard Warm Cool and Custom Aspect Ratio Changes the screen ratio for the display The available settings include 4 3 16 9 Cinema Sub...

Страница 46: ...adjust the following settings Item Description Sound Mode Changes the sound mode for the display The available settings include Movie Sports User Standard and Music Balance Adjust the left right audio...

Страница 47: ...able settings include English French Spanish Portuguese Italian German Russian and Chinese Transparency Sets the level of transparency for the settings menu OSD Time Out Sets the amount of inactive ti...

Страница 48: ...ached to the display Do not use any chemicals on the panels Do not use anything abrasive to wipe the display use a clean soft lint free cloth instead to wipe the display Do not spray water directly on...

Страница 49: ...Audio Out 3 5mm x1 OPS Module Audio Out 3 5mm x1 Control RS 232 RJ45 x1 USB Rear USB 2 0 x1 Support up to 32GB OPS Module OPS Interface Standard 80pin System OS Version Android v7 1 RAM 2GB DDR3 Inte...

Страница 50: ...nu The display format is not supported 1 Select auto correction in the OSD settings menu 2 Adjust the clock and phase values in the OSD settings menu Videos do not function normally No picture and no...

Страница 51: ...5 FD 20 C4 39 Pause E5 FD 20 C5 38 Stop E5 FD 20 C6 37 Next E5 FD 20 DC 21 Previous E5 FD 20 DD 20 Rotate E5 FD 20 DE 1F Volume Up E5 FD 20 C7 36 Volume Down E5 FD 20 C8 35 Mute E5 FD 20 C9 34 Exit E5...

Страница 52: ...nge without notice The manufacturer does not provide any statement or warranty of the contents in the manual and clearly give up the implied warranties of merchantability and of fitness for a particul...

Страница 53: ...T 1 510 668 5100 F 1 510 668 0680 Vivitek Asia 7F No 186 Ruey Kuang Road Neihu Taipei 11491 Taiwan R O C T 886 2 8797 2088 F 886 2 6600 2358 Vivitek Europe Zandsteen 15 2132 MZ Hoofddorp The Netherla...

Отзывы: