www.deltapowersolutions.com
4 / 8
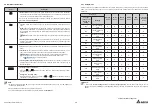
6.2.1 Setup Mode
Please note that only qualified service personnel can perform setup action. In setup mode, you can set up the following
items. For some settings, they can’t be set in certain operation modes. Please refer to the table below for relevant
information.
Setup Item
Standby
mode
On-line
mode
Bypass
mode
Battery
mode
ECO
mode
Frequency
converter
mode
The code
shown on the
16-segment
display
Meaning
INV
*1
Inverter Voltage
Setup
V
X
V
X
X
X
INV
*1
Inverter Frequency
Setup
V
X
V
X
X
X
COV
Frequency Converter
Setup
V
X
V
X
X
X
STB
Standby Bypass
Setup
V
V
V
V
V
V
ECO
ECO Setup
V
V
V
V
V
X
ALM
Overload Alarm
Setup
V
V
V
V
V
V
BUZ
Buzzer Setup
V
V
V
V
V
V
BYP
Bypass Range
Setup
V
V
V
V
V
V
CAP
Battery Capacity
Setup
V
V
V
V
V
V
STG
Battery String
Setup
V
V
V
V
V
V
AST
Auto-Start To On-line
Setup
V
X
V
X
X
X
PF
Power Factor
Setup
V
X
V
X
X
X
RST
Restore Default
Setup
V
X
V
X
X
X
NOTE:
*
1
Both of the '
Inverter Voltage Setup
' and '
Inverter Frequency Setup
' use the same code, but you can tell
whether the UPS is in '
Voltage
' or in '
Frequency
' setup by checking the information shown on the 7-segment
display.
6.2 Multi-function Buttons
Icon(s)
Description
z
z
Buzzer Off
: When the buzzer is on, press the button for 0.1 second to turn the buzzer
off. Please note that the buzzer will automatically turn on when a new alarm occurs. The
buzzer can’t be manually turned on after it has been muted.
In setup mode, the button is used to confirm or change your parameter. For more details,
please refer to
6.2.1 Setup Mode
.
ON
z
z
Turn On
: Press and hold the button for 3 seconds, and release it after you hear one
beep.
z
z
Battery Test
: Only applicable for on-line mode. Press and hold the button for 3 seconds,
and the UPS will transfer to run in battery mode to perform a battery test. After the battery
test completes, the LCD will show the test result and the UPS will return to on-line mode
automatically.
NOTE:
The UPS will not perform the battery test if the batteries are not fully charged.
z
z
Scrolling Up/ Increasing Number
: Press the button for 0.1 second to go to the previous
display or to increase number. In setup mode, press the button for 0.1 second to go to the
previous parameter.
OFF
z
z
Turn Off
: Press and hold the button for 3 seconds, and release it after you hear one
beep.
z
z
Fault Clear
: When the UPS has a fault condition, press and hold the button for 3 sec-
onds, release it after you hear one beep and the UPS will clear the fault condition.
NOTE:
When the UPS clears the fault condition, it means that the buzzer/ warning
message has been turned off. To eliminate the fault detected, please refer
to
8
Troubleshooting
for relevant solutions.
z
z
Scrolling Down/ Decreasing Number
: Press the button for 0.1 second to go to the next
display or to decrease number. In setup mode, press the button for 0.1 second to go to
the next parameter.
ON
SETUP
z
z
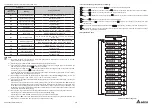
Entering into the setup mode
Press the
and
ON
buttons at the same time for 3 seconds and the UPS will enter
into the setup mode.
z
z
Exiting from the setup mode
When the UPS is in setup mode, press the
and
ON
buttons at the same time for 3
seconds to exit the setup mode.
NOTE:
1. When the LCD display gets dim, press any of the above-mentioned buttons to wake up the LCD display and
enable each button function.
2. Only qualified service personnel can perform setup action.
3. For more information about the setup mode, please refer to
6.2.1 Setup Mode
.
Continue to the Next Page


