background image

SNMP IPv6 for UPS

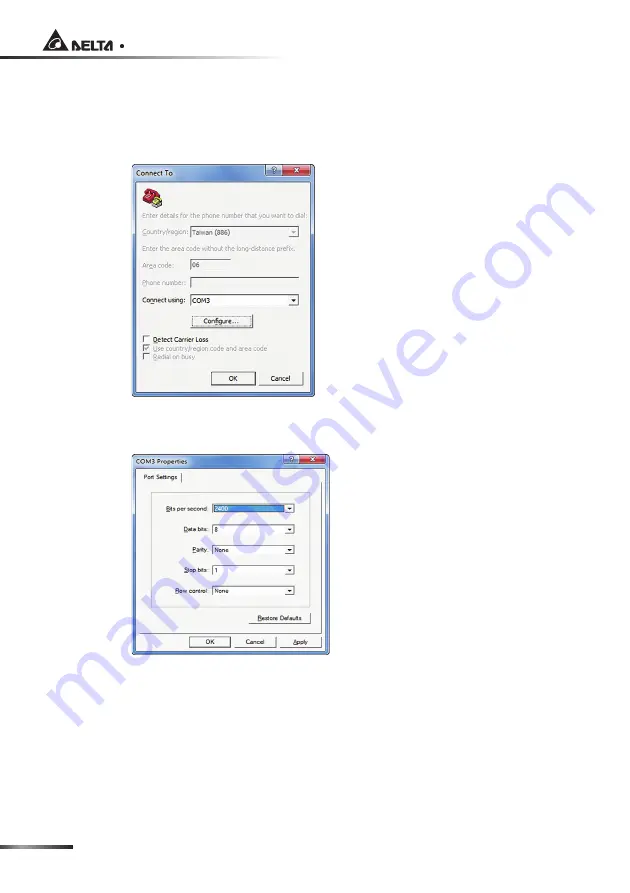
Step 5


Enter a name and choose an icon for the connection. Click 

OK

 to con-

tinue. From the dropdown list 

Connect using

, select the 

COM port

 that 

is connected to the SNMP IPv6.

Step 6

 Click 

Configure

 and set up COM port parameters as follows:

Step 7

 Click 

OK 

to continue and set both of the DIP switches of the SNMP IPv6 

to the 

ON

 position (configuration mode). HyperTerminal will automati-

cally connect to the SNMP IPv6. If it does not connect, click the telephone 
icon 

call

 from the icon list. When connection is established, log in with 

account/ password. (Default: admin/ password, case sensitive). Once you 
are logged in, the 

Main Menu

 appears on the screen. Please refer to 

4-5 

Configuring via Text Mode 

for more information.

Содержание InsightPower SNMP IPv6 for UPS

Страница 1: ...HOWD QVLJKW3RZHU 6103 3Y IRU 836 8VHU 0DQXDO ZZZ GHOWDZZ FRP 7KH SRZHU EHKLQG FRPSHWLWLYHQHVV...

Страница 2: ...is product Any disposition duplication dissemination reproduction modification translation extraction or usage of this Manual in whole or in part is prohibited without the prior written permission of...

Страница 3: ...Chapter 4 System Configurations 10 4 1 Configuring via InsightPower UPS Web 10 4 2 Configuring with EzSetting 12 4 3 Configuring via Telnet 14 4 4 Configuring through COM Port 15 4 5 Configuring via T...

Страница 4: ...nt Level 36 5 3 System 37 5 3 1 Administration 37 User Manager 37 TCP IP 38 Web 39 Console 40 FTP 41 Time Server 42 Syslog 43 Batch Configuration 43 Upgrade 45 5 3 2 Notification 45 SNMP Access 45 SNM...

Страница 5: ...difications on the unit z Do not attempt to fix replace internal components When repair is needed refer all servicing to the nearest Delta service center or authorized distributor z Do not allow any o...

Страница 6: ...2 Features z Network UPS management Allows remote management of the UPS from any workstation through Internet or Intranet z Remote UPS monitoring via SNMP HTTP Allows remote monitoring of the UPS usi...

Страница 7: ...d IPv6 2 3 Package Contents Please carefully verify the SNMP IPv6 and the included accessories Contact your dealer if any item is missing or damaged Should you return the items for any rea son ensure...

Страница 8: ...M Port Reset Button Dip Switch Front view 21 Network Port LED Indicators Console COM Port Reset Button Dip Switch No Item Description Network Port Connects to the Ethernet Network Console COM Port 1 C...

Страница 9: ...rmal Mode The SNMP IPv6 works with the UPS It provides the UPS s status information and parameters through a network system OFF ON Pass Through Mode The SNMP IPv6 stops polling the UPS but transfers t...

Страница 10: ...our UPS does not have any SNMP slot please install it in an optional external SNMP box z Please follow the procedures below to install the SNMP IPv6 into your UPS s SNMP slot Step 1 Remove the cover a...

Страница 11: ...holes on the SNMP slot to select the suit able cover and use the two screws that you just removed to fix the cover on the SNMP slot see Figure 3 d Figure 3 d z Please follow the procedures below to i...

Страница 12: ...IPv6 into the grooves see Figure 3 g Two grooves Figure 3 g Step 4 There are three covers provided in the SNMP IPv6 s package Please follow the location of screw holes on the external SNMP box to sel...

Страница 13: ...cable provided by your UPS to connect your UPS s RS232 port 10 pin Connector Connects your UPS s PC board Please ask quali fied service personnel to execute such connec tion Do not perform the connec...

Страница 14: ...Please see 4 4 Configuring through COM Port 127 1 To ensure system security it is highly recommended that you change your account and password after the first login 2 If you have other SNMP IPv6 units...

Страница 15: ...to observe monitoring data 127 You can manually specify whether users are allowed to log in from external connections from other LANs Selecting Only in This LAN will block login attempts from externa...

Страница 16: ...station Windows 2000 2003 2008 XP Vista Win7 or later version Step 2 Use a CAT5 cable to connect the SNMP IPv6 s network port and the net work Step 3 Make sure both of the DIP switches of the SNMP IPv...

Страница 17: ...Discover 2 If the SNMP IPv6 can not be found check the networking port UDP 3456 on the workstation you are using Make sure it is not blocked Step 6 Select a device from the Device List click Modify an...

Страница 18: ...t to the OFF position normal mode Step 4 For Windows workstations launch DOS prompt mode Start Run key in cmd and press Enter For Linux launch shell Step 5 Enter the following command telnet InsightPo...

Страница 19: ...ws 2000 2003 2008 XP Vista or 7 Step 2 Use the provided RJ45 to D89 cable to connect the SNMP IPv6 s COM port and the workstations COM port Step 3 Make sure both of the DIP switches of the SNMP IPv6 a...

Страница 20: ...Click OK to continue and set both of the DIP switches of the SNMP IPv6 to the ON position configuration mode HyperTerminal will automati cally connect to the SNMP IPv6 If it does not connect click the...

Страница 21: ...UVLRQ 0 GGUHVV DE H H 8VHU 0DQDJHU 7 3 3 6HWWLQJ 1HWZRUN 3DUDPHWHU 7LPH 6HUYHU 6RIW 5HVWDUW 5HVHW OO 7R HIDXOW LW LWKRXW 6DYH 6DYH QG LW 3OHDVH QWHU RXU KRLFH _ _ 0DLQ 0HQX User Manager 5 86 5 86 XWK...

Страница 22: ...trict Administrator login area Only in This LAN 8 Device Manager Account The default account password case sensitive for the Device Manager who is only permitted to change device related settings devi...

Страница 23: ...WLQJ No Item Description Default 1 IPv4 Address The IPv4 address 192 168 001 100 2 IPv4 Subnet Mask The IPv4 subnet mask setting 255 255 255 000 3 IPv4 Gateway IP The IPv4 network gateway 192 168 001...

Страница 24: ...on check time 3 Network Parameter 773 6HUYHU QDEOH 7736 6HUYHU QDEOH 7HOQHW 6HUYHU QDEOH 66 6 73 6HUYHU QDEOH 73 6HUYHU LVDEOH 6 VORJ LVDEOH 773 6HUYHU 3RUW 7736 6HUYHU 3RUW 7HOQHW 6HUYHU 3RUW D 66 6H...

Страница 25: ...TP Server Port FTP networking port 21 c Syslog Server1 The remote syslog Host Name d Syslog Server2 The remote syslog Host Name e Syslog Server3 The remote syslog Host Name f Syslog Server4 The remote...

Страница 26: ...TP POOL NTP ORG 4 2nd Time Server The second time server for SNTP 5 Manual Date Set the date manually 01 01 2000 6 Manual Time Set the time manually 00 00 00 Soft Restart Reset the SNMP IPv6 This will...

Страница 27: ...92 168 1 100 Step 3 When connection is established the InsightPower UPS Login page ap pears Enter your account and password Default admin password http 192 168 1 100 127 1 If you have previously chang...

Страница 28: ...ree items 5 1 1 Information This includes the information of UPS Properties Battery Parameters In Out Param eters Identification Status Indication and Power Module Please note that since different UPS...

Страница 29: ...ers to view the information of Battery Status Battery Measurement Battery Cabinet and Replacement Date http 192 168 1 100 In Out Parameters Go to Monitor Information In Out Parameters to view the info...

Страница 30: ...cation Go to Monitor Information Status Indication to view the UPS s event list When an event occurs its according beacon lights green http 192 168 1 100 Power Module Go to Monitor Information Power M...

Страница 31: ...History Event Log Page 1 2 3 4 to see events that occur The existing ones are overwritten when the maximum number of entries 1 000 is reached You can also download the entire event log archive event_...

Страница 32: ...and replies to the user through network Please note that this op tion only appears when the UPS supports this function and the event logs saved in the UPS may be different from the event logs saved in...

Страница 33: ...ta Interval http 192 168 1 100 z Clear History Data Empty history data logs z Clear Event Log Empty event logs z Save Data Interval The time interval after which an event data entry is recorded 5 1 3...

Страница 34: ...PS It provides the UPS s status information and parameters through a network system OFF ON Pass Through Mode The SNMP IPv6 stops polling the UPS but transfers the communication data between the consol...

Страница 35: ...owing Please note that different UPSs may support different configuration options http 192 168 1 100 z Auto Restart After you click Submit to confirm your auto restart setup the SNMP IPv6 will send th...

Страница 36: ...uld estimate the lon gest OS Shutdown Delay time for your operating systems that have been in stalled shutdown software and connected to the SNMP IPv6 The SNMP IPv6 will delay the assigned OS Shutdown...

Страница 37: ...m your setup the SNMP IPv6 will send the command to the UPS and save the setup in the UPS When the test time is due the UPS will automatically perform the battery test z Output Dry Contacts After you...

Страница 38: ...cted computers and the UPS First of all you should estimate the lon gest OS Shutdown Delay time for your operating systems that have been in stalled shutdown software and connected to the SNMP IPv6 Th...

Страница 39: ...wn Restart 10 Second Test and set up what day and what time you want the action to be executed http 192 168 1 100 Specific Schedule Go to Device Management Specific Schedule to arrange a specific sche...

Страница 40: ...ent Level Go to Device Management Event Level to set up a level for an event If you want to receive an event notification please refer to 5 3 2 Notification SNMP Trap and 5 3 2 Notification Mail Serve...

Страница 41: ...Pv6 supports RADIUS Check the Use RADIUS box key in required information including Server Secret and Port default 1812 and click Submit to enable RADIUS You can define service types for Administrator...

Страница 42: ...format e g 192 168 1 100 3 Subnet Mask The Subnet Mask for your network e g 255 255 255 0 4 Gateway IP The IP address for network gateway in dotted format e g 192 168 1 254 5 DNS IP The IP address Dom...

Страница 43: ...6 Host Name on the network 2 System Contact System contactor information 3 System Location System location information z Link 1 Auto Negotiation Enable Disable automatic transfer rate 10 100M bps nego...

Страница 44: ...station SSL certificate can be used to encrypt and secure the integrity of transmitting data 2 Certificate File This allows you to replace your own SSL certificate file The SNMP IPv6 supports PEM form...

Страница 45: ...n an SSH protocol port number default 22 z Host Key DSA RSA Key This allows you to replace your own SSH keys The SNMP IPv6 supports key files generated by OpenSSH Please refer to Chapter 7 Troubleshoo...

Страница 46: ...he time zone for the lo cation where the SNMP IPv6 is located 2 Primary Secondary Time Server Two time servers can be added Ev ery 60 minutes the SNMP IPv6 synchronizes with the first responding serve...

Страница 47: ...ogs http 192 168 1 100 Batch Configuration The SNMP IPv6 provides batch configuration to allow quick and effortless setup on multiple SNMP devices You can duplicate settings by exporting configura tio...

Страница 48: ...xxx under the System section from the exported configura tion file You can open the configuration file with text editors such as Notepad and WordPad To modify assign IP address for the SNMP IPv6 pleas...

Страница 49: ...QVLJKW3RZHU 836 HE Chapter 5 Upgrade This menu allows the Administrator to update the SNMP IPv6 s firmware http 192 168 1 100 5 3 2 Notification SNMP Access http 192 168 1 100...

Страница 50: ...f IP entries is 256 127 If IP address 0 0 0 0 is enlisted the NMS IP access restriction is ignored The SNMP IPv6 checks the community string to identify the access level and permission according to yo...

Страница 51: ...168 1 100 127 The SNMP IPv6 provides SNMPv1 v2c and v3 traps to satisfy most of customers environments If you use the SNMPv3 trap please provide one of the user names in the SNMPv3 USM table You can...

Страница 52: ...8 1 100 127 If a DNS server is not available in the network you need to manually as sign an SMTP server address to enable the E mail notification system z SMTP Server Name or IP If a Host Name is ente...

Страница 53: ...target address 2 Warning Warning and Alarm event notifications are sent to the target address 3 Alarm Only Alarm event notifications are to the target address Wake On LAN Wake On LAN function can star...

Страница 54: ...for SNMP devices discoverable on the LAN Please refer to the following in structions to upgrade your devices Step 1 The subnet mask allows you to refine the device discovery range in the specified su...

Страница 55: ...ick Discover A list of SNMP devices on the specified subnet is shown Step 3 Select a device from the Device List click Modify and key in Administra tor account and password 6103 HYLFH LUPZDUH 8SJUDGH...

Страница 56: ...SNMP IPv6 firmware binary file Verify the firmware version listed under File Information and then click Upgrade Now to continue Step 5 The upgrade process should take about 20 seconds Step 6 When the...

Страница 57: ...mode Start Run key in cmd and press En ter In Linux launch Shell Enter the following command ping Host Name default InsightPower If the connection is correctly established you should be able to recei...

Страница 58: ...resh by entering the following command nbtstat R in DOS prompt mode or shell After that you can now connect to the SNMP IPv6 by its Host Name Q5 How to obtain the IP address and MAC address from my wo...

Страница 59: ...ort connection to change the SNMP IPv6 s IP address Please see 4 4 Configuring through COM port 2 Change the workstation s IP address so that they are on the same block 192 168 1 0 192 168 1 255 Q7 Un...

Страница 60: ...as the primary IP address for the SNMP IPv6 To learn more information regarding IPv6 compatibility please visit IETF http tools ietf org html or IPv6 Ready Logo Program http www ipv6ready org Q12 How...

Страница 61: ...Select SSH 2 DSA from the Parameters area and select Key Generate key pair to generate a DSA key 6 Select Export OpenSSH Key from Conversions and assign a file name to the DSA key Please ignore it whe...

Страница 62: ...able X The Priv Password which is assigned from SNMPv3 USM table n The Context Name which is assigned from SNMPv3 USM table t Timeout in seconds ip The IP address of the SNMP IPv6 oid The next availab...

Страница 63: ...on RJ 45 jack connector 10 100M Physical Size W x D 130 mm x 60 mm Weight 75 g Environmental Operating Temperature 0 60 Storage Temperature 40 125 Operating Humidity 0 90 Non condensing 127 Refer to t...

Страница 64: ...e maintenance or irresistible force i e war fire natural disaster etc and this warranty also expressly excludes all incidental and consequen tial damages Maintenance service for a fee is provided for...

Страница 65: ......

Страница 66: ......

Страница 67: ......

Страница 68: ...NO UMEN3915100924 S35111129...

Отзывы: