Delta Five D5r6 Скачать руководство пользователя страница 9

Delta Five D5r6 Account Setup & Installation Guide


9 | 

P a g e


Mounting the Device 

Mounting Option 1: Using Pre-Installed Adhesive 

Prior to Placement wipe down the wall with a damp cloth and allow to dry fully before placing the device. 

Each Delta Five device comes with a strip of foam tape attached to its perimeter. Remove the light blue cover on 

all four edges to reveal the foam’s adhesive

 (tweezers may assist with this step).  

Press the device firmly into position against the wall and hold for 5-10 seconds. 

*Note: always install the device in the upright position - the Red LED should be at the top and the white 
traction tape at the bottom. 

*Ensure to mark location prior to placing on the wall as the industrial strength adhesive could cause 
damage to wall if removed right away. 


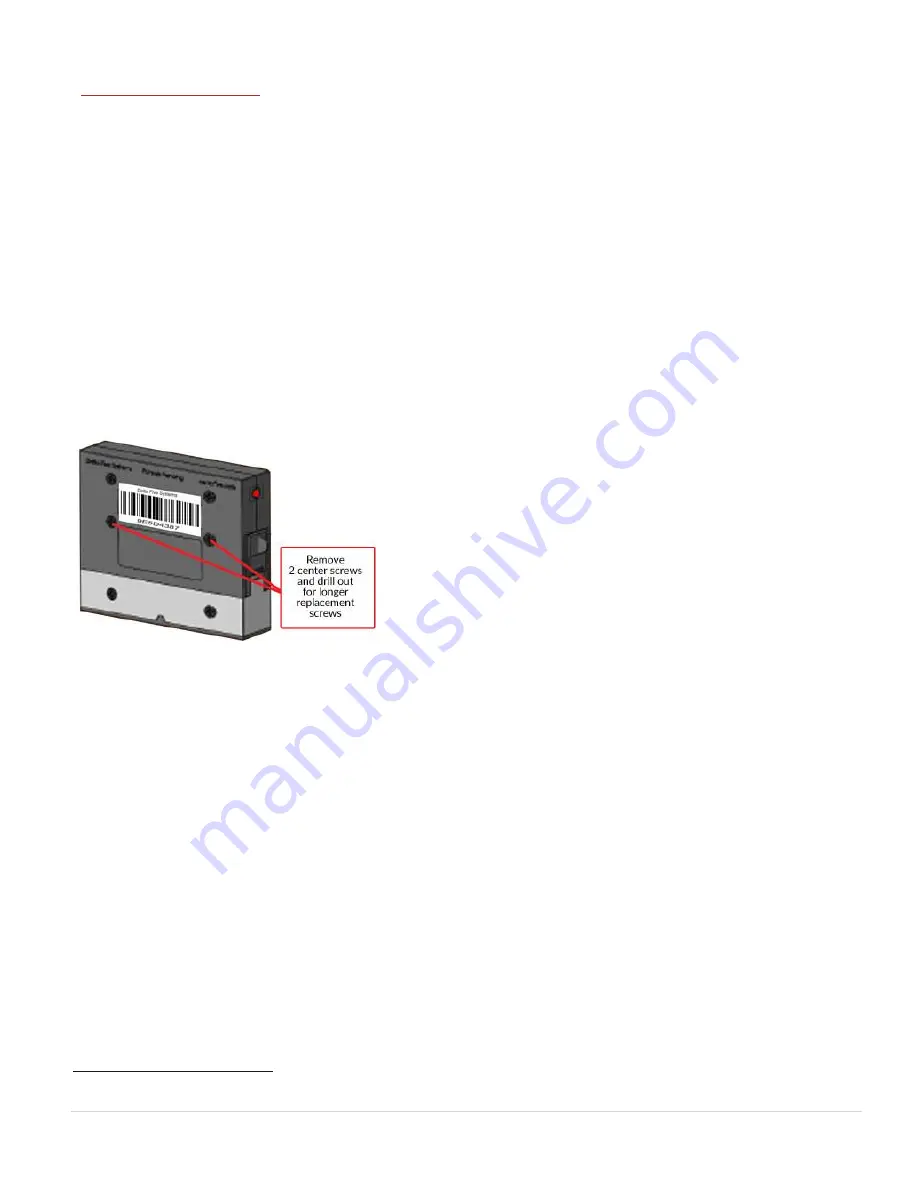
Mounting Option 2: Using Screws 


If the foam tape is not ideal for your mounting location, two screws may be used to secure the device to the wall. 

Note: If mounting using screws, the space between the holes will be 2 3/16 inches.


1.


First remove the middle two screws from the device 

then firmly hold the device in the intended installation location  

2.


Using a 1/8-inch drill bit, drill through the screw holes 

where removed screws were and into the wall. This will clear 
the holes on the device and create a marking location for the 
device  

3.


Set aside the D5r6 device and finish out the wall holes 

with a 3/16-inch bit. 


If needed place anchors may be placed into the wall 


4.


Now using the new mounting screws begin inserting the screws through the device and into the wall 


Hand tighten screws for mounting. The use of power tools is NOT Recommended and over torqueing could 

result in damaged device, poor image quality, or faulty Alerts 


STEP 6: Block & Guide Installation 

For most accurate results the D5r6 System requires two diagonal plastic block strips called the 

Block & Guide.


Setting up the 

Block & Guide

:


1. 

First Mount the D5r6 Device in desired location outlined in Step 5.


2. 

Remove the blue backing from the Block and Guide tape to expose the adhesive.


Содержание D5r6

Страница 1: ...STEP 2 Adding a Property 4 STEP 3 Adding Devices to the Dashboard 4 STEP 4 Pairing your Device with a Wireless Network 6 STEP 5 Mounting the D5r6 Device 8 STEP 6 Block Guide Installation 9 STEP 7 WRAP...

Страница 2: ...ezers may be useful for assisting with the removal of the Blue masking tape on the back of the device Before installing the D5r6 Device and Block Guide onto wall be sure to dust entire area with damp...

Страница 3: ...r whitelisting the 2 URLs below to allow the devices to pass through the captive portal Generally you will need to contact your IT department to complete this process URLs to be Whitelisted http endur...

Страница 4: ...n ten minutes of creating an account STEP 2 Adding a Property After creating an account select the Property icon on the left and complete the information for your home or rental and click Submit at th...

Страница 5: ...ted below the barcode on the front of the device Nickname The Nickname of the device is your identifying location name for that specific device i e Master Bedroom or Bedroom 1 C Click Submit and a mes...

Страница 6: ...wireless device such as a laptop or smartphone Note if the light is not blinking try pressing the LED Button Steps to add Device to Wi Fi Plug in the Device and ensure the Red LED Indicator light Butt...

Страница 7: ...reen will not change from this screen After loading the network credentials and after any power on the D5r6 device will run through an initialization phase where it tests the network connection and at...

Страница 8: ...om the floor may vary depending on bed height mattress thickness etc Ideal placement is centered vertically between the top and bottom of the mattress if a rental property this location may not be bes...

Страница 9: ...o the wall Note If mounting using screws the space between the holes will be 2 3 16 inches 1 First remove the middle two screws from the device then firmly hold the device in the intended installation...

Страница 10: ...Pests that are determined to reach the bed will generally attempt to find an alternate route upon encountering the double sided tape As such they are more likely to use the wall as a path to the bed...

Страница 11: ...ver but are having issues connecting to the server Disabled devices that have been disabled via the dashboard by the user Syncing operating normal and syncing with the server Clicking a Status will fi...

Страница 12: ...every few seconds you have held the reset button too long and the device now needs to be reconfigured to the Wi Fi Network See Step 4 Configuring to a Wireless Network to complete this process Chamber...

Страница 13: ...if the signal strength is too low you may need to reposition your AIM device or move your access pointcloser Cannot Connect to the Test Server If this error occurs it means your D5r6 device is able to...

Страница 14: ...entials Appendix C USER TYPES Groups Owner This user Is the owner of the account and can edit view all data within their account and any groups within their account Groups Viewer This user can view ev...

Отзывы: