background image

D

D

D

L

L

L

P

P

P


P

P

P

r

r

r

o

o

o

j

j

j

e

e

e

c

c

c

t

t

t

o

o

o

r

r

r

U

U

U

s

s

s

e

e

e

r

r

r

s

s

s


M

M

M

a

a

a

n

n

n

u

u

u

a

a

a

l

l

l


— 

— 

I

NSTALLATION


The computer identifies the PointRacer as a separate touch device. The installation process is com-
pleted in two stages: 

  First connect hardware 

  Then install drivers 

Both stages require configuration of the hardware and software. 

Important:  
You must install the driver for correct interactive functionality. 

Hardware Installation 

Connecting Hardware 

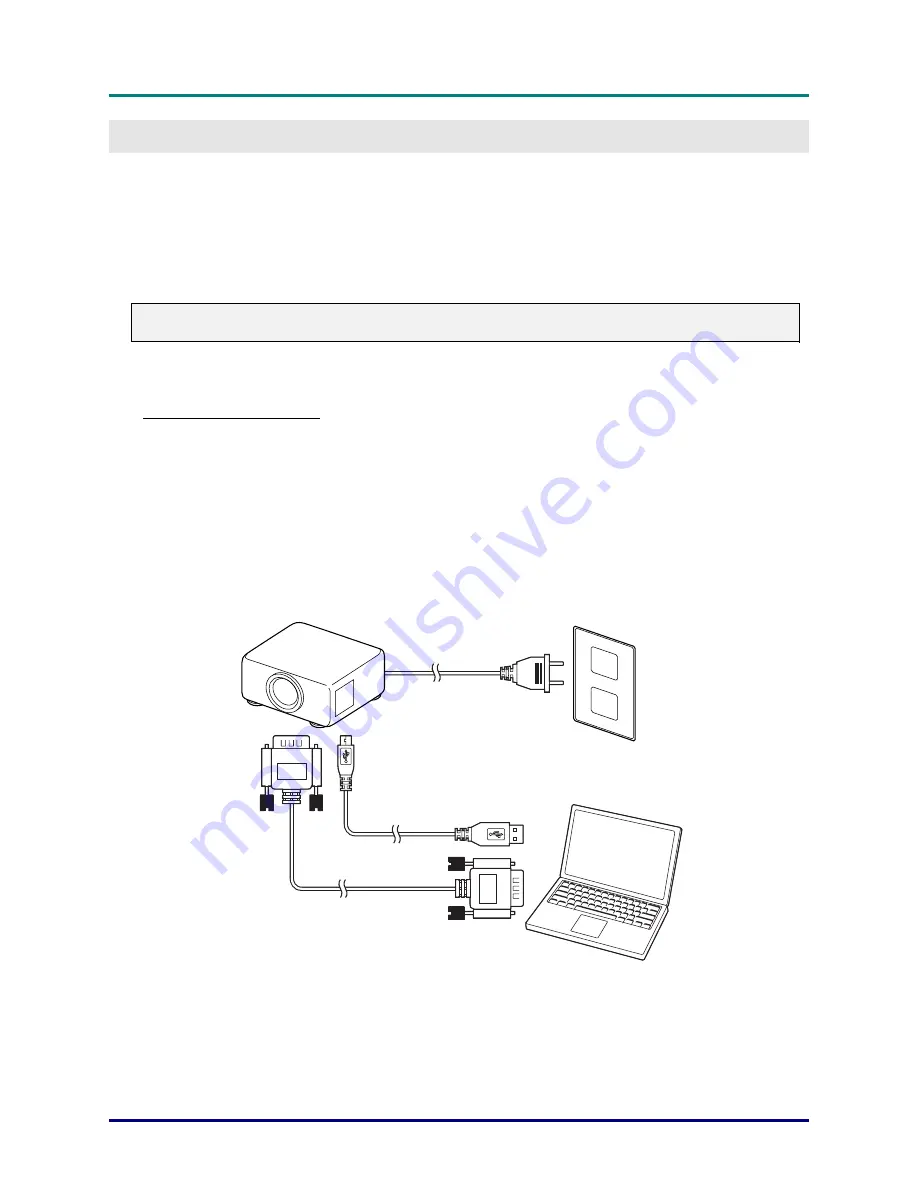
Interactive function requires connecting your projector to a computer. 

Important: Do not connect or disconnect cables while your computer or projector is powered on. This 
can damage your device. 

1.


Turn off your devices. 

2.


Set up your projector. See your projector’s User Manual. 

3.


Connect a media cable (HDMI / DVI / RGB) from the projector to the computer. 

4.


Connect a USB cable from the projector to the computer. 


The hardware is connected. The PointRacer function must be enabled on your projector. 

Содержание POINTRACER

Страница 1: ...ced without written consent of the author Copyright 2012 Disclaimer The information in this document is subject to change without notice The manufacturer makes no repre sentations or warranties with r...

Страница 2: ...tional information that should not be overlooked Caution Alerts you to situations that may damage the device Warning Alerts you to situations that may damage the device create a hazardous environment...

Страница 3: ...nd operate the device Wherever pos sible relevant information such as an illustration and its description has been kept on one page This printer friendly format is both for your convenience and to hel...

Страница 4: ...LATION 6 Connecting Hardware 6 Configuring Your Projector 7 Pairing Your Device 9 DRIVER INSTALLATION 10 System Requirements 10 Installing Drivers 10 Confirming Installation 10 USING THE POINTRACER 11...

Страница 5: ...affordable solution to help you engage and excite your audience with interactive presentations With off surface interactivity of up to 9m 29 5 feet audience members can participate by writing on the p...

Страница 6: ...pack the device and check that the following items are included DELTA POINTRACER RECHARGEABLE BATTERY Contact your dealer immediately if any items are missing appear damaged or if the unit does not wo...

Страница 7: ...a primary mouse button click 3 Right button Press to simulate a secondary mouse button click 4 Pairing button Press to pair with a projector 5 Battery LED Green Charge the battery 6 Link LED Green Sig...

Страница 8: ...nt cover in the direction of the arrow to remove it 2 Install battery making sure they are positioned correctly positive to positive and negative to negative AAA rechargeable battery 3 Replace the cov...

Страница 9: ...mini USB to your PointRacer 2 Connect the other end to a USB port Important The PointRacer charges when the USB charging source is on and awake Caution Only use rechargeable battery to avoid damage US...

Страница 10: ...tall the driver for correct interactive functionality Hardware Installation Connecting Hardware Interactive function requires connecting your projector to a computer Important Do not connect or discon...

Страница 11: ...nnecting the hardware the PointRacer function must be enabled on your projector to allow for device pairing To enable PointRacer 1 Turn on your projector 2 Press MENU to display the OSD menu 3 Press t...

Страница 12: ...ress the cursor button to enable PointRacer Dual Pen Press the cursor button to enable dual pen PointRacer Touch Press the cursor button to enable touch function PointRacer Touch Cursor Press the curs...

Страница 13: ...link is found the Link LED starts to blink and displays a solid red light when the con nection is established 2 Turn on the projector 3 On the projector navigate to Installation I Advanced PointRacer...

Страница 14: ...4 Follow the on screen prompts to finish in stallation Confirming Installation Once hardware connection and the drivers are installed you can confirm a successful installation by using the following i...

Страница 15: ...distance are illustrated in the following figure 45 45 6m Screen PointRacer Pen PointRacer Pen For best results point the interactive pen directly at the screen without line of sight interference Adj...

Страница 16: ...ld a pen pencil or a remote control Pen Position You can control the screen functions by pushing the PointRacer tip to the screen Alternatively you can hold the tip with your finger instead of pushing...

Страница 17: ...cer You can operate the PointRacer by using the information as provided in the following table BUTTON DESCRIPTION Tip Hold the tip to simulate the left button of a mouse Use this button to perform a l...

Страница 18: ...e PointRacer and the display screen Pair the PointRacer and the device again Check the battery polarity Replace battery and recharge again Click function does not work Make sure to hold the buttons fi...

Страница 19: ...equipment off and on the user is encouraged to try to correct the interference by one or more of the following measures Reorient or relocate the receiving antenna Increase the separation between the e...

Отзывы: