background image

SHORT  CORD  INSTRUCTIONS

A short power cord is provided to reduce the risk resulting from

entanglement or tripping over a longer cord.  Longer

detachable power supply cords are available and may be used

if care is exercised in their use.  If a longer detachable power

cord or extension cord is used (1) the marked electrical rating

of the extension cord should be at least as great as the

electrical rating of the appliance, and (2) the longer cord should

be arranged so that it will not drape over the counter top or

table top where it can be pulled on by children or tripped over

unintentionally.  The electrical rating of the appliance is listed on

the bottom of the unit.  If the appliance is of the grounded type,

the extension cord should be a grounded type 3-wire cord.

This appliance has a polarized plug.  One blade is wider than

the other.  As a safety feature this plug will fit in a polarized

outlet only one way.  If the plug does not fit, contact a qualified
electrician.  Do not attempt to defeat this safety feature.

Содержание DFP690 Series

Страница 1: ...Instruction Manual Food Processors Mode D emploi Robots de cuisine DFP690 S ries DFP690 Series...

Страница 2: ...or plug or after the appliance malfunctions or has been damaged in any manner Return appliance to an authorized DeLonghi service center for examination repair or adjustment 6 To disconnect remove plug...

Страница 3: ...r from the blade assembly 18 Allow hot liquids to cool before putting them in the blender 19 Do not use the scraper while the unit is still running 20 Always operate blender with cover in place 21 If...

Страница 4: ...the appliance and 2 the longer cord should be arranged so that it will not drape over the counter top or table top where it can be pulled on by children or tripped over unintentionally The electrical...

Страница 5: ...Food Processor 1 Power Unit 2 Detachable Drive Shaft 3 Plastic Bowl 4 Lid 5 Large Feed Tube 6 Stomper for Large Feed Tube Small Feed Tube Adapter 7 Stomper For Small Feed Tube 8 Pulse Control 9 Speed...

Страница 6: ...y 5 Thick Slicing Shredding Disc 2 5 mm 6 Thin Slicing Shredding Disc 1 5 mm 7 Julienne Disc 4x4 mm 8 Disc Storage Container Note Not all attachments below will be included with your food processor Pl...

Страница 7: ...us Juicer 10 Blender 11 Juice Extractor 12 Mini Food Processor and Chopper 13 Spatula 14 Recipe Book ADDITIONAL ATTACHMENTS continued 9 10 11 12 See Mini Food Processor and Chopper Section for Picture...

Страница 8: ...before using for the first time See Cleaning Your Food Processor and Parts section of this manual for detailed instructions OPERATING YOUR FOOD PROCESSOR 1 Attach the drive shaft 2 to the power unit 1...

Страница 9: ...pulse will operate for as long as the lever is held down The pulse control is indicated by the letter P 6 Turn the unit off and unplug it before removing lid attachments and bowl To remove the bowl tu...

Страница 10: ...KNOW YOUR FOOD PROCESSOR 1 Filler Cap 2 Lid 3 Container 4 Sealing Ring 5 Blade Unit Blender Attachment 1 2 3 4 5...

Страница 11: ...or Using the Blender 1 When making mayonnaise put all ingredients except oil into the blender Then with the machine running pour the oil into the filler cap and let it process through 2 Thick mixtures...

Страница 12: ...ile the machine is running Process until a smooth elastic ball of dough is formed this will take about 60 90 seconds 2 Re knead the dough by hand only Re kneading the dough in the bowl is not recommen...

Страница 13: ...room temperature Ensure that the bowl and whisks are clean and free from grease before whisking Maxi Blend Canopy Figure 7 1 When blending liquids use the maxi blend canopy with the blade assembly It...

Страница 14: ...onions 3 Thick disc 2 5 mm Thin disc 1 5 mm Julienne Disc 4x4 mm 1 Use it to cut potatoes for Julienne style French fries or ingredients for salads casseroles and stir frys Ex carrots cucumbers etc N...

Страница 15: ...t and bowl onto to the power unit 4 Fit the strainer into the bowl ensuring that the lip of the strainer is locked into position directly over the bowl handle 5 Place the juicing cone over the drive s...

Страница 16: ...y may damage the plastic 8 The machine will not operate if the mini food processor and chopper is fitted incorrectly 9 Use for dry ingredients only 10 Place your ingredients into the container Fill it...

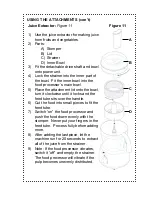
Страница 17: ...e until it locks and the feed tube sits over the handle 6 Cut the food into small pieces to fit the feed tube 7 Switch on the food processor and push the food down evenly with the stomper Never put yo...

Страница 18: ...vegetables into cubes approximately inch thick before processing 4 When making mayonnaise add the oil down the feed tube Juice Extractor Figure 11 con t 10 Process small amounts at a time and empty t...

Страница 19: ...style fish balls try this recipe 550g fish 110g flour 11g vegetable oil Preparataion method 1 extract the fish meat discard the bones head and tail 2 cut the fish meat into squares around 3 5cm x 4cm...

Страница 20: ...immerse cord plug or unit in water or liquid After each use always make sure plug is first removed from wall outlet 2 Use caution when handling the blades they are extremely sharp 3 Some foods may di...

Страница 21: ...laced in the top rack of your dishwasher CLEANING YOUR FOOD PROCESSOR AND PARTS con t Blender and Food Processor Chopper Empty the container of its contents before unscrewing the blade unit Wash the e...

Страница 22: ...lso consequential and incidental damage resulting from the use of this product or arising out of any breach of contract or breach of this warranty are not recoverable under this warranty Some states d...

Страница 23: ...u d en retirer des accessoires 5 N utilisez aucun appareil qui a t endommag dont la fiche ou le cordon lectrique est ab m ou dont le fonctionnement est anormal Retournez l appareil un centre de r para...

Страница 24: ...appareil teignez l appareil attendez que les l accessoire ou les lames soient compl tement arr t s et faites attention ne pas d visser le m langeur ou le hachoir de l ensemble lames 18 Laissez les liq...

Страница 25: ...u de la table l o il pourrait tre tir par des enfants ou faire tr bucher quelqu un par accident Le r gime lectrique de la cafeti re est inscrit sur le panneau inf rieur de l appareil Cet appareil poss...

Страница 26: ...d tachable 3 Bol en plastique 4 Couvercle 5 Gros tube de remplissage 6 Poussoir pour le grand tube de remplissage Adaptateur pour le petit tube de remplissage 7 Poussoir pour le petit tube de rempliss...

Страница 27: ...voir quels sont les accessoires que vous devriez avoir AUTRES ACCESSOIRES 1 Ensemble de lames 2 Crochet p trisseur 3 Double fouet Plastique 4 Auvent maxi m lange 5 Disque de tranchage d chiquetage pai...

Страница 28: ...10 M langer 11 Centrifugeuse 12 Mini robot de cuisine et hachoir 13 Racloir 14 Livre de recettes AUTRES ACCESSOIRES suite 9 10 11 12 Consultez la section mini robot de cuisine et hachoir pour en voir...

Страница 29: ...uvre les lames Soyez prudent lorsque vous retirez les prot ge lames les lames sont extr mement tranchantes Ces prot ge lames devraient tre jet s car ils servent prot ger l ensemble lames pendant la fa...

Страница 30: ...ement 2 au bloc d alimentation 1 Puis installez le bol 4 sur la tige d entra nement afin que la tige d entra nement soit au centre du bol Figure 1 2 Installez un accessoire sur la tige d entra nement...

Страница 31: ...les accessoires et le bol Pour retirer le bol tournez le dans le sens inverse des aiguilles d une montre Pour retirer la tige d entra nement d tachable du bol tirez simplement la tige vers le bas Rema...

Страница 32: ...VOTRE ROBOT DE CUISINE Accessoire m langeur 1 Capuchon de remplissage 2 Couvercle 3 Contenant 4 Anneau d tanch it 5 Bloc de lames 1 2 3 4 5...

Страница 33: ...uette Figure 3 4 Placez le m langeur sur le bloc d alimentation du robot de cuisine et tournez le dans le sens des aiguilles d une montre jusqu qu il soit verrouill en position 5 Utilisez la commande...

Страница 34: ...e d coupez les ingr dients secs en morceaux et retirez le capuchon de remplissage Puis avec l appareil en marche laissez tomber un un les morceaux au travers du capuchon de remplissage 9 Ne mettez jam...

Страница 35: ...rs comme les blancs d uf la cr me le lait concentr et pour battre des ufs et du sucre Les m langes plus lourds comme la farine ab meront le fouet 2 Installez la tige d entra nement d tachable et le bo...

Страница 36: ...tenez le par la poign e centrale 5 Installez le couvercle UTILISATION DES ACCESSOIRES suite Disques en acier inoxydable Figure 8 Disques de tranchage et d chiquetage pais et mince 1 Utilisez la secti...

Страница 37: ...nt dans le tube de remplissage Allumez l appareil et poussez l aliment progressivement avec le poussoir Remarque Ne mettez jamais les doigts dans le tube de remplissage lorsque l appareil est allum UT...

Страница 38: ...ol 5 Placez le c ne d extraction sur la tige d entra nement en le tournant jusqu ce qu il tombe jusqu au fond 6 Coupez le fruit en deux moiti s Puis allumez l appareil et appuyez le fruit sur le c ne...

Страница 39: ...elles pourraient ab mer le plastique 8 L appareil ne fonctionnera pas si le mini robot de cuisine et hachoir n est pas correctement install UTILISATION DES ACCESSOIRES suite Figure 10 A B C D E 9 Uti...

Страница 40: ...Poussoir B Couvercle C Passoire D Bol int rieur 3 Installez la tige d entra nement d tachable et le bol sur le bloc d alimentation 4 Verrouillez la passoire dans la partie int rieure du bol Installez...

Страница 41: ...morceau faites tourner l appareil pendant 20 secondes pour extraire tout le jus de la passoire 9 Remarque Si le robot de cuisine vibre teignez le et videz la passoire Le robot de cuisine vibre si la p...

Страница 42: ...Ajoutez toujours un peu de liquide lorsque vous m langez des ingr dients cuits pour pr parer des aliments pour b b 3 Coupez les aliments comme la viande le pain et les l gumes en d s de de pouce envir...

Страница 43: ...bien teindre et d brancher cet appareil avant d en nettoyer le bo tier et ses accessoires Pour viter les lectrocutions ne plongez pas le cordon lectrique la fiche ou l appareil dans l eau ou dans un l...

Страница 44: ...irez et lavez la main l anneau d tanch it de la m me mani re que le contenant Remarque soyez prudent lorsque vous manipulez les lames elles sont extr mement tranchantes Nettoyez avec prudence les lame...

Страница 45: ...ENSEIGNEMENTS SUR LE PRODUIT Conception et Ing nierie aux Etas Unis Fabriqu en RPC Caract ristiques lectriques 120 volts 60 Hz Site Web www delonghi com Garantie de 5 ans sur le moteur du DFP690 2002...

Страница 46: ...dommages indirects ou cons cutifs r sultant de l utilisation de ce produit ou d une rupture de contrat ou de la violation de cette garantie ne sont pas remboursables par cette garantie Certains tats o...

Страница 47: ...ach and fill out this form and mail with payment check or money order only Your Extended Service Plan certificate will be sent to you by return mail PLEASE PRINT Name _________________________________...

Страница 48: ...chez et remplissez ce formulaire et envoyez le avec votre paiement ch que ou mandat uniquement par la poste Votre certificat de programme de garantie prolong e vous sera envoy par retour du courrier E...

Отзывы: