background image

17

ENGLISH

H o w   t o   d e h u m i d i f y

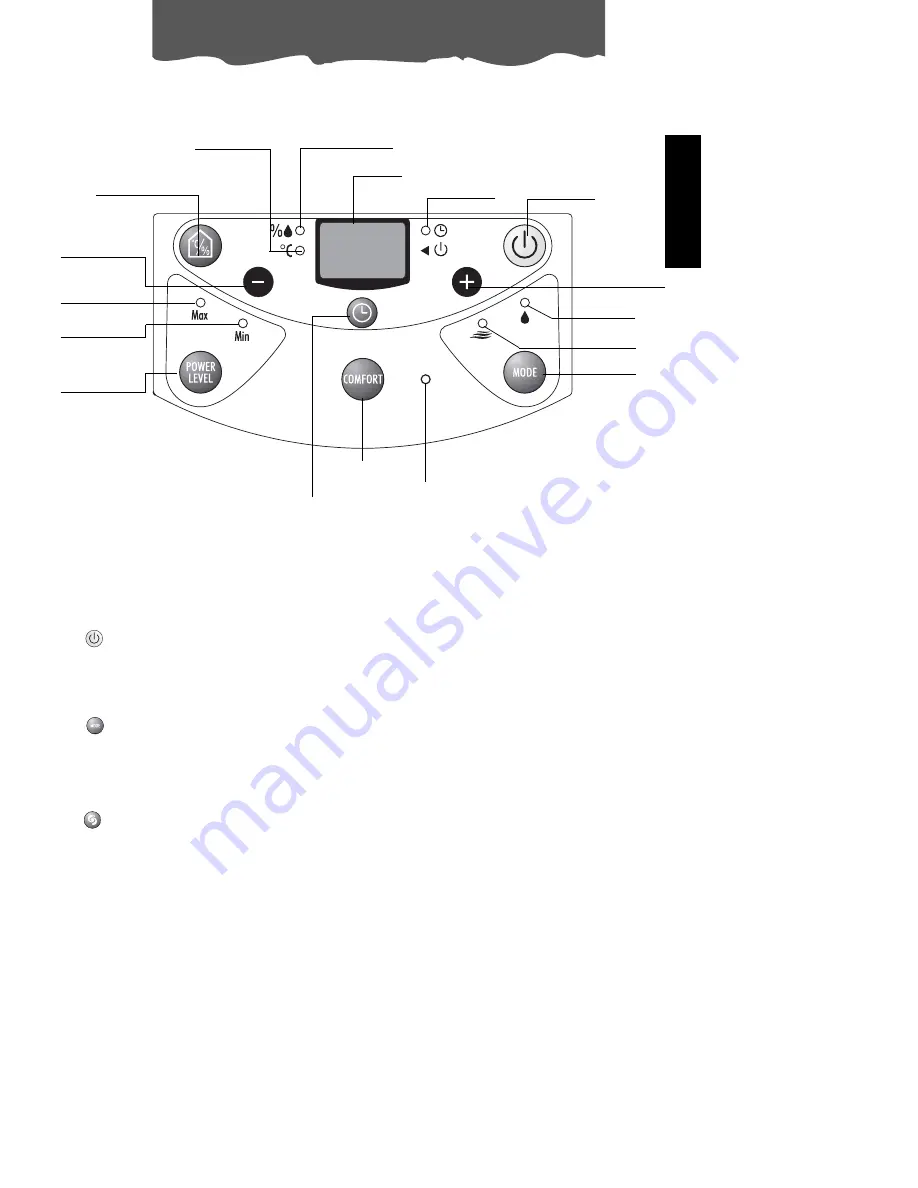
Hygrometer/thermometer
button

Humidity percentage
indicator light

Display 

Timer ON
indicator light

ON/OFF button

Increase
humidity/hours button

MODE button

C O M F O R T

button

Timer button

Power
level
button

Max. power
indicator light

Min. power
indicator light

Dehumidifying
indicator light

Decrease
humidity/hours
button

Ventilation
indicator light

Comfort
indicator light

Temperature
indicator light

“O

N/OFF” button

Starts the appliance. 

“M

ODE” button

Selects the “dehumidification” function or the “ventilation” function.

“C

OMFORT” button

Activates the “COMFORT” function When the “COMFORT” function is activated, pressing the
button again deactivates it.

Содержание DE250E

Страница 1: ...g fitted as below warning Very carefully dispose of the cut off plug after removing the fuse do not insert in a 13 Amp socket elsewhere in the house as this could cause a shock hazard With alternative plugs not incorporating a fuse the circuit must be protected by a 15 Amp fuse If the plug is a moulded on type the fuse cover must be re fitted when changing the fuse using a 13 Amp Asta approved fus...

Страница 2: ... Control panel 2 Control panel cover 3 Air outlet grille 4 Condensate collection tank 5 Lifting handle 6 Air intake grille 7 Dust filter Accessories Description condensate drain hose 2 m some models only rubber bung 1 4 5 3 2 6 7 ...

Страница 3: ...f heat Do not use the appliance on inclined surfaces Keep the unit at least 50 cm away from inflammable substances alcohol etc or pressurised containers eg aerosol cans Do not rest heavy or hot objects on top of the appliance Clean the air filter regularly Always transport the appliance upright or resting on one side Remember to drain the tank before moving the appliance Wait at least 1 hour after...

Страница 4: ... to empty the tank it is recommended to use the continuous drain facility 1 Remove the rubber bung from the spout 2 Drill the inside of the drain spout using a narrow drill bit Fig 2 3 Fasten the rubber hose to the spout To do this open the door remove the tank pass the drain hose supplied through the opening between the door slightly inclined and the bottom of the appliance then reposition the ta...

Страница 5: ... Max power indicator light Min power indicator light Dehumidifying indicator light Decrease humidity hours button Ventilation indicator light Comfort indicator light Temperature indicator light ON OFF button Starts the appliance MODE button Selects the dehumidification function or the ventilation function COMFORT button Activates the COMFORT function When the COMFORT function is activated pressing...

Страница 6: ... that the appliance is operating in COMFORT mode 3 Ft Indicates that the tank is not fitted is full or is positioned incorrectly 4 dF Indicates that the appliance is operating at low temperature In this mode ventilation cycles are alternated with dehumidification cycles to avoid the formation of frost For use in particularly cold environments heating is recom mended so as to raise the ambient temp...

Страница 7: ...ng Timer indicator light If on indicates that the timer function is active Dehumidifying indicator light Indicates that the appliance is operating in dehumidification mode Ventilation indicator light Indicates that the appliance is operating in ventilation mode Minimum power indicator light Indicates that the MIN power level has been selected Indicates that the MAX power level has been selected In...

Страница 8: ...s the humidity set point it will stop and the periodical ventila tion function will start so as to ensure a correct relative humidity reading As soon as the humidity increases above the set point the appliance will automatically resume dehumidi fication operation How to use as a ventilator 1 Plug the appliance into a mains socket 2 The display shows to indicate that the appliance is in standby and...

Страница 9: ... the dehumidifying and air purifying functions decreases It is therefore good practice to clean the filter at regular inter vals The frequency depends on the duration and conditions of operation It is good practice to clean the filter every week To remove the air filter pull it out Fig 4 Use a vacuum cleaner to remove dust accumulations from the filter If the filter is very dirty wash in warm wate...

Страница 10: ...oom being dehumidified should also be heated decrease the humidity set point Check the following points before calling your local authorised Service Centre The appliance does not work for around 3 minutes when restarted the appliance s safety devi ce has been activated wait for 3 minutes The display shows Ft the tank is missing the tank is full the tank is in the wrong position position the tank e...

Страница 11: ...Absorbed current Frost protection device Humidistat Fan speeds Air filter Dimensions WxHxD Tank capacity Operating limits temperature relative humidity See rating plate yes yes 2 yes 365x610x360 mm 5 5 litres dehumidification 5 32 30 95 DE250E Technical specifications ...

Отзывы: