background image

Back to Contents Page


 Coin-Cell Battery  

Dell™ Vostro™ A90 Service Manual 


Removing the Coin-Cell Battery 


Replacing the Coin-Cell Battery 


Removing the Coin-Cell Battery  


1.

Follow the instructions in 

Before You Begin

.  


2.

Remove the module cover (see 

Removing the Module Cover

).  


3.

Remove the keyboard (see 

Removing the Keyboard

).  


4.

Remove the palm rest (see 

Removing the Palm Rest

).  


5.

Remove the display assembly (see 

Removing the Display Assembly

).  


6.

Remove the system board (see 

Removing the System Board

).  


7.

Turn the system board over.  


8.

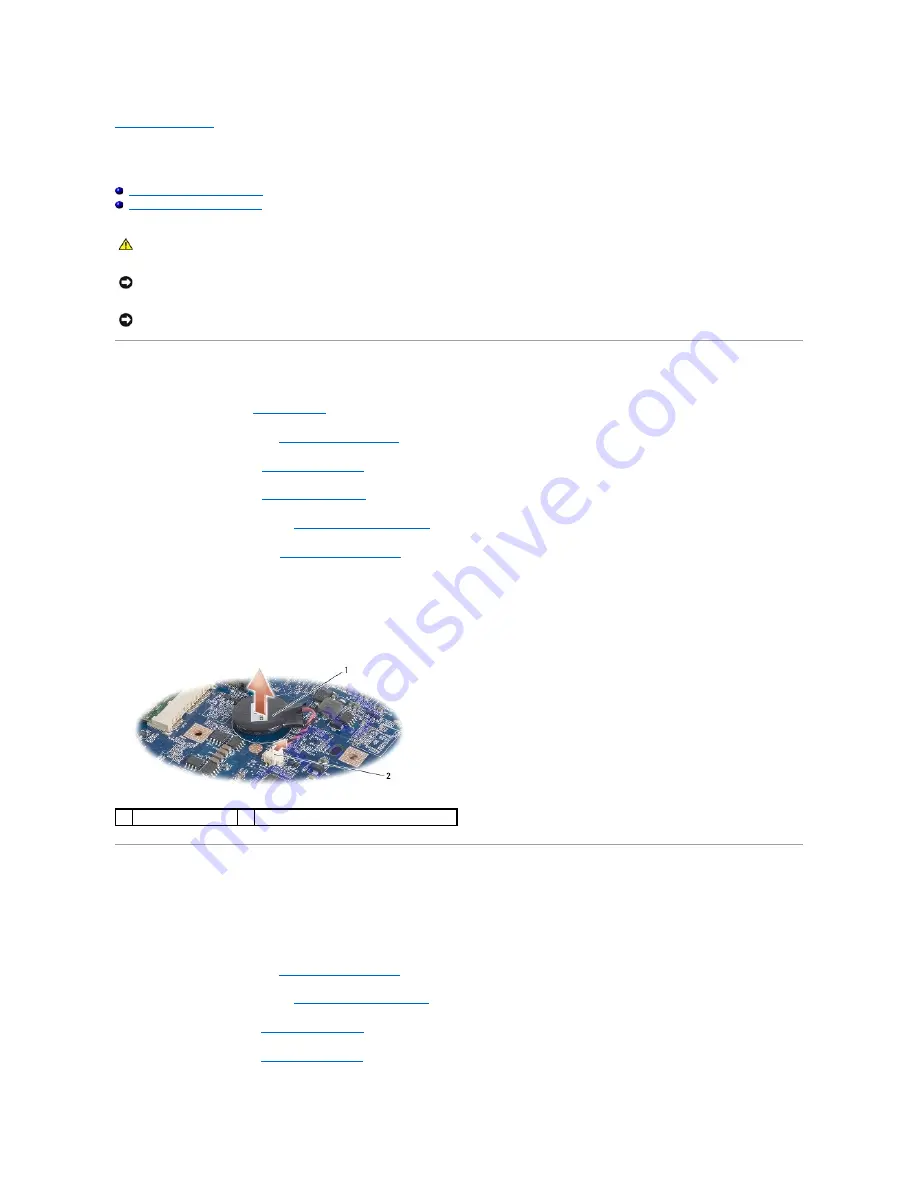
Disconnect the coin-cell battery cable from the system board connector.  


9.

Remove the coin-cell battery.  


Replacing the Coin-Cell Battery  


1.

Replace the coin-cell battery.  


2.

Connect the coin-cell battery cable to the system board connector and hold the coin-cell battery in place.  


3.

Replace the system board (see 

Replacing the System Board

).  


4.

Replace the display assembly (see 

Replacing the Display Assembly

).  


5.

Replace the palm rest (see 

Replacing the Palm Rest

).  


6.

Replace the keyboard (see 

Replacing the Keyboard

).  


CAUTION: 

Before working inside your computer, read the safety information that shipped with your computer. For additional safety best 

practices information, see the Regulatory Compliance Homepage at www.dell.com/regulatory_compliance. 


NOTICE: 

To avoid electrostatic discharge, ground yourself by using a wrist grounding strap or by periodically touching an unpainted metal surface 

(such as a connector on the back of the computer). 


NOTICE: 

To help prevent damage to the system board, you must remove the battery from the battery bay before you begin working inside the 

computer. 

coin-cell battery 

coin-cell battery cable connector 

Содержание Vostro A90

Страница 1: ...r countries Other trademarks and trade names may be used in this document to refer to either the entities claiming the marks and names or their products Dell Inc disclaims any proprietary interest in trademarks and trade names other than its own September 2009 Rev A01 Before You Begin Module Cover Memory Module Solid state Drive Wireless Mini Card Keyboard Palm Rest Internal Card With Bluetooth Wi...

Страница 2: ...tery lock latch to the lock position Back to Contents Page CAUTION Before working inside your computer read the safety information that shipped with your computer For additional safety best practices information see the Regulatory Compliance Homepage at www dell com regulatory_compliance CAUTION Before performing this procedure turn off the computer disconnect the AC adapter from the electrical ou...

Страница 3: ...lly turn off when you shut down your operating system press and hold the power button until the computer turns off Before Working Inside Your Computer Use the following safety guidelines to help protect your computer from potential damage and to help to ensure your own personal safety NOTE Flash BIOS update program CD ships only in certain countries when you replace the system board NOTICE To avoi...

Страница 4: ...you disconnect a cable pull on its connector or on its pull tab not on the cable itself Some cables have connectors with locking tabs if you are disconnecting this type of cable press in on the locking tabs before you disconnect the cable As you pull connectors apart keep them evenly aligned to avoid bending any connector pins Also before you connect a cable ensure that both connectors are correct...

Страница 5: ... 1 Ensure that the AC adapter is plugged in the main battery is properly installed and a network cable is attached 2 Turn on the computer 3 Locate the latest BIOS update file for your computer at support dell com 4 Click Download Now to download the file 5 If the Export Compliance Disclaimer window appears click Yes I Accept this Agreement The File Download window appears 6 Click Save this program...

Страница 6: ...o disk and then click OK The Save In window appears 9 Click the down arrow to view the Save In menu select Documents BIOS and then click Save 10 Click Close if the Download Complete window appears 11 Open the terminal command line application and proceed as follows a Type sudo s b Type your password c Type cd Documents d Type cd BIOS e Type a90A00 flash start string appears The computer will resta...

Страница 7: ...alm rest 7 Lift the card out of the palm rest Replacing the Card 1 Insert card into the slot and replace the two screws 2 Turn the palm rest over 3 Replace the palm rest see Replacing the Palm Rest 4 Replace the keyboard see Replacing the Keyboard CAUTION Before working inside your computer read the safety information that shipped with your computer For additional safety best practices information...

Страница 8: ...Replace the module cover see Replacing the Module Cover 6 Slide the battery into the battery bay until it clicks into place and slide the battery lock latch towards the lock position Back to Contents Page ...

Страница 9: ...ce the display bezel see Replacing the Display Bezel 4 Replace the display assembly see Replacing the Display Assembly 5 Replace the palm rest see Replacing the Palm Rest 6 Replace the keyboard see Replacing the Keyboard 7 Replace the module cover see Replacing the Module Cover 8 Slide the battery into the battery bay until it clicks into place and slide the battery lock latch towards the lock pos...

Страница 10: ...Back to Contents Page ...

Страница 11: ...e to the system board connector and hold the coin cell battery in place 3 Replace the system board see Replacing the System Board 4 Replace the display assembly see Replacing the Display Assembly 5 Replace the palm rest see Replacing the Palm Rest 6 Replace the keyboard see Replacing the Keyboard CAUTION Before working inside your computer read the safety information that shipped with your compute...

Страница 12: ...lace the module cover see Replacing the Module Cover 8 Slide the main battery into the battery bay until it clicks into place and slide the battery lock latch towards the lock position Back to Contents Page ...

Страница 13: ...display cables and the speaker cable from the respective system board connectors 8 Make note of the display cables and the speaker cable routing and carefully dislodge from their routing guides as shown in the figure CAUTION Before working inside your computer read the safety information that shipped with your computer For additional safety best practices information see the Regulatory Compliance ...

Страница 14: ...ing guides and connect them to the respective system board connectors 4 Carefully slide the Mini Card antenna cables through the system board and into their routing guides 5 Replace the palm rest see Replacing the Palm Rest 6 Replace the keyboard see Replacing the Keyboard 7 Replace the module cover see Replacing the Module Cover 8 Slide the battery into the battery bay until it clicks into place ...

Страница 15: ...ow the instructions in Replacing the Display Assembly Display Panel Removing the Display Panel 1 Follow the instructions Removing the Display Assembly 2 Remove the display bezel see Removing the Display Bezel 3 Remove the camera see Removing the Camera 4 Remove the six screws securing the display panel assembly to the display cover 5 Remove the display panel assembly NOTICE The display bezel is ex...

Страница 16: ...n each side of the display panel 2 Align the display assembly panel with the display cover and replace the six screws 3 Replace the camera see Replacing the Camera 4 Replace the display bezel see Replacing the Display Bezel 5 Follow the instructions in Replacing the Display Assembly Display Panel Cable 1 display cover 2 screw 6 3 display panel 1 screw 4 total 2 on each side 2 display panel bracket...

Страница 17: ...nnector and disconnect the flex cable Replacing the Display Panel Cable 1 Connect the flex cable to the display board connector and secure it with the conductive tape 2 Replace the display panel see Replacing the Display Panel 3 Replace the camera see Replacing the Camera 4 Replace the display bezel see Replacing the Display Bezel 5 Follow the instructions in Replacing the Display Assembly Back to...

Страница 18: ...al safety best practices information see the Regulatory Compliance Homepage at www dell com regulatory_compliance NOTICE To avoid electrostatic discharge ground yourself by using a wrist grounding strap or by periodically touching an unpainted metal surface such as a connector on the back of the computer NOTICE To help prevent damage to the system board you must remove the battery from the battery...

Страница 19: ...lose the display turn the computer over 4 Replace the two screws in the base of the computer 5 Slide the battery into the battery bay until it clicks into place and slide the battery lock latch to the lock position Back to Contents Page 1 keyboard 2 keyboard tab 3 3 keyboard cable 4 securing tab 2 NOTICE The keycaps on the keyboard are fragile easily dislodged and time consuming to replace Be care...

Страница 20: ... the connector Replacing the Memory Module 1 Follow the instructions in Before You Begin 2 Align the notch in the memory module edge connector with the tab in the memory module connector slot CAUTION Before working inside your computer read the safety information that shipped with your computer For additional safety best practices information see the Regulatory Compliance Homepage at www dell com ...

Страница 21: ...computer As the computer boots it detects the additional memory and automatically updates the system configuration information To confirm the amount of memory installed in the computer Windows XP Right click the My Computer icon on your desktop then click Properties General Ubuntu Click System Administration System Monitor Back to Contents Page NOTE If the memory module is not installed properly t...

Страница 22: ...rd see Replacing the Keyboard 4 Replace the module cover see Replacing the Module Cover 5 Slide the battery into the battery bay until it clicks into place and slide the battery lock latch towards the lock position Back to Contents Page CAUTION Before working inside your computer read the safety information that shipped with your computer For additional safety best practices information see the Re...

Страница 23: ...ws 5 Lift the Mini Card out of its system board connector CAUTION Before working inside your computer read the safety information that shipped with your computer For additional safety best practices information see the Regulatory Compliance Homepage at www dell com regulatory_compliance NOTICE To help prevent damage to the system board you must remove the battery from the battery bay before you be...

Страница 24: ...uter as required For more information see the Dell Technology Guide Back to Contents Page NOTICE When the Mini Card is not in the computer store it in protective antistatic packaging See the information on protection against electrostatic discharge in the safety information that shipped with your computer NOTICE The connectors are keyed to ensure correct insertion If you feel resistance check the ...

Страница 25: ... the seven screws from the top of the palm rest 7 Disconnect the Bluetooth card cable touch pad cable and the power button cable from the respective system board connectors CAUTION Before working inside your computer read the safety information that shipped with your computer For additional safety best practices information see the Regulatory Compliance Homepage at www dell com regulatory_complian...

Страница 26: ...dge 2 Align the tabs of the palm rest with the computer base 3 Gently snap the palm rest into place 4 Connect the Bluetooth card cable touch pad cable and power button cable to the respective system board connectors 5 Replace the seven screws on the top of the palm rest 1 power button cable 2 screw 7 3 Bluetooth card cable 4 palm rest 5 touch pad cable NOTICE Carefully separate the palm rest from ...

Страница 27: ... left and right rubber bumpers 8 Replace the keyboard see Replacing the Keyboard 9 Replace the module cover see Replacing the Module Cover 10 Slide the battery into the battery bay until it clicks into place and slide the battery lock latch towards the lock position Back to Contents Page ...

Страница 28: ...tton Board 1 Insert the power button board into the slot and tighten the two screws 2 Turn the palm rest over 3 Replace the palm rest see Replacing the Palm Rest 4 Replace the keyboard see Replacing the Keyboard 5 Replace the module cover see Replacing the Module Cover CAUTION Before working inside your computer read the safety information that shipped with your computer For additional safety best...

Страница 29: ...6 Slide the battery into the battery bay until it clicks into place and slide the battery lock latch towards the lock position Back to Contents Page ...

Страница 30: ...er cable routing 10 Remove the speakers Replacing the Speaker 1 Replace the speakers and the speaker cables 2 Replace the three screws that secure the speakers to the display base 3 Replace the speaker cable into its routing path 4 If removed replace the two corner screws on the LCD panel to secure the speaker cable 5 Replace the display bezel see Replacing the Display Bezel CAUTION Before working...

Страница 31: ...st see Replacing the Palm Rest 8 Replace the keyboard see Replacing the Keyboard 9 Replace the module cover see Replacing the Module Cover 10 Slide the battery into the battery bay until it clicks into place and slide the battery lock latch towards the lock position Back to Contents Page ...

Страница 32: ...latory Compliance Homepage at www dell com regulatory_compliance CAUTION If you remove the solid state drive from the computer when the drive is hot do not touch the solid state drive NOTICE To prevent data loss turn off your computer see Turning Off Your Computer before removing the solid state drive Do not remove the solid state drive while the computer is on or in Sleep state NOTICE Solid state...

Страница 33: ...Your Operating System in your computer Setup Guide or Ubuntu Quick Start Guide 7 Install the drivers and utilities for your computer as needed see Reinstalling Drivers and Utilities in your computer Setup Guide Back to Contents Page NOTICE Before turning on the computer replace all screws and ensure that no stray screws remain inside the computer Failure to do so may result in damage to the comput...

Страница 34: ... cable and AC adapter cable from the respective system board connectors 9 Remove the two screws that secure the system board to the computer base 10 Lift the system board at an angle towards the side of the computer and out of the computer base Replacing the System Board CAUTION Before working inside your computer read the safety information that shipped with your computer For additional safety be...

Страница 35: ...3 Press and hold the following key combination for the desired keyboard matrix United States Fn S United Kingdom Fn K Japan Fn J Korea Fn E 4 Connect the AC adapter to the computer and then plug it into a wall outlet or surge protector 5 Release the key combination Updating Service Tag The system board s BIOS chip contains the service tag which is also visible on a barcode label on the bottom of t...

Страница 36: ... board includes a CD that provides a utility for transferring the service tag to the replacement system board Back to Contents Page NOTE Your computer may or may not ship with an external optical drive Use an external optical drive or any external storage device for the procedures that involve discs NOTICE Handle components and cards by their edges and avoid touching pins and contacts ...

Страница 37: ...P are either trademarks or registered trademarks of Microsoft Corporation in the United States and or other countries Other trademarks and trade names may be used in this document to refer to either the entities claiming the marks and names or their products Dell Inc disclaims any proprietary interest in trademarks and trade names other than its own September 2009 Rev A01 Back to Contents Page NOT...

Отзывы: