Dell Vostro 1710 Скачать руководство пользователя страница 37

Back to Contents Page

 Power Button and Multimedia Button Pads

Dell™ Vostro™ 1710 

Service Manual


Removing the Power Button and Multimedia Button Pads


Replacing the Power Button and Multimedia Button Pads

Removing the Power Button and Multimedia Button Pads

CAUTION: 

Before you begin any of the procedures in this section, follow the safety instructions that

shipped with your computer.

NOTICE: 

The power button and multimedia button pads should be removed and reinstalled as a single unit.

1.  Follow the procedures in 

Before Working on Your Computer

2.  Remove the hinge cover (see 

Removing the Hinge Cover

). 

3.  Remove the keyboard (see 

Removing the Keyboard

). 

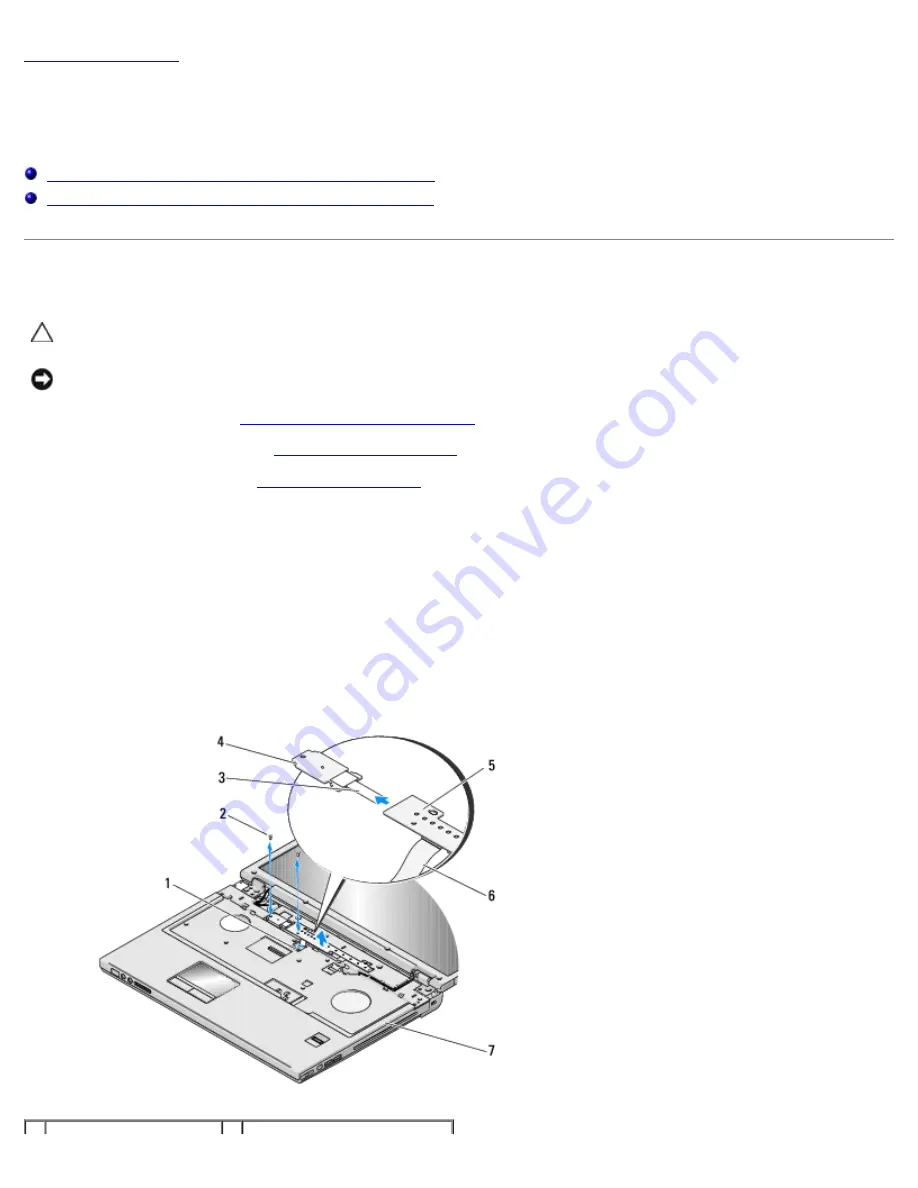
4.  Disconnect the multimedia-button pad cable from the system board. 

5.  Remove the M2 x 3-mm screw that secures the power button pad to the palm rest. 

6.  Remove the M2 x 3-mm screw that secures the multimedia button pad to the palm rest. 

7.  Lift the power button pad and slide the power button and multimedia button pads to the left and lift the pads out of the

computer in one movement. 

8.  Disconnect the power-button pad cable from the connector at the bottom of the multimedia button pad. 

9.  Gently remove the multimedia-button pad cable from underneath the palm rest. 

Содержание Vostro 1710

Страница 1: ...erty damage personal injury or death If you purchased a DELL n Series computer any references in this document to Microsoft Windows operating systems are not applicable Information in this document is subject to change without notice 2008 Dell Inc All rights reserved Reproduction in any manner whatsoever without the written permission of Dell Inc is strictly forbidden Trademarks used in this text ...

Страница 2: ...hts in order from left to right Num Lock Caps Lock and then Scroll Lock If the computer malfunctions the individual lights display a status of either On Off or Flashing Light Pattern Problem Description Suggested Resolution No memory modules are detected If two or more memory modules are installed remove the modules see Removing a Memory Module then reinstall one module see Replacing a Memory Modu...

Страница 3: ...dware Troubleshooter to resolve the incompatibility Windows Vista 1 Click the Windows Vista start button and click Help and Support 2 Type hardware troubleshooter in the search field and press Enter to start the search 3 In the search results select the option that best describes the problem and follow the remaining troubleshooting steps Windows XP 1 Click Start Help and Support 2 Type hardware tr...

Страница 4: ...ystem Assessment write down the error code s and contact Dell Support If the Pre boot System Assessment completes successfully the following message appears Booting Dell Diagnostic Utility Partition Press any key to continue NOTE If you see a message stating that no diagnostics utility partition has been found run the Dell Diagnostics from your Drivers and Utilities media see Starting the Dell Dia...

Страница 5: ...etup 5 Press any key to confirm that you want to start from the CD DVD If you wait too long and the operating system logo appears continue to wait until you see the Microsoft Windows desktop then shut down your computer and try again 6 Type 1 to Run the 32 Bit Dell Diagnostics 7 At the Dell Diagnostics Menu type 1 to select Dell 32 bit Diagnostics for Resource CD graphical user interface 8 Press T...

Страница 6: ...ommon symptoms NOTE It is recommended that you select Extended Test to perform a more thorough check of devices in the computer For any problem encountered during a test a message appears with an error code and a description of the problem Write down the error code and problem description exactly as it appears and follow the instructions on the screen If you cannot resolve the problem contact Dell...

Страница 7: ...cannot read the disk Insert a disk into the drive and try again Insert bootable media Insert a bootable floppy disk CD or DVD Non system disk error Remove the floppy disk from the floppy drive and restart your computer Not enough memory or resources Close some programs and try again Close all windows and open the program that you want to use In some cases you may have to restart your computer to r...

Страница 8: ...etimes prevent Windows from recognizing the drive Test the drive Insert another disc to eliminate the possibility that the original drive is defective Insert a bootable floppy disk and restart the computer Clean the drive or disk For information on cleaning your computer see the Dell Technology Guide on your computer or at support dell com Check the cable connections Run the Hardware Troubleshoote...

Страница 9: ...ck Start and click Computer 2 Right click Local Disk C 3 Click Properties Tools Check Now The User Account Control window may appear If you are an administrator on the computer click Continue otherwise contact your administrator to continue the desired action 4 Follow the instructions on the screen IEEE 1394 Device Problems CAUTION Before you begin any of the procedures in this section follow the ...

Страница 10: ...computer and to the electrical outlet The computer stops responding NOTICE You may lose data if you are unable to perform an operating system shutdown Turn the computer off If you are unable to get a response by pressing a key on your keyboard or moving your mouse press and hold the power button for at least 8 to 10 seconds until the computer turns off and then restart your computer A program stop...

Страница 11: ...are problems Check the software documentation or contact the software manufacturer for troubleshooting information Ensure that the program is compatible with the operating system installed on your computer Ensure that your computer meets the minimum hardware requirements needed to run the software See the software documentation for information Ensure that the program is installed and configured pr...

Страница 12: ...that the computer turns on properly Ensure that any power strips being used are plugged into an electrical outlet and are turned on Ensure that the electrical outlet is working by testing it with another device such as a lamp Eliminate interference Some possible causes of interference are Power keyboard and mouse extension cables Too many devices connected to the same power strip Multiple power st...

Страница 13: ...ings See the Dell Technology Guide on your computer or at support dell com Adjust the Windows display settings Windows XP 1 Click Start Control Panel Appearance and Themes 2 Click the area you want to change or click the Display icon 3 Try different settings for Color quality and Screen resolution Windows Vista 1 Click Start Control Panel Hardware and Sound Personalization Display Settings 2 Adjus...

Страница 14: ...and download the software The Dell Support Utility is customized for your computing environment The icon in the taskbar functions differently when you click double click or right click the icon Clicking the Dell Support Icon Click or right click the icon to perform the following tasks Check your computing environment View the Dell Support Utility settings Access the help file for the Dell Support ...

Страница 15: ... this section follow the safety instructions that shipped with your computer CAUTION Many repairs may only be done by a certified service technician You should only perform troubleshooting and simple repairs as authorized in your product documentation or as directed by the online or telephone service and support team Damage due to servicing that is not authorized by Dell is not covered by your war...

Страница 16: ...ble from your computer and then unplug it from the network wall jack 4 Disconnect any telephone or network cables from the computer 5 Remove any installed cards from the ExpressCard slot and the 8 in 1 memory card reader NOTICE To help prevent damage to the system board you must remove the battery from the battery bay before you service the computer NOTE To avoid damage to the computer use only th...

Страница 17: ...Back to Contents Page ...

Страница 18: ...our computer before removing the hard drive Do not remove the hard drive while the computer is on or in Sleep state NOTICE Hard drives are extremely fragile Exercise care when handling the hard drive 1 Follow the procedures in Before Working on Your Computer 2 Close the display and turn the computer upside down 3 Loosen the five screws that secure the hard drive compartment cover 4 Remove the cove...

Страница 19: ...ive s connection to the hard drive cable Replacing the Hard Drive CAUTION Before you begin any of the procedures in this section follow the safety instructions that shipped with your computer NOTICE Hard drives are extremely fragile Exercise care when handling the hard drive NOTICE Use firm and even pressure to slide the hard drive into place Excessive force may result in damage to the connector T...

Страница 20: ...mputer as needed For information on reinstalling the operating system see the Setup and Quick Reference Guide for your computer on support dell com 10 Install the drivers and utilities for your computer as needed For information on reinstalling drivers and utilities see the Setup and Quick Reference Guide for your computer on support dell com Back to Contents Page ...

Страница 21: ...emoving a WLAN Card 1 Follow the procedures in Before Working on Your Computer 2 Turn the computer upside down 3 Loosen the eight screws that secure the memory cover See Removing a Memory Module for an illustration of the memory cover 4 Remove the memory cover and set it aside 5 Remove the M2 x 3 mm screw that secures the WLAN card 1 M2 x 3 mm screw 1 2 WLAN card 3 antenna cables 2 6 Slide the WLA...

Страница 22: ... 2 Connect the antenna cables to the WLAN card that you are installing If the WLAN card has two triangles on the label white and black connect the white antenna cable to the connector labeled main white triangle and connect the black antenna cable to the connector labeled aux black triangle If the WLAN card has three triangles on the label white black and gray connect the white antenna cable to th...

Страница 23: ... See Removing a Memory Module for an illustration of the memory cover 3 Remove the memory cover and set it aside 4 Remove the two M2 0 x 3 mm screws that secure the fan to the base of the computer 5 Disconnect the fan connector from the system board connector and remove the fan 1 fan 2 M2 0 x 3 mm screws 2 3 fan connector Replacing the Fan CAUTION Before you begin the following procedure follow th...

Страница 24: ... on the base of the computer 2 Replace the two M2 0 x 3 mm screws to secure the fan to the base of the computer 3 Connect the fan connector to the system board connector 4 Replace the memory cover and tighten the eight screws that secure the memory cover Back to Contents Page ...

Страница 25: ... Remove the memory cover and set it aside 4 Remove the fan see Removing the Fan 5 In sequential order loosen the four captive screws that secure the processor thermal cooling assembly to the system board and carefully lift the processor thermal cooling assembly out of the computer 1 processor thermal cooling assembly 2 captive screws 4 Replacing the Processor Thermal Cooling Assembly CAUTION Befor...

Страница 26: ...tighten the screws in sequential order 2 Replace the fan see Replacing the Fan 3 Replace the memory cover and tighten the eight screws that secure the memory cover Back to Contents Page ...

Страница 27: ... it aside 4 Remove the fan see Removing the Fan 5 Remove the processor thermal cooling assembly see Removing the Processor Thermal Cooling Assembly NOTICE To avoid damage to the processor hold the screwdriver so that it is perpendicular to the processor when turning the cam screw 6 To loosen the ZIF socket use a small flat blade screwdriver and rotate the ZIF socket cam screw counterclockwise unti...

Страница 28: ...oling assembly which will include an affixed thermal pad or you will receive a new thermal pad along with a tech sheet to illustrate proper installation This procedure assumes that you have completed the removal procedure Removing the Processor Module 1 Align the pin 1 corner of the processor module with the pin 1 corner of the ZIF socket then insert the processor module NOTE The pin 1 corner of t...

Страница 29: ...5 Replace the memory cover and tighten the eight screws that secure the memory cover Back to Contents Page ...

Страница 30: ...Dell are covered under your computer warranty Removing a Memory Module CAUTION Before you begin any of the procedures in this section follow the safety instructions that shipped with your computer 1 Follow the procedures in Before Working on Your Computer 2 Turn the computer upside down 3 Loosen the eight screws that secure the memory cover 4 Remove the memory cover and set it aside 1 memory cover...

Страница 31: ...ay not boot No error message indicates this failure 1 tab 2 notch NOTICE If the memory cover is difficult to close remove the memory module and reinstall it Forcing the memory cover to close may damage your computer 3 Replace the memory cover and tighten the eight screws that secure the memory cover 4 Insert the battery into the battery bay or connect the AC adapter to your computer and an electri...

Страница 32: ...Back to Contents Page ...

Страница 33: ...k 3 Gently insert a plastic scribe underneath the raised parts of the hinge cover at the back of the computer and loosen the hinge cover 1 back of computer 2 raised part of hinge cover one on each side 3 plastic scribe 4 Turn the computer to the front and open the display all the way 180 degrees NOTICE To avoid damage to the hinge cover do not lift the cover on both sides simultaneously 5 Insert a...

Страница 34: ...ce is used Exercise care when replacing the hinge cover This procedure assumes that you have completed the removal procedure Removing the Hinge Cover 1 Align the two tabs underneath both edges of the hinge cover with the corresponding notches in the computer 2 Moving from left to right press down until the hinge cover snaps into place 3 Close the display and turn the computer to the back 4 Press e...

Страница 35: ... the keyboard NOTICE The key caps on the keyboard are fragile easily dislodged and time consuming to replace Exercise care when removing and handling the keyboard NOTE Lift the keyboard carefully to ensure that you do not pull on the keyboard cable 4 Lift the top of the keyboard and rotate it towards the front of the computer to access the keyboard cable connector 5 Rotate the retaining bracket up...

Страница 36: ...g and handling the keyboard This procedure assumes that you have completed the removal procedure Removing the Keyboard 1 Slide the keyboard cable connector into the keyboard connector on the system board 2 Rotate the retaining bracket downward to secure the keyboard cable connector 3 Hook the tabs along the front edge of the keyboard beneath the front inside edge of the palm rest 4 Press on the up...

Страница 37: ...dures in Before Working on Your Computer 2 Remove the hinge cover see Removing the Hinge Cover 3 Remove the keyboard see Removing the Keyboard 4 Disconnect the multimedia button pad cable from the system board 5 Remove the M2 x 3 mm screw that secures the power button pad to the palm rest 6 Remove the M2 x 3 mm screw that secures the multimedia button pad to the palm rest 7 Lift the power button p...

Страница 38: ...ct the power button pad cable in the connector on the bottom of the multimedia button pad 2 Replace the power button pad positioning it under the tabs on the palm rest and aligning the screw hole 3 Gently reinsert the multimedia button pad cable underneath the palm rest 4 Slide the multimedia button pad to the right aligning it under the tabs on the palm rest and aligning the screw hole 5 Replace ...

Страница 39: ...bottom side up remove the two M2 5 x 8 mm screws that attach the display assembly to both corners of the computer 4 With the computer facing bottom side up remove the M2 5 x 5 mm screw located at the bottom of the battery bay near the edge of the computer 5 Remove the hinge cover see Removing the Hinge Cover 6 Remove the keyboard see Removing the Keyboard 7 With the computer facing top side up rem...

Страница 40: ... in the base of the computer then lower the display into place NOTICE Ensure that the display cable and antenna cables are properly routed and secured beneath the plastic tabs on the palm rest 2 With the computer facing top side up replace in sequential order the three numbered M2 5 x 5 mm screws that secure the base of the display assembly 3 Route the antenna cables beneath the plastic tabs on th...

Страница 41: ...e Working on Your Computer 2 Disconnect the antenna from the WLAN card see Removing a WLAN Card 3 Remove the hinge cover see Removing the Hinge Cover 4 Remove the keyboard see Removing the Keyboard 5 Remove the display assembly see Removing the Display Assembly 6 Remove the eight rubber display bumpers from around the display bezel 7 Remove the four M2 5 x 5 mm screws and the four shoulder screws ...

Страница 42: ...Replace the hinge cover see Replacing the Hinge Cover 7 Reconnect the antenna to the WLAN card see Replacing a WLAN Card Display Panel Removing the Display Panel CAUTION Before you begin the following procedure follow the safety instructions that shipped with your computer 1 Follow the instructions in Before Working on Your Computer 2 Disconnect the antenna from the WLAN card see Removing a WLAN C...

Страница 43: ... the top of the display hinge panels and position the display panel in the top cover 4 Replace the two M2 5 x 5 mm screws in the hinges 5 Replace the display bezel see Replacing the Display Bezel 6 Replace the display assembly see Replacing the Display Assembly 7 Replace the keyboard see Replacing the Keyboard 8 Replace the hinge cover see Replacing the Hinge Cover 9 Reconnect the antenna to the W...

Страница 44: ...nverter on the back of the display panel 1 display panel 2 display cable connector 3 display cable Replacing the Display Cable CAUTION Before you begin the following procedure follow the safety instructions that shipped with your computer This procedure assumes that you have completed the removal procedure Removing the Display Cable 1 Connect the display cable to the display inverter on the back o...

Страница 45: ...N Card 3 Remove the hinge cover see Removing the Hinge Cover 4 Remove the keyboard see Removing the Keyboard 5 Remove the display assembly see Removing the Display Assembly 6 Remove the display bezel see Removing the Display Bezel 7 Remove the M2 x 3 mm screw that secures the camera microphone assembly 8 Lift the camera microphone out of the top cover and disconnect the camera microphone cable 1 M...

Страница 46: ... secures the camera microphone assembly to the top cover 3 Replace the display bezel see Replacing the Display Bezel 4 Replace the display assembly see Replacing the Display Assembly 5 Replace the keyboard see Replacing the Keyboard 6 Replace the hinge cover see Replacing the Hinge Cover 7 Reconnect the antenna to the WLAN card see Replacing a WLAN Card Back to Contents Page ...

Страница 47: ...or blanks installed in the ExpressCard slot and the 8 in 1 card slot 5 Remove the hinge cover see Removing the Hinge Cover 6 Remove the keyboard see Removing the Keyboard 7 Remove the display assembly see Removing the Display Assembly 8 Remove the eight M2 5 x 8 mm screws from the bottom of the computer and one M2 x 3 mm screw from the fan NOTE The screw locations may vary slightly from the image ...

Страница 48: ...he palm rest from the computer If you encounter resistance gently flex or apply pressure to the palm rest or move along the edge working away from the area of resistance until the palm rest is free 14 Moving from left to right carefully lift the palm rest along the rear edge near the hinge brackets and gently lift the palm rest 1 multimedia panel connector 2 computer base 3 palm rest 4 fingerprint...

Страница 49: ... the finger print reader connector to the system board 5 Replace the three cap screws located towards the display end of the palm rest 6 Replace the eight M2 5 x 5 mm screws on the top of the palm rest 7 Turn the computer upside down and replace the eight M2 5 x 8 mm screws on the bottom of the computer and the one M2 x 3 mm screw on the fan to secure the palm rest 8 Replace the display assembly s...

Страница 50: ...er see Removing the Hinge Cover 5 Remove the keyboard see Removing the Keyboard 6 Remove the display assembly see Removing the Display Assembly 7 Remove the palm rest see Removing the Palm Rest 8 On the underside of the palm rest remove the M2 x 3 mm screw from the fingerprint reader cover and lift the fingerprint reader cover out of the palm rest 9 Rotate the retaining bracket on the fingerprint ...

Страница 51: ...fingerprint reader on the underside of the palm rest 2 Connect the fingerprint reader cable connector to the fingerprint reader connector and rotate the retaining bracket downward to secure the cable 3 Replace the fingerprint reader cover and replace the M2 x 3 mm screw that secures the cover to the palm rest 4 Replace the palm rest see Replacing the Palm Rest 5 Replace the display assembly see Re...

Страница 52: ...ore Working on Your Computer 2 Remove the hard drive cover See Removing the Hard Drive for an illustration of the hard drive cover 3 Remove the M2 x 3 mm screw that connects the card to the base of the computer 4 Lift the card and cable and disconnect the card connector from the card 5 Remove the card from the card compartment 1 card cable connector 2 card Replacing the Card CAUTION Before you beg...

Страница 53: ...he card compartment 3 Replace the M2 x 3 mm screw that connects the card to the base of the computer 4 Replace the hard drive cover See Removing the Hard Drive for an illustration of the hard drive cover Back to Contents Page ...

Страница 54: ...emove the WLAN card see Removing a WLAN Card 4 Remove the hinge cover see Removing the Hinge Cover 5 Remove the keyboard see Removing the Keyboard 6 Remove the display assembly see Removing the Display Assembly 7 Remove the palm rest see Removing the Palm Rest 8 Remove the M2 5 x 5 mm screw from the optical drive 9 Lift the back end of the drive out and disconnect the optical drive cable from the ...

Страница 55: ... the optical drive to the system board 3 Replace the palm rest see Replacing the Palm Rest 4 Replace the display assembly see Replacing the Display Assembly 5 Replace the keyboard see Replacing the Keyboard 6 Replace the hinge cover see Replacing the Hinge Cover 7 Replace the WLAN card see Replacing a WLAN Card 8 Replace the hard drive cover See Removing the Hard Drive for an illustration of the h...

Страница 56: ...uter 2 Remove any cards or blanks installed in the ExpressCard slot and the 8 in 1 card slot 3 Remove the hard drive see Removing the Hard Drive 4 Remove the WLAN card see Removing a WLAN Card 5 Remove the fan see Removing the Fan 6 Remove the hinge cover see Removing the Hinge Cover 7 Remove the keyboard see Removing the Keyboard 8 Remove the display assembly see Removing the Display Assembly 9 R...

Страница 57: ...mputer at an angle until the connectors on the system board are aligned with the holes on the base of the computer then carefully lower the system board into place 2 Replace the three M2 5 x 5 mm screws on the system board 3 Connect the 1394 USB daughter card cable to the connector on the system board 4 Disconnect the DC in cable and speaker cable from the system board 5 Replace the optical drive ...

Страница 58: ...ia to flash the BIOS press F12 before inserting the media in order to set the computer to boot from the media for one time only Otherwise you must enter the system setup program to change the default boot order 15 Flash update the BIOS see Flashing the BIOS for more information 16 Enter the system setup program to update the BIOS on the new system board with the computer Service Tag For informatio...

Страница 59: ...ng a WLAN Card 4 Remove the hinge cover see Removing the Hinge Cover 5 Remove the keyboard see Removing the Keyboard 6 Remove the display assembly see Removing the Display Assembly 7 Remove the palm rest see Removing the Palm Rest 8 Remove the system board see Removing the System Board Assembly 9 Remove the two M2 x 3 mm screws from the speaker assembly 10 Remove the speaker assembly 1 M2 0 x 3 mm...

Страница 60: ...y 3 Replace the palm rest see Replacing the Palm Rest 4 Replace the display assembly see Replacing the Display Assembly 5 Replace the keyboard see Replacing the Keyboard 6 Replace the hinge cover see Replacing the Hinge Cover 7 Replace the WLAN card see Replacing a WLAN Card 8 Replace the hard drive cover See Removing the Hard Drive for an illustration of the hard drive cover Back to Contents Page...

Страница 61: ...rd Drive for an illustration of the hard drive cover 3 Remove the WLAN card see Removing a WLAN Card 4 Remove the hinge cover see Removing the Hinge Cover 5 Remove the keyboard see Removing the Keyboard 6 Remove the display assembly see Removing the Display Assembly 7 Remove the palm rest see Removing the Palm Rest 8 Remove the two M2 5 x 5 mm screws from the daughter card 9 Disconnect the daughte...

Страница 62: ... the computer base 2 Connect the daughter card connector to the daughter card 3 Replace the palm rest see Replacing the Palm Rest 4 Replace the display assembly see Replacing the Display Assembly 5 Replace the keyboard see Replacing the Keyboard 6 Replace the hinge cover see Replacing the Hinge Cover 7 Replace the WLAN card see Replacing a WLAN Card 8 Replace the hard drive cover See Removing the ...

Страница 63: ...Palm Rest 9 Disconnect the cable that secures the internal card with Bluetooth wireless technology to the system board see Removing the Card 10 Remove the optical drive see Removing the Optical Drive 11 Remove the system board see Removing the System Board Assembly 12 Remove the M2 x 3 mm screw from the battery release button 13 Push the alignment bracket to the left to remove and lift the battery...

Страница 64: ... M2 x 3 mm screw that holds the battery release button in the battery latch assembly 4 Align the guide post on the battery latch assembly with the slot on the base of the computer then lower the latch assembly into place NOTICE The battery release button is keyed to ensure proper alignment If you feel resistance check the alignment of the release button 5 Replace the system board see Replacing the...

Страница 65: ...13 Replace the hard drive see Replacing the Hard Drive 14 Replace the WLAN card see Replacing a WLAN Card Back to Contents Page ...

Страница 66: ... card see Removing a WLAN Card 4 Remove the fan see Removing the Fan 5 Remove the hinge cover see Removing the Hinge Cover 6 Remove the keyboard see Removing the Keyboard 7 Remove the display assembly see Removing the Display Assembly 8 Remove the palm rest see Removing the Palm Rest 9 Remove the optical drive see Removing the Optical Drive 10 Remove the system board see Removing the System Board ...

Страница 67: ...tem board 3 Replace the system board see Replacing the System Board Assembly 4 Replace the optical drive see Replacing the Optical Drive 5 Replace the palm rest see Replacing the Palm Rest 6 Replace the display assembly see Replacing the Display Assembly 7 Replace the keyboard see Replacing the Keyboard 8 Replace the hinge cover see Replacing the Hinge Cover 9 Replace the fan see Replacing the Fan...

Страница 68: ...oid possible keyboard failure press and release F12 in even intervals until the Boot Device Menu appears If you wait too long and the operating system logo appears continue to wait until you see the Microsoft Windows desktop then shut down your computer and try again 7 At the Boot Device Menu use the up and down arrow keys or press the appropriate number on the keyboard to highlight CD ROM and the...

Страница 69: ...e Download window click Save this program to disk and then click OK 7 In the Save In window click the down arrow to view the Save In menu select Desktop and then click Save The file downloads to your desktop 8 Click Close if the Download Complete window appears The file icon appears on your desktop and is titled the same as the downloaded BIOS update file 9 Double click the file icon on the deskto...

Отзывы: